Categories
In this article
- Restore deleted Salesforce records from the Recycle Bin
- Salesforce data recovery using native data import/export tools
- Recover deleted Salesforce data using native Backup and Restore
- Recover deleted Salesforce data using Salesforce Data Recovery Service
- Salesforce data recovery using third-party cloud backup tools
Salesforce Data Recovery: How to Restore Deleted Records in Salesforce
9 Nov 2022
6 min read
Anju George
Salesforce data recovery at a glance
What is the solution? SysCloud offers automated, continuous backups and advanced recovery solutions for Salesforce, ensuring all data is securely backed up and easily recoverable, with options for restoring specific records or entire datasets efficiently and cost-effectively.
Salesforce is a leading software platform that offers Customer Relationship Management (CRM) services to over 150,000 businesses globally. Widespread adoption of Salesforce by businesses also means that there is an increased risk of data loss due to a variety of reasons.
Even though Salesforce is a secure platform, data loss due to human error is inevitable. While Salesforce recommends using third-party cloud backup solutions, most businesses still rely on Salesforce Data Import/Export Service or similar tools to back up and restore their Salesforce data.
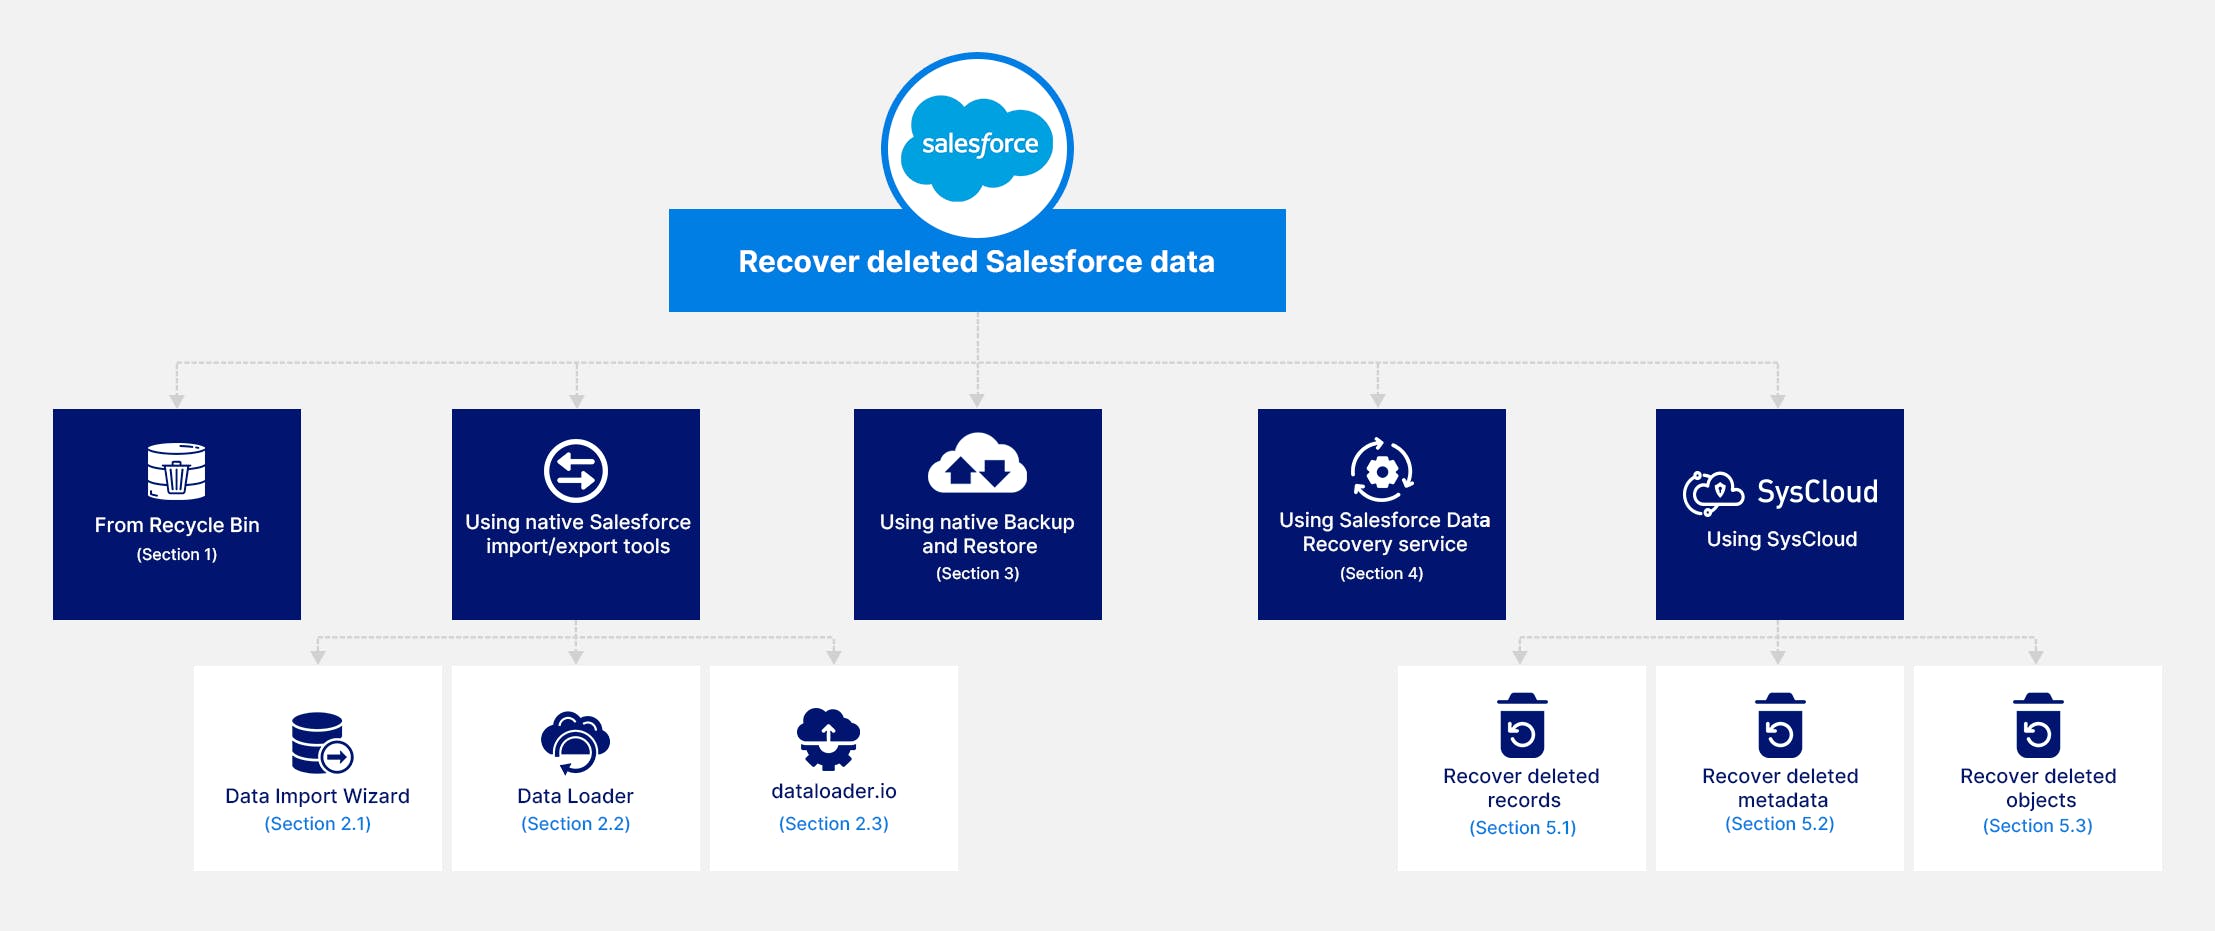
1. Restore deleted Salesforce records from the Recycle Bin
1.1. Required editions and user permissions:
Available in both Salesforce Classic (not available in all orgs) and Lightning Experience
Available in Group, Essentials, Professional, Enterprise, Performance, Unlimited, and Developer Editions
User permissions needed:
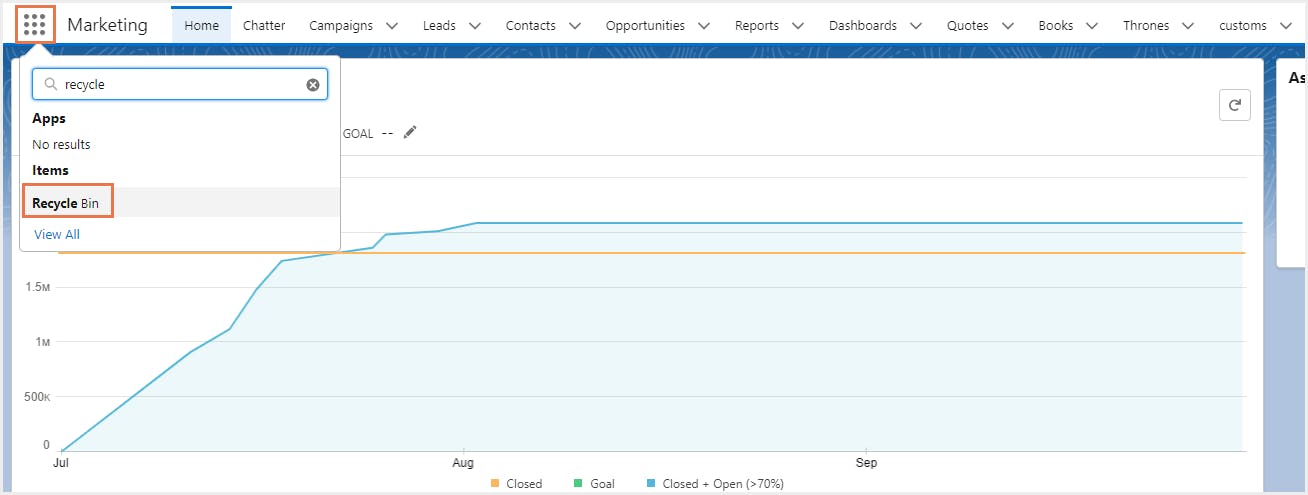
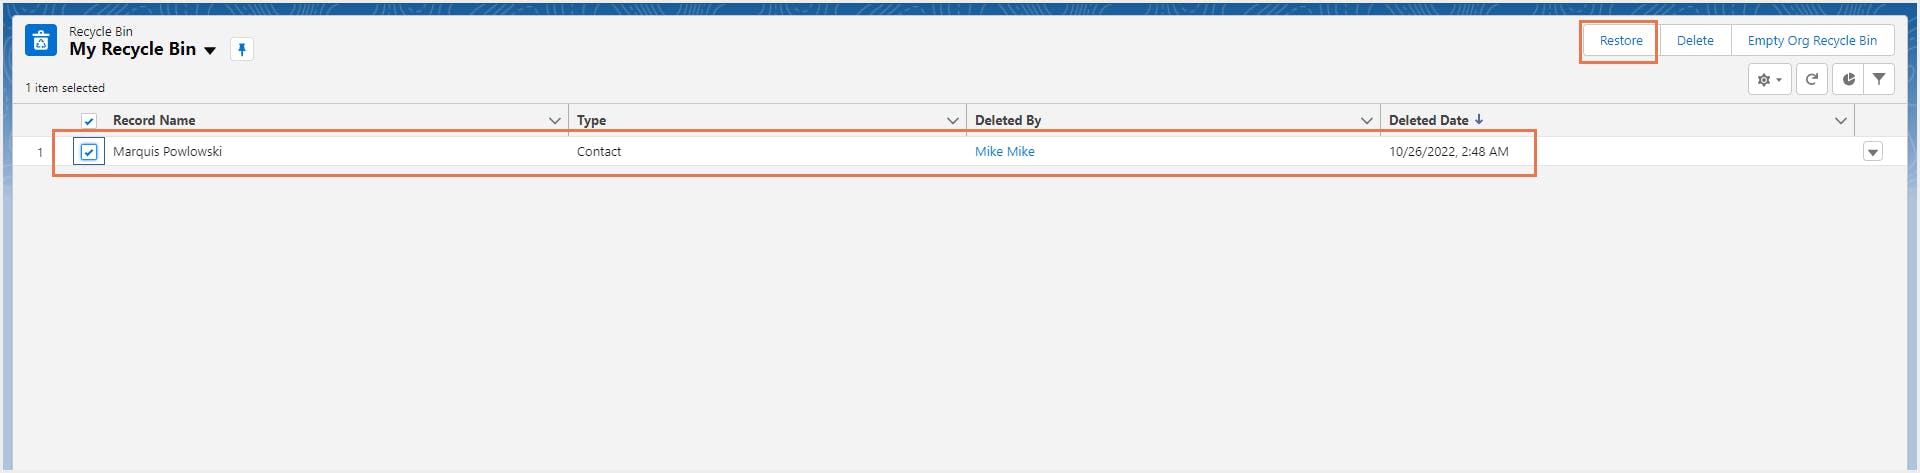
1.2. How to restore deleted records in Salesforce from the Recycle Bin
Step 1: Access the Recycle Bin from the App Launcher.
Step 2: Select the record(s) to be restored and click Restore.
1.3. Limitations of Salesforce data recovery using the Salesforce Recycle Bin
- Previous versions of the record cannot be restored. If a user accidentally overwrites the record prior to its deletion, you will only be able to restore the latest, modified version of the record.
- Deleted data is only available for 15 days, beyond which it is permanently deleted.
- Reports, customizations, and other metadata cannot be recovered. They must be recreated from scratch in case of accidental deletion or modification.
Not all object relationships are restored. Learn more
2. Salesforce data recovery using native data import/export tools
To learn how to export Salesforce data using native data export tools, read our article, Salesforce Data Export Options: A Complete Guide for IT Admins.
2.1. Import Salesforce data using Salesforce Data Import Wizard
2.1.1. Required editions and user permissions
User permissions needed:
Depends on what data you are importing. Learn more
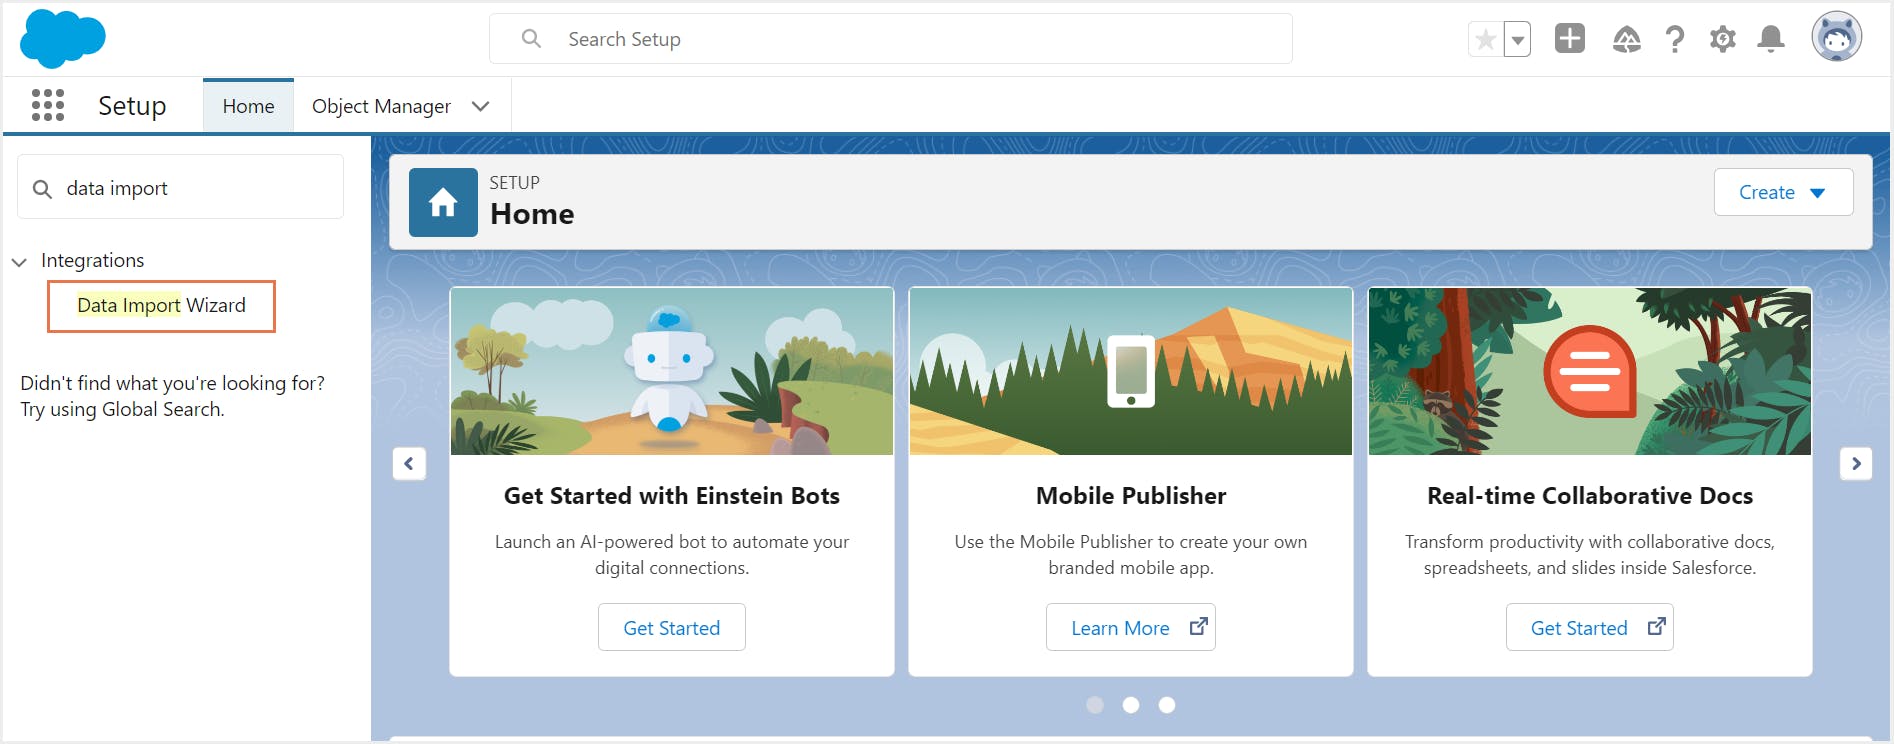
2.1.2. How to import data into Salesforce using the Data Import Wizard
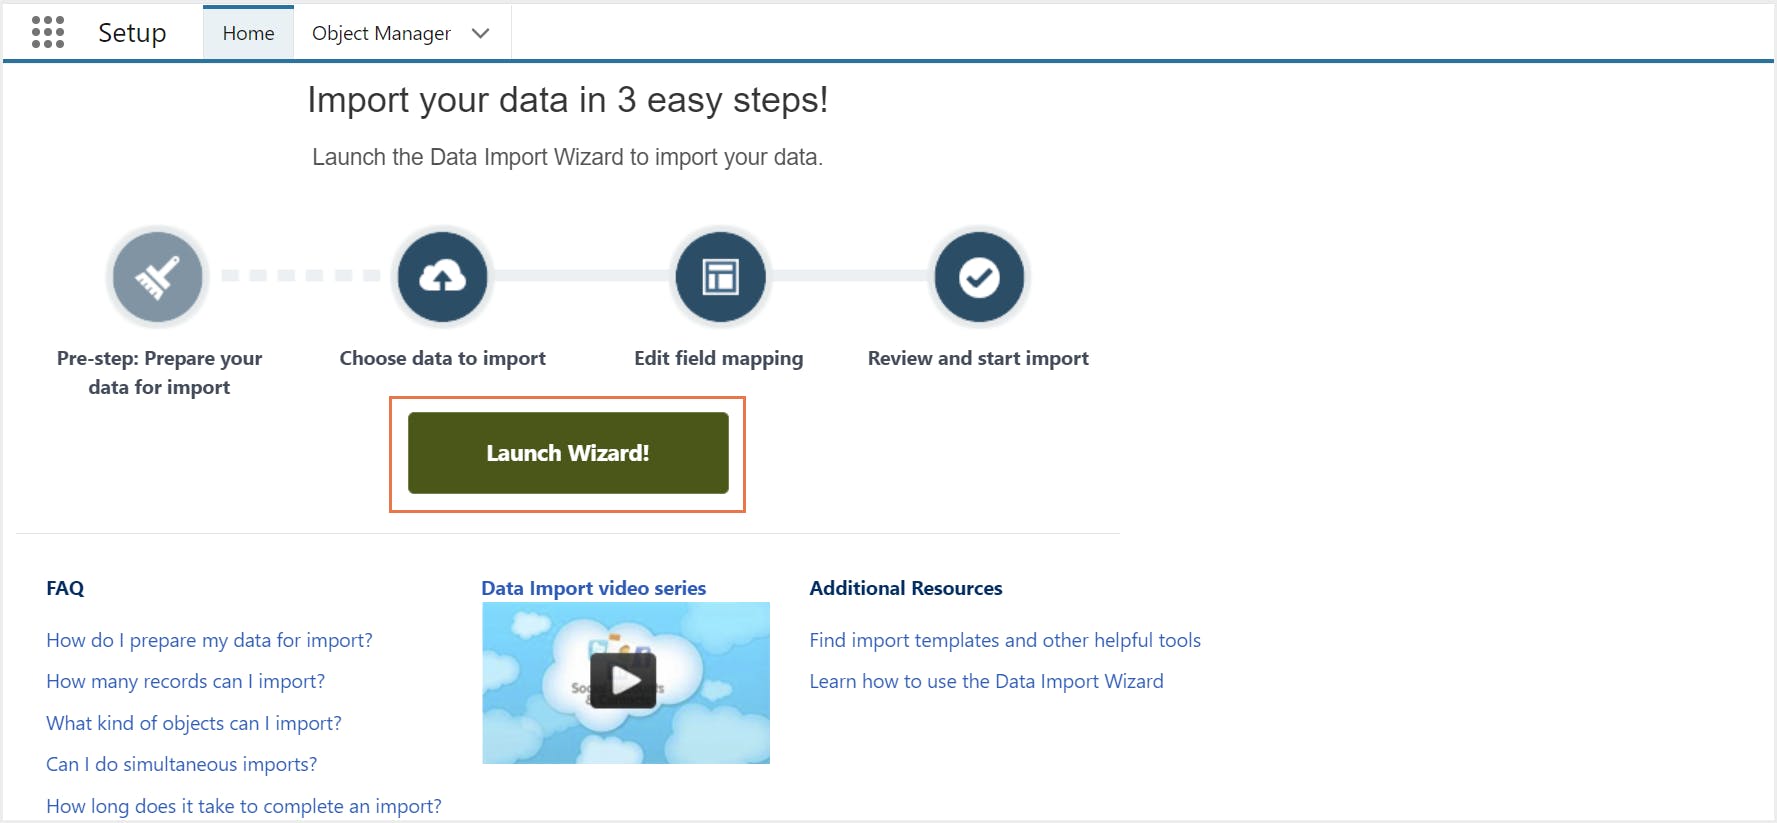
Step 1: Go to Setup and search for Data Import Wizard in the Quick Find box.
Step 2: Click Launch Wizard.
Step 3: Choose the type of data that you need to import. To import accounts, contacts, leads, solutions, person accounts, or articles, click Standard Objects. To import custom objects, click Custom Objects.
Step 4: Specify if you want to add new records to Salesforce, update existing records, or add and update records simultaneously.
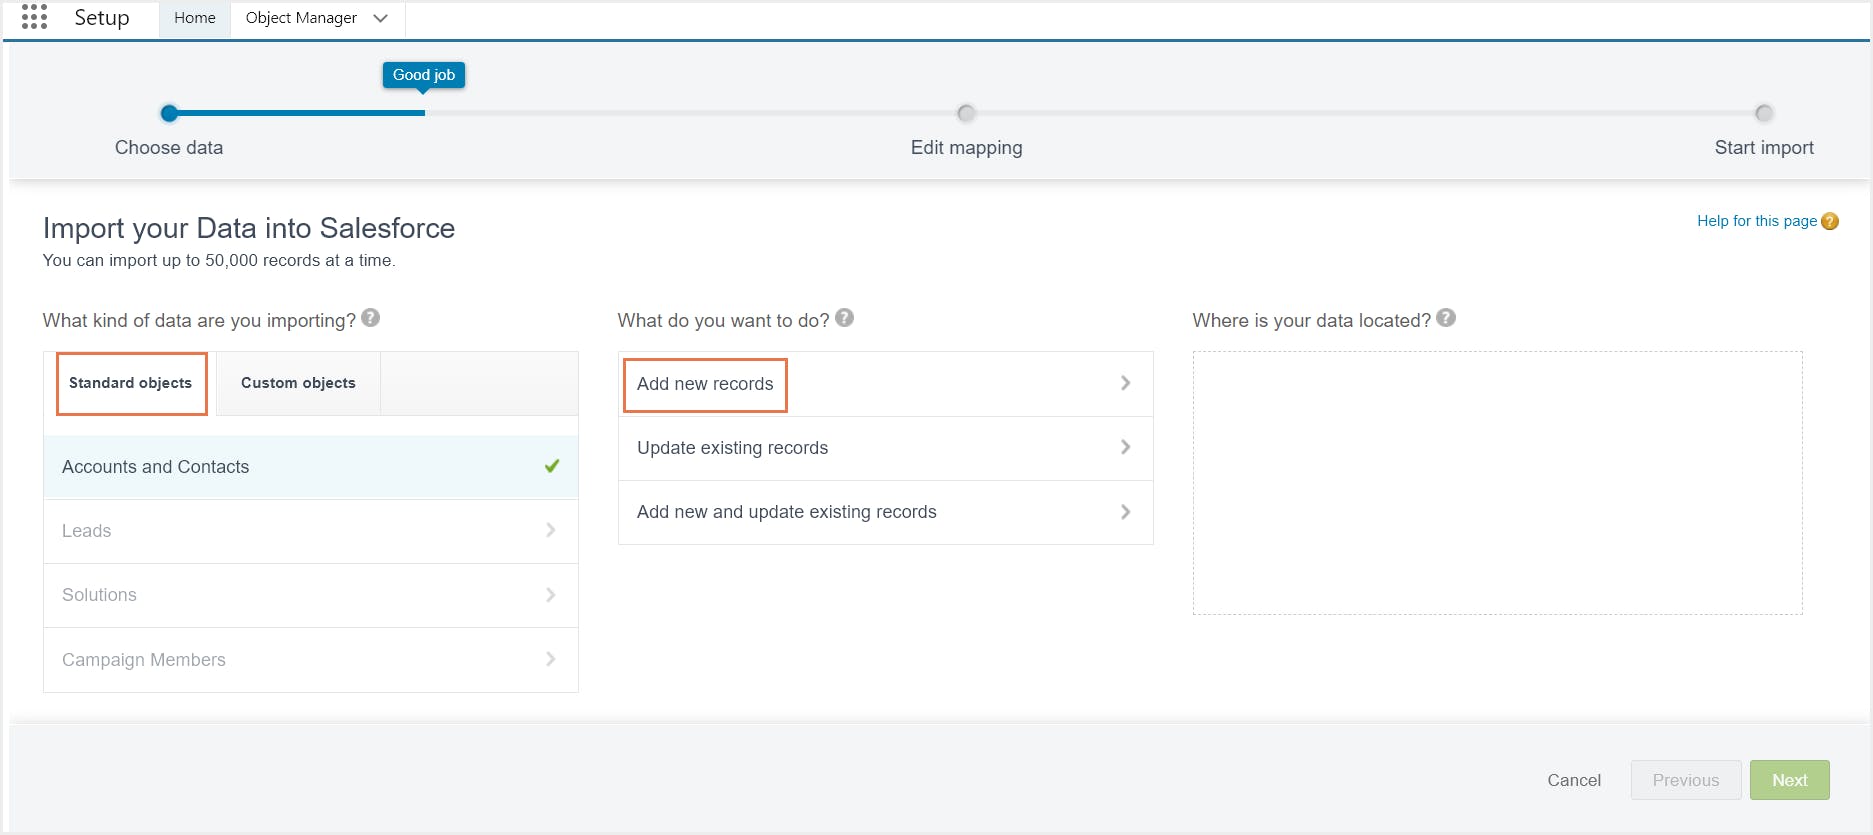
Step 5: Specify matching and other criteria as required. You can also specify whether to trigger workflow rules and processes when the imported records meet the criteria.

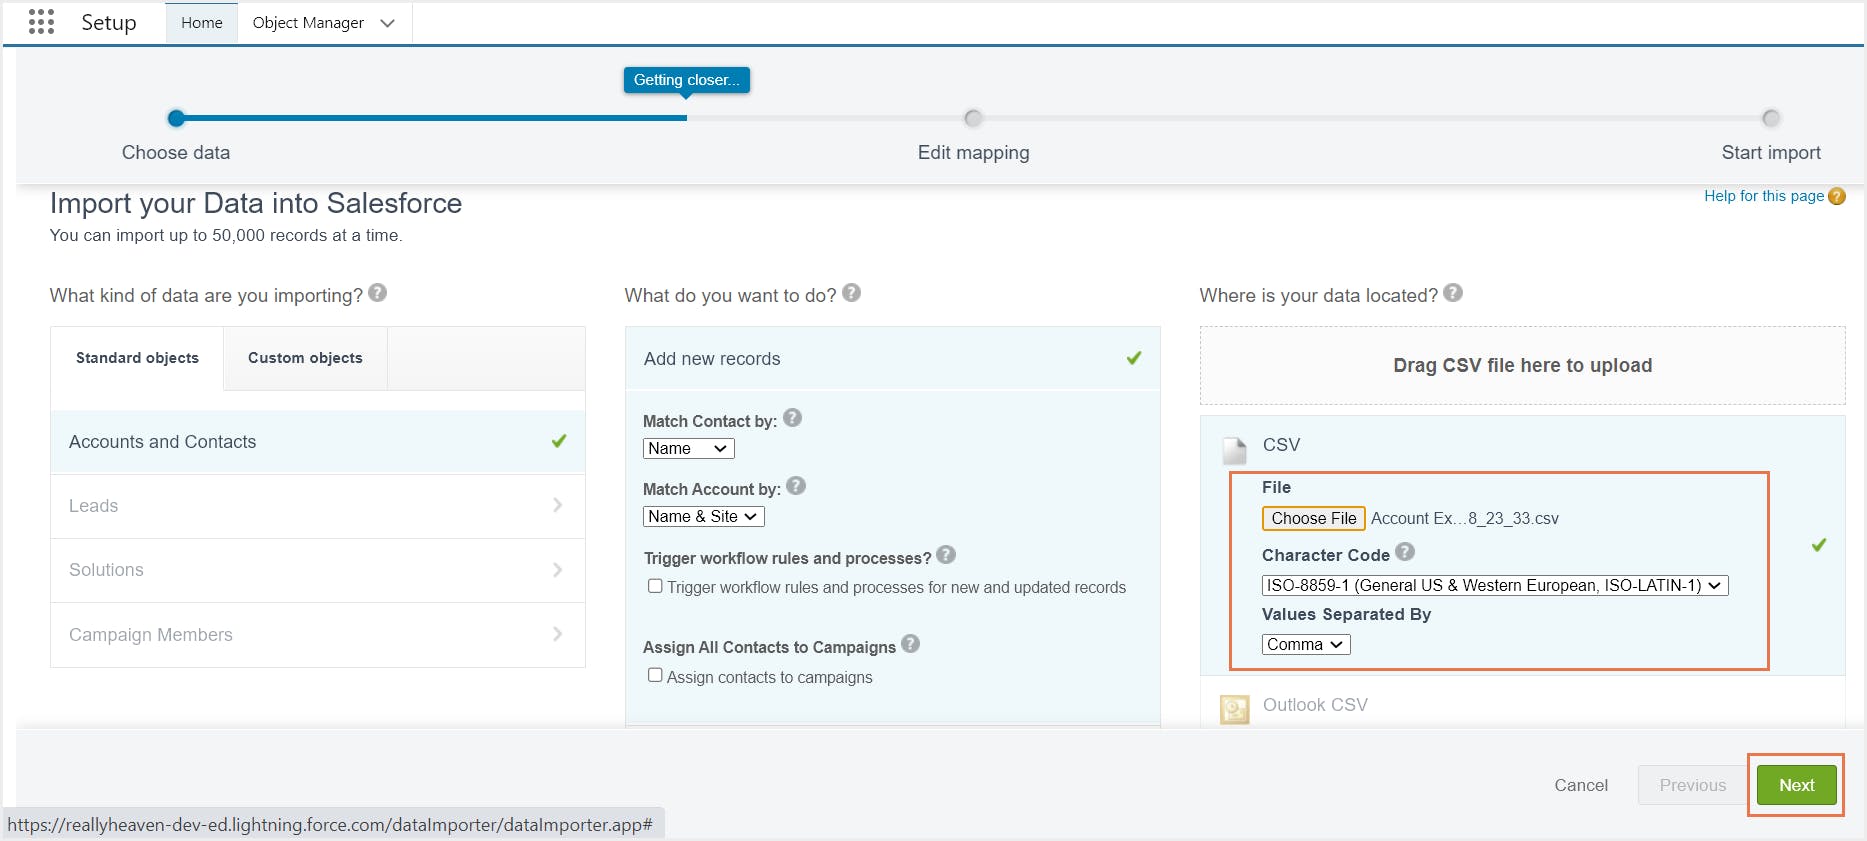
Step 6: Upload the CSV file containing the data you need to import. (Learn how you can prepare your data for import.)
Step 7: Choose a character encoding method for your file. (Typically, you do not change your character encoding.) Choose between comma or tab as a value separator. Click Next.
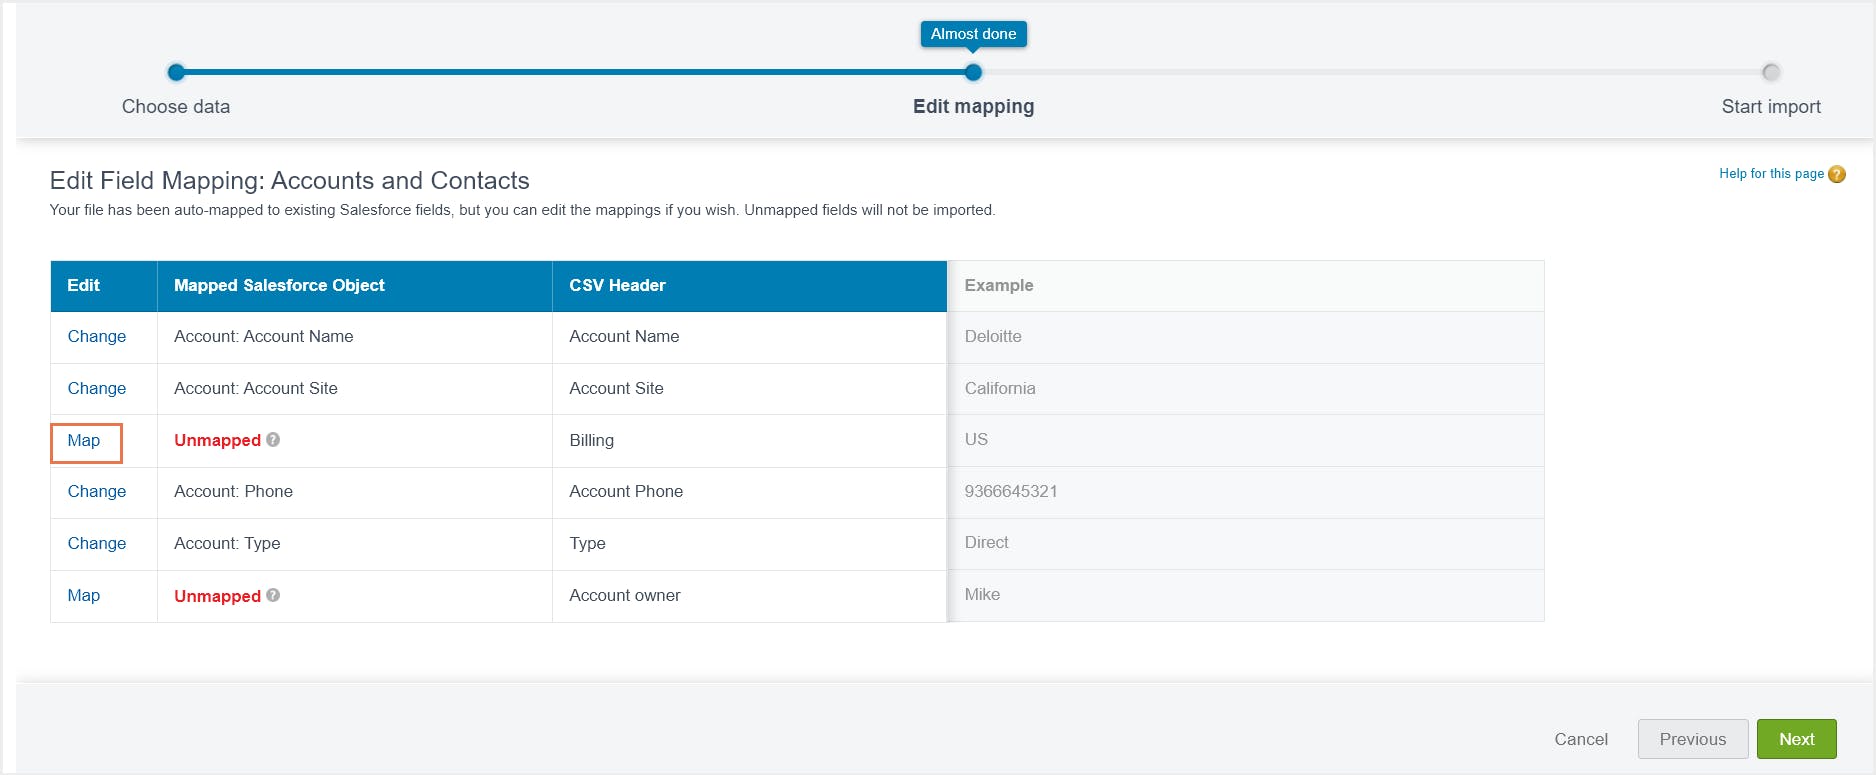
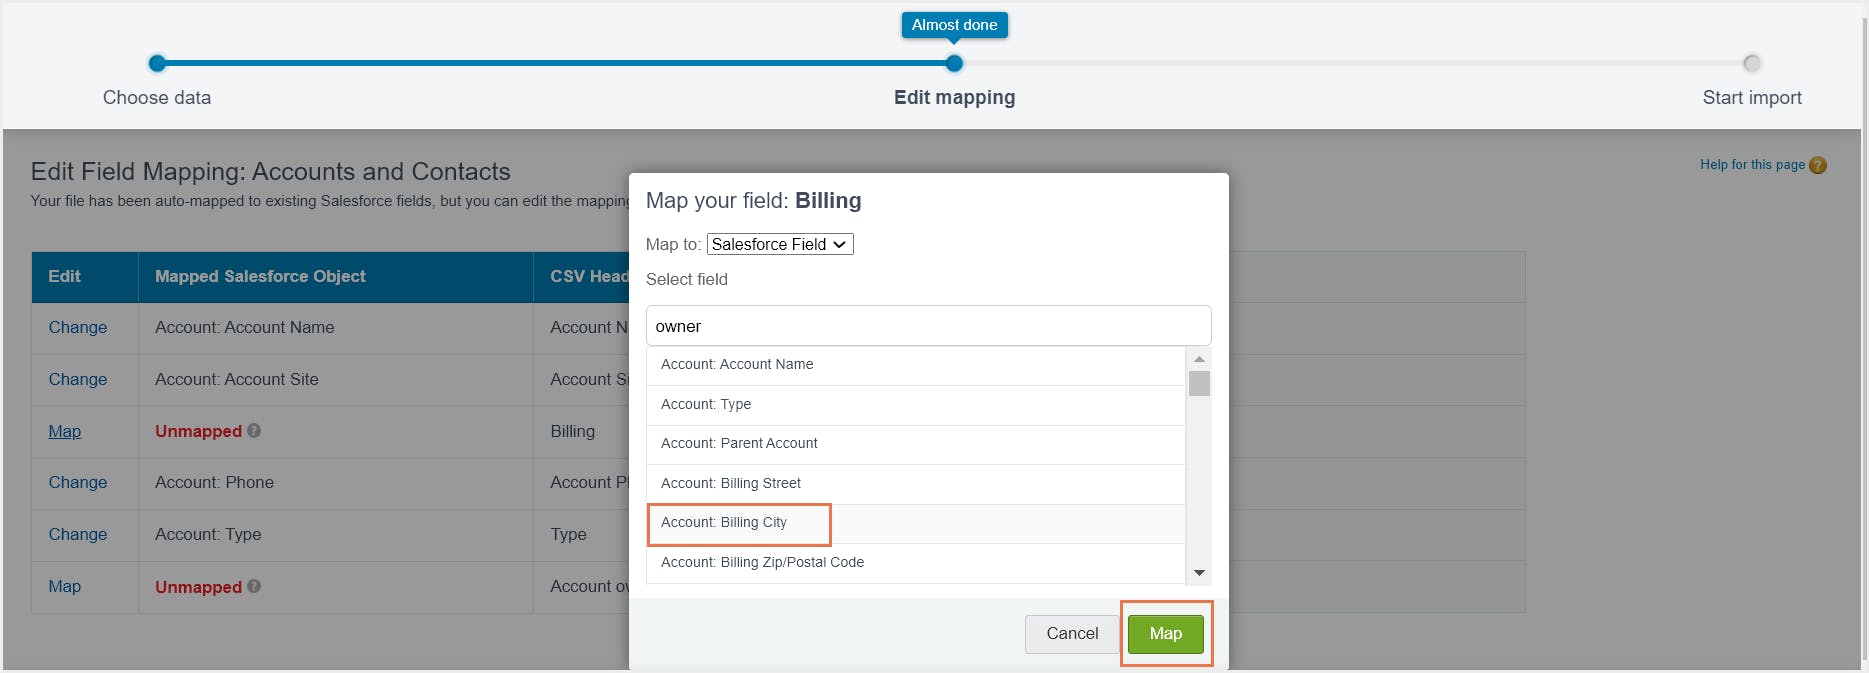
Step 8: Map the CSV data fields to Salesforce data fields. The Data Import wizard maps as many of your data fields as possible to standard Salesforce data fields. But if there are any fields that cannot be mapped by the wizard, you must do it manually by clicking on Map to the left of each unmapped field. Click Next.
Notes:
- Unmapped fields are not imported into Salesforce.
To change mappings that Salesforce performed automatically, click Change to the left of the respective field. Delete the Salesforce fields you do not want to map, choose the fields you want to map, and click Map.
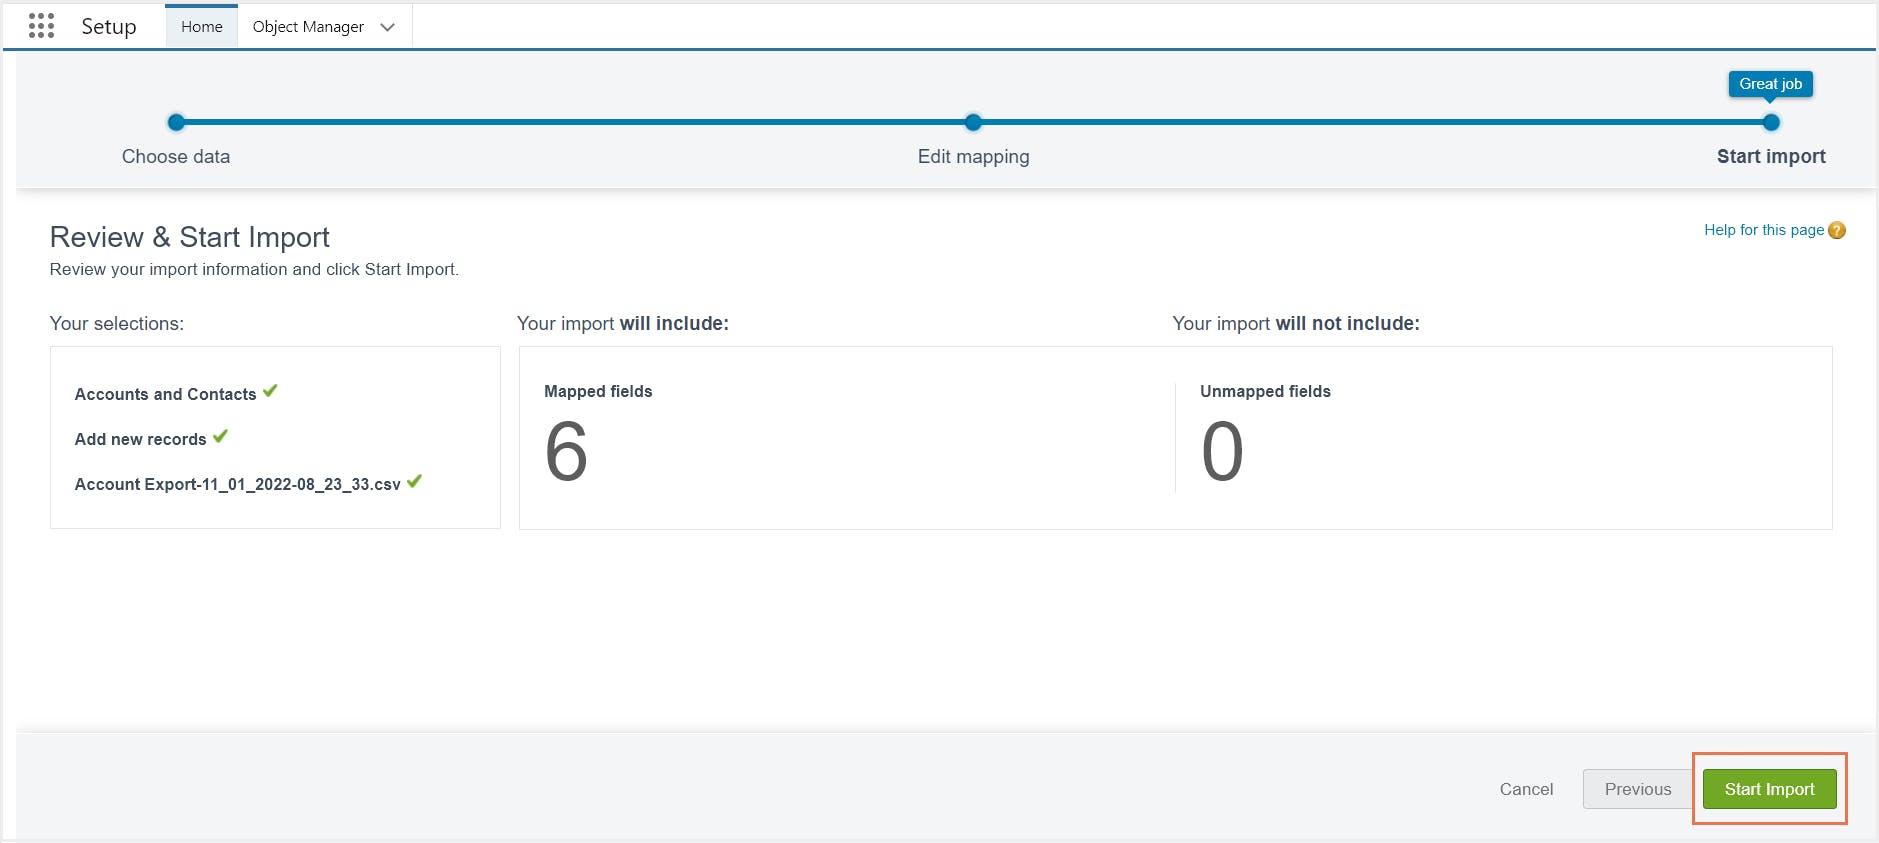
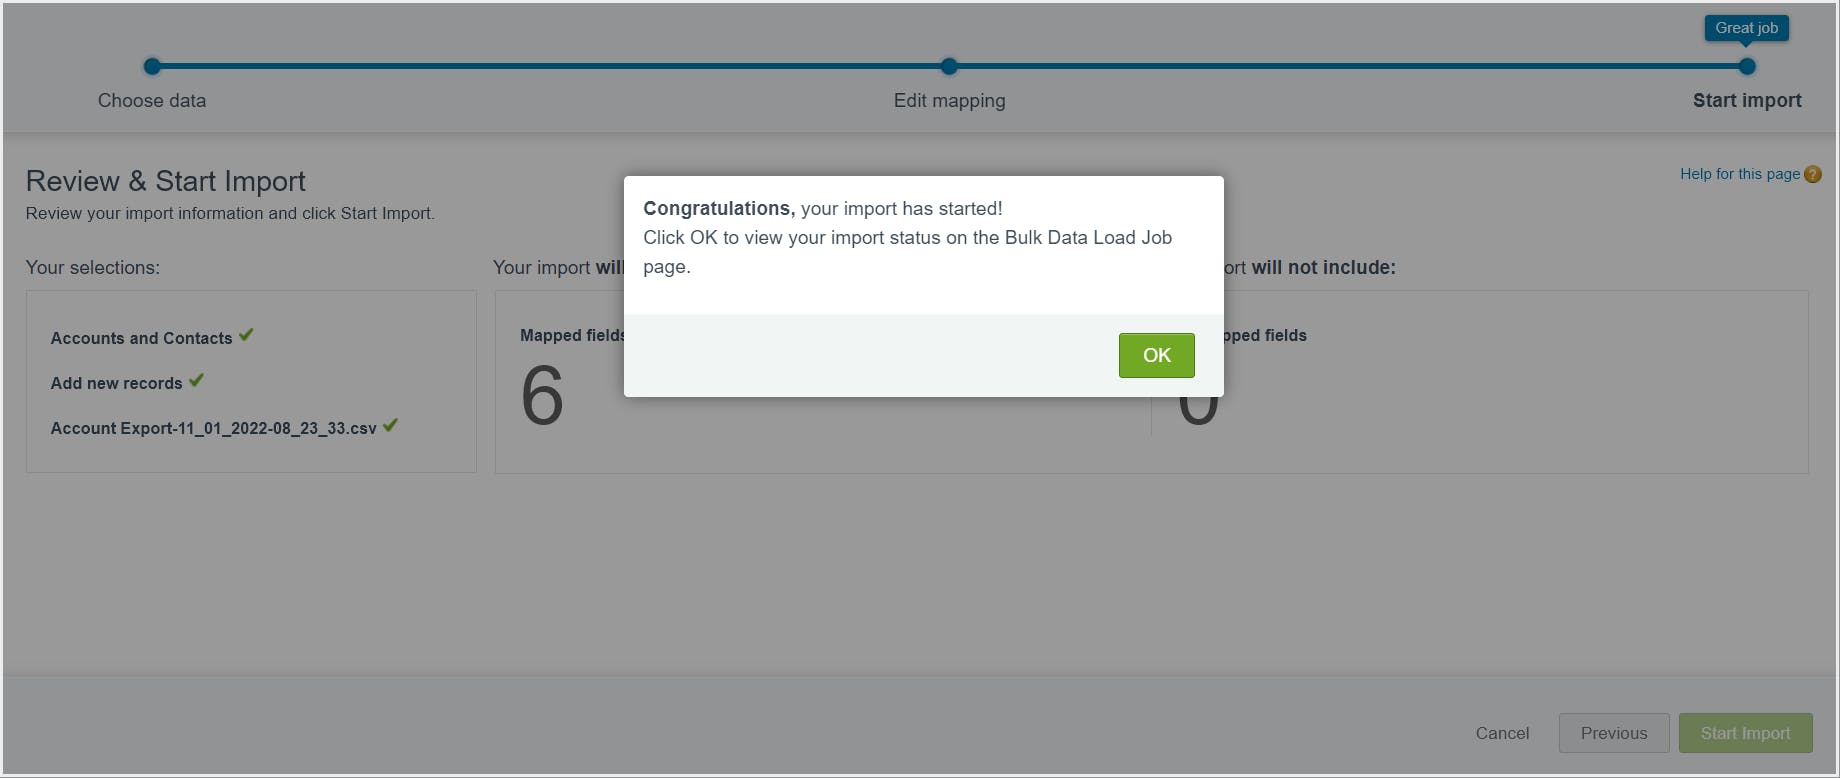
Step 9: Review and start the import. You can view the import status on the Bulk Data Load Jobs page.

2.2. Import Salesforce data using Salesforce Data Loader
Data loader is a client application developed by Salesforce that needs to be installed separately. It allows you to perform mass data operations such as import, export, update, or delete. The application can be operated either through the Salesforce user interface or command line. The latter is useful if you want to automate the data import process. Learn more about Salesforce Data Loader
So, what can you do? Click here to know how you can manage Salesforce data storage and save on additional costs.
2.2.1. Required editions and user permissions
Available in both Salesforce Classic (not available in all orgs) and Lightning Experience
User permissions needed:
2.2.2. How to import records into Salesforce using Data Loader
Step 2: Open the Data Loader. Click Insert.
Step 3: Enter your Salesforce username and password, and click Log in. When you are logged in, click Next.
Note: If your organization restricts IP addresses, logins from untrusted IPs are blocked until they are activated. Salesforce automatically sends you an activation email that you can use to log in. The email contains a security token that you need to add to the end of your password. For example, if your password is "example” and your security token is “1234567890”, you must enter example1234567890 to log in.
Step 4: Choose an object that you need to import. If your object name is not displayed in the default list, select Show all objects to see a complete list of the objects that you can access. The objects are listed by localized label name, with the developer name noted in parentheses.
Step 5:To select your CSV file, click Browse. For example, if you are inserting Contact records, you could specify a CSV file called insertcontacts.csv containing a Name column for the names of the contacts to be added. Click Next. After the object and CSV file are initialized, click OK.
Step 6: Define how the columns in your CSV file map to Salesforce fields. To select an existing field mapping, click Choose an Existing Map. To create or modify a map, click Create or Edit a Map. Here, you can drag the Salesforce fields down to the column mapping. Click Ok.Click Next.
Step 7: Select the directory where your success and error files will be stored. The success file contains all the records that have been successfully inserted and the error file contains the records that have not been inserted along with the error descriptions. Click Finish, and then click Yes to confirm.
| Data Import Wizard | Data Loader |
|---|---|
For simpler/smaller imports of data | For complex/larger imports of data |
Can load up to 50,000 records | Can load up to 5 million records |
Supports all custom objects and only a few standard objects | Supports all custom and standard objects |
Delete operation is not available | Delete operation is available. |
Does not require installation | Requires installation |
While importing, duplicates can be ignored | While importing, duplicates cannot be ignored |
Cannot import Cases and Opportunities | Can import Cases and Opportunities |
2.3. Import Salesforce data using dataloader.io
2.3.1 Required editions and user permissions
2.3.2. How to import data into Salesforce using dataloader.io
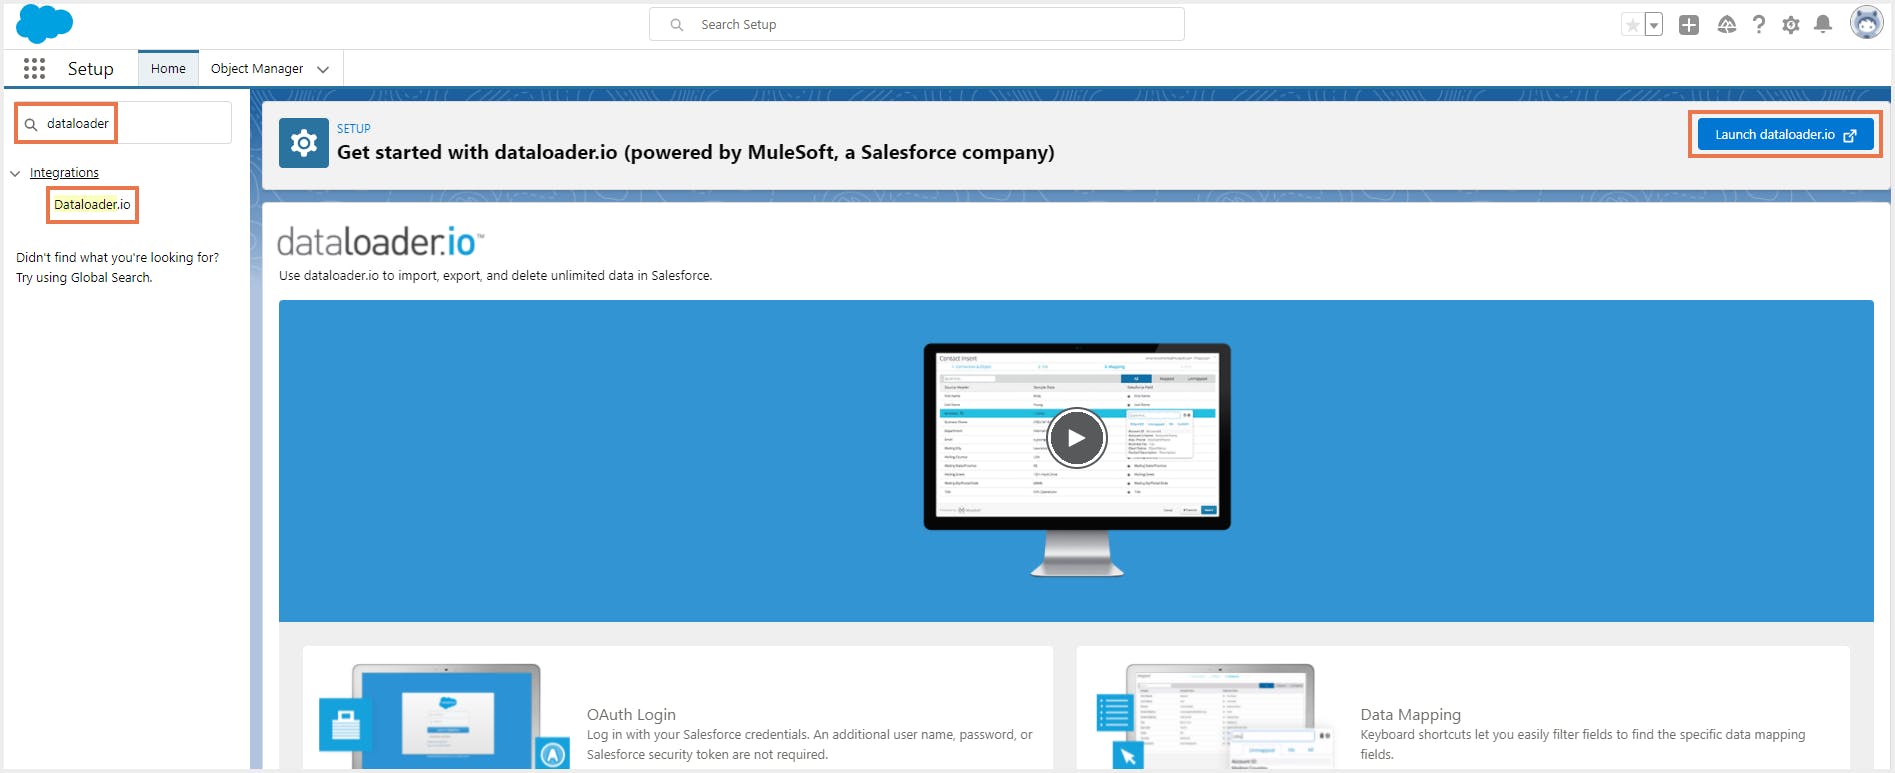
Step 1: From Setup, enter Dataloader.io in the Quick Find box, then select Dataloader.io.
Step 2: Click Launch dataloader.io.
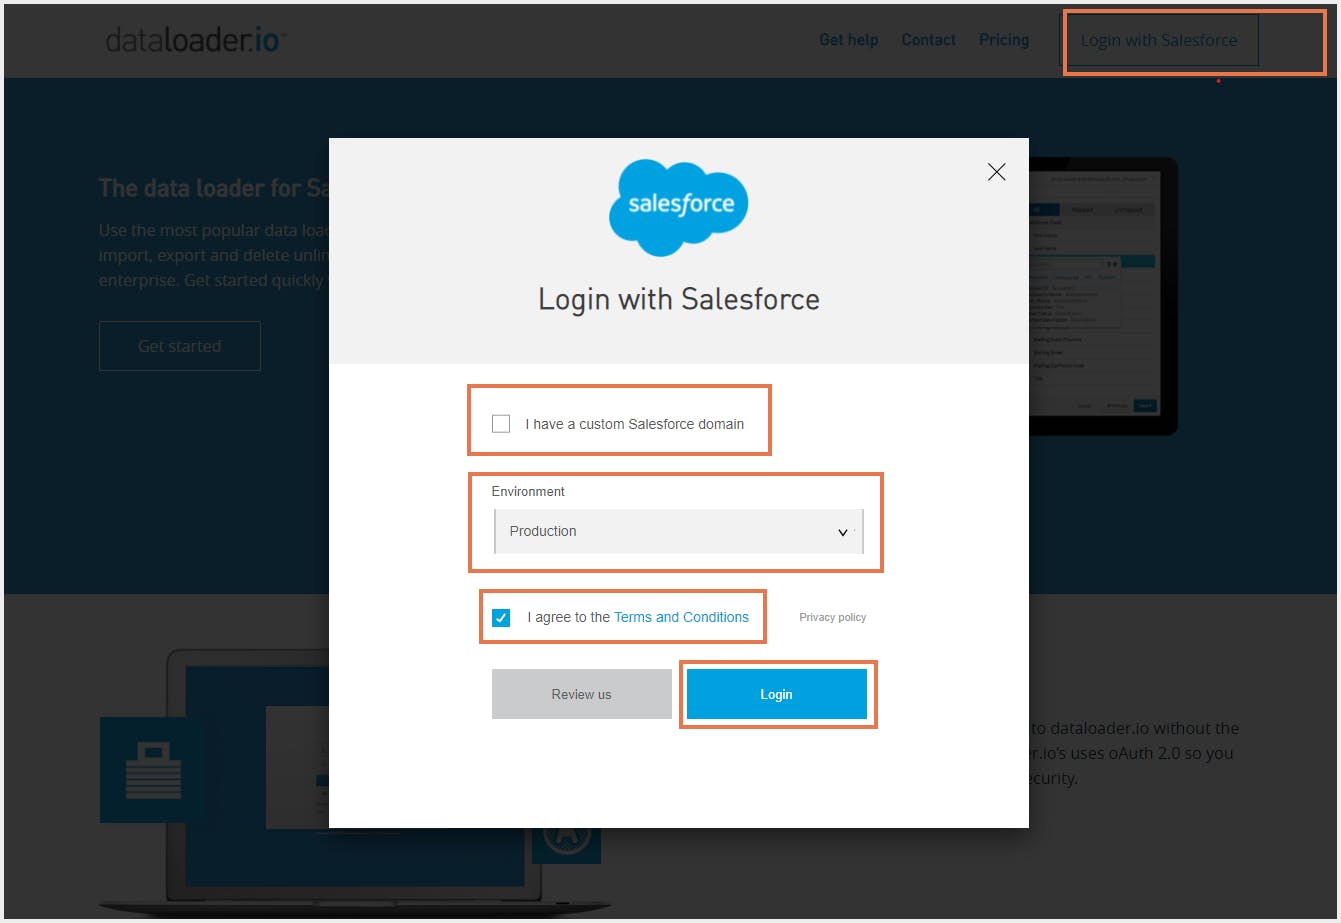
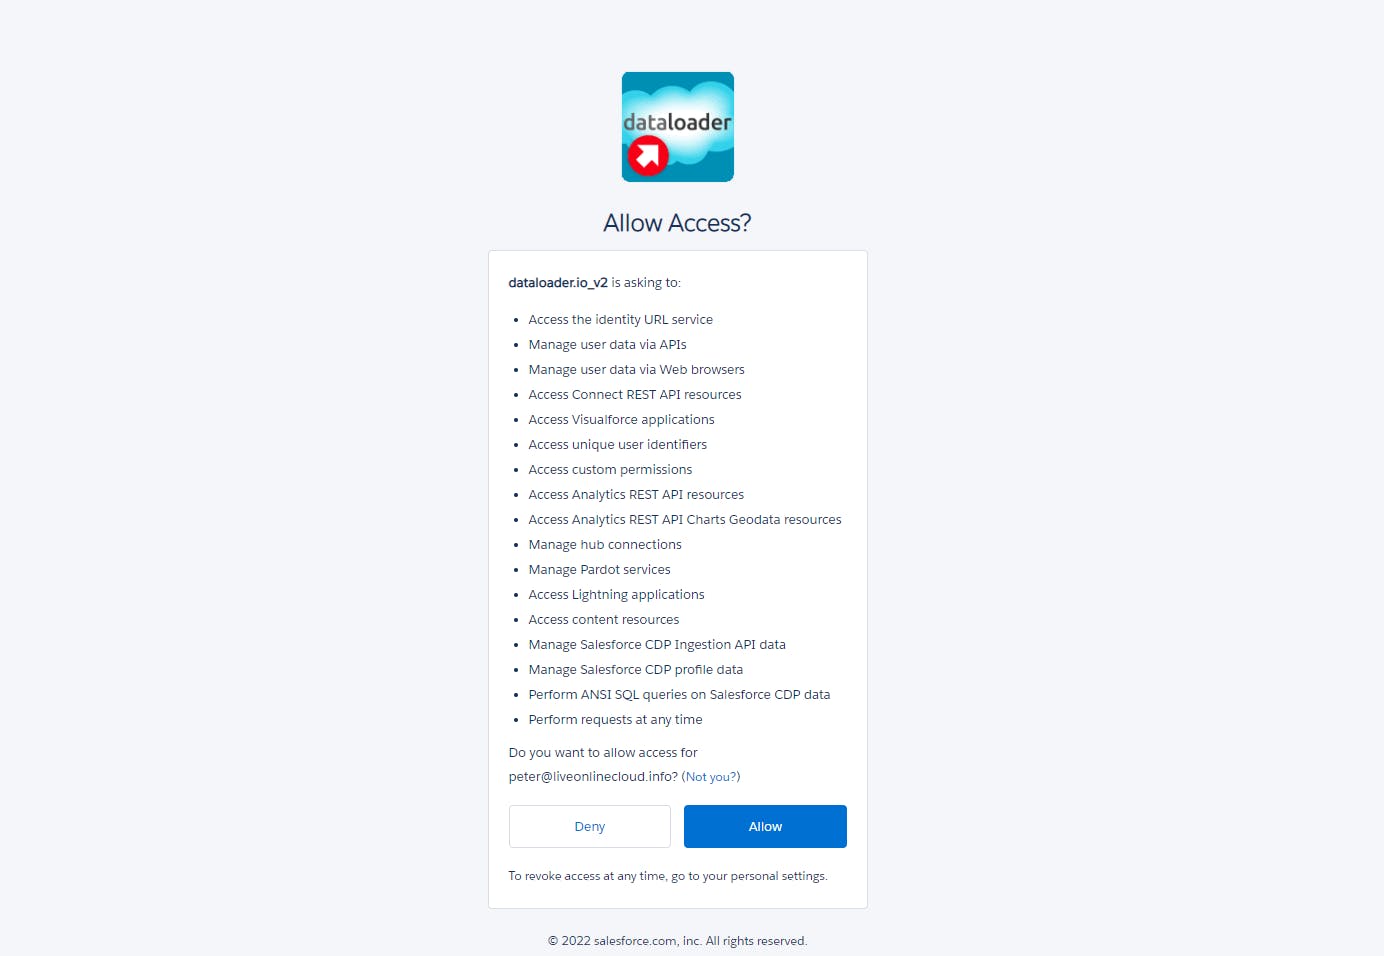
Step 3: Click Login with Salesforce. Uncheck the option I have a custom Salesforce domain and choose Production as the Environment. Check the option agree to the Terms and Conditions and click Login. Click Allow.
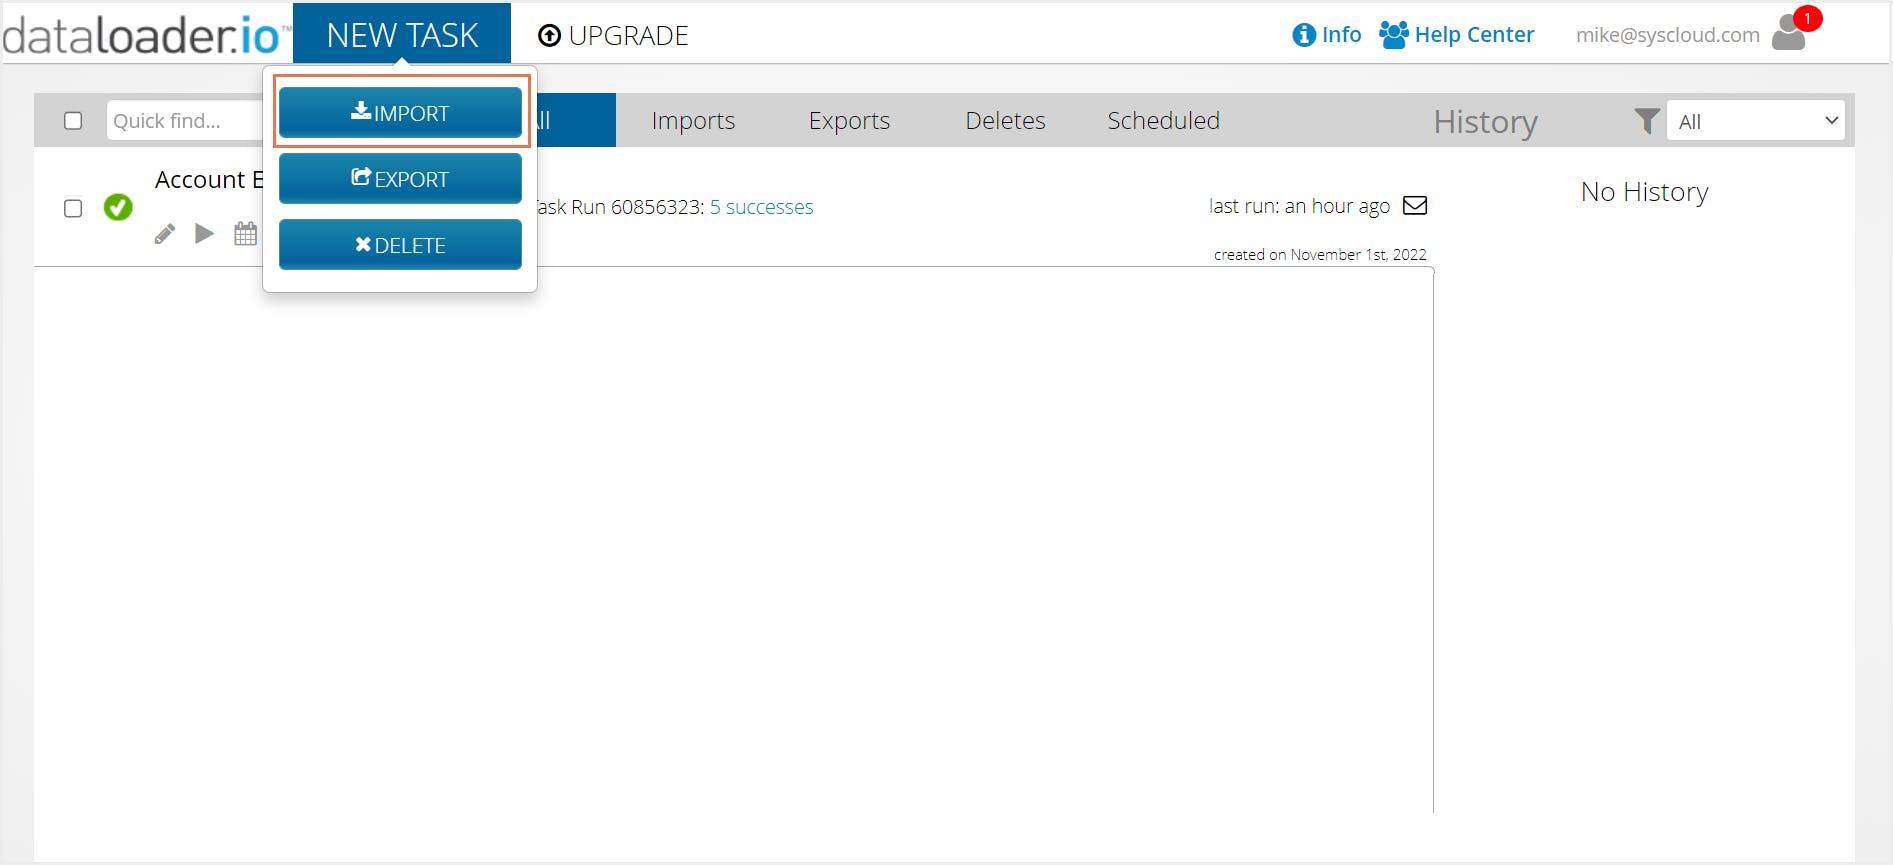
Step 4: In the dataloader.io application, click NEW TASK -> IMPORT.
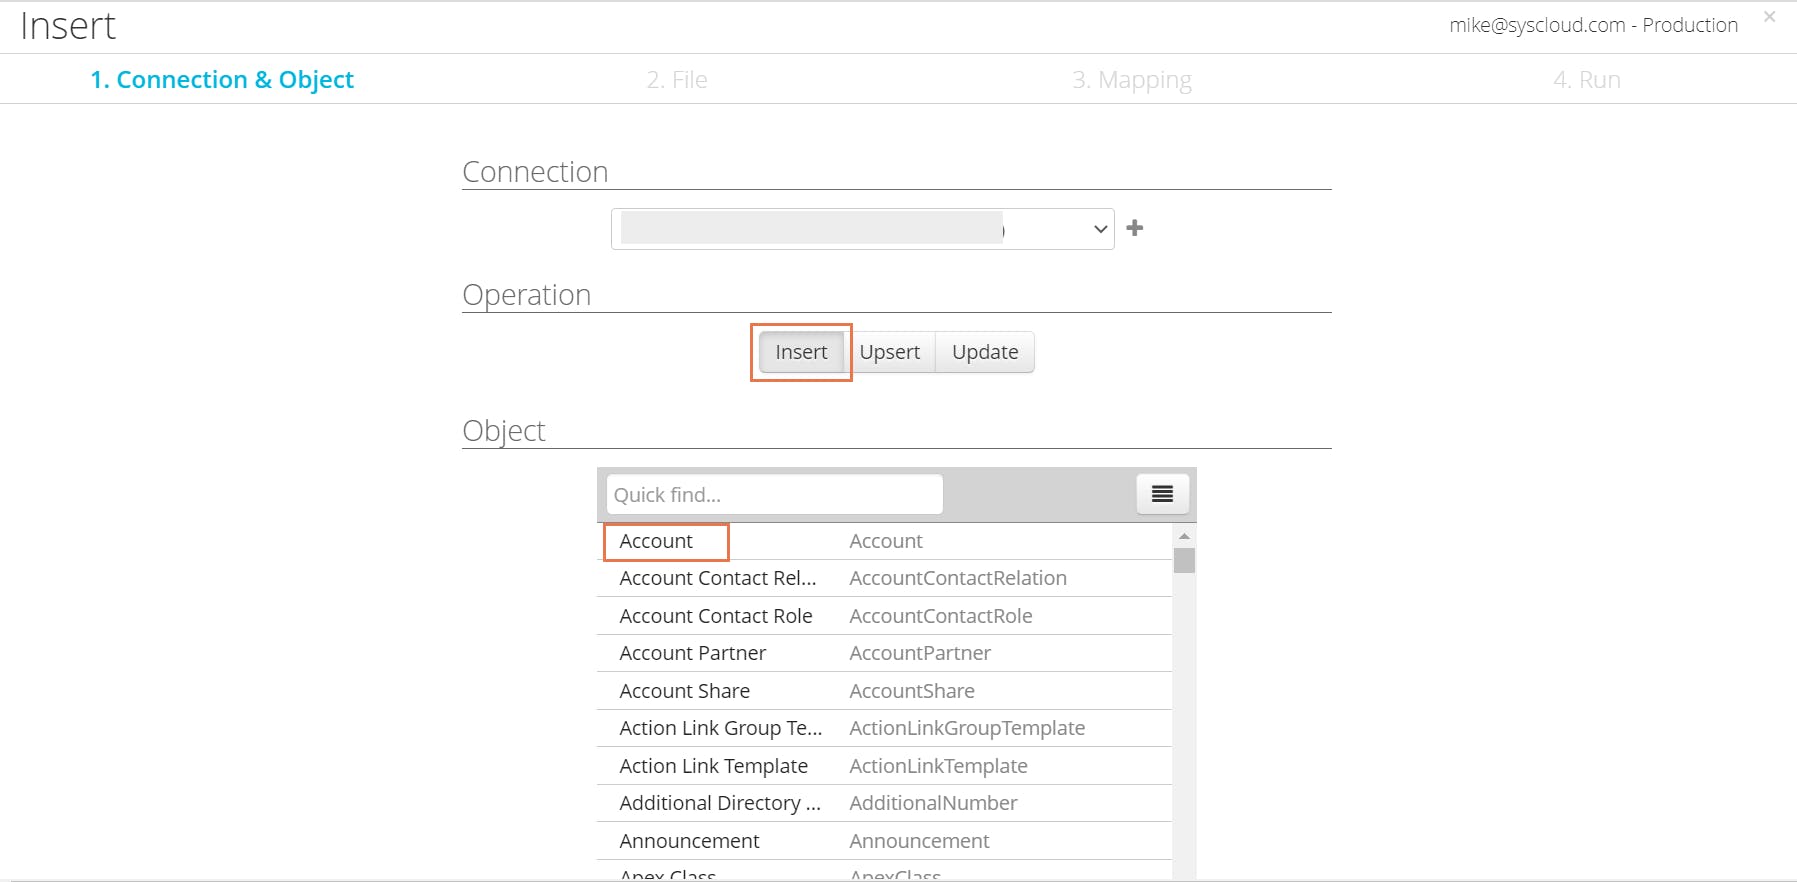
Step 5: Click Insert if you want to import only deleted records into Salesforce. If your records have been overwritten and you wish to update it with new values, choose Update. Choose Upsert if you want to perform a combination of Insert and Update -if a record in your file matches an existing record, the existing record is updated with the values in your file. If no match is found, a new record is created.
Step 6: Choose the object to which you need to insert records and click Next.
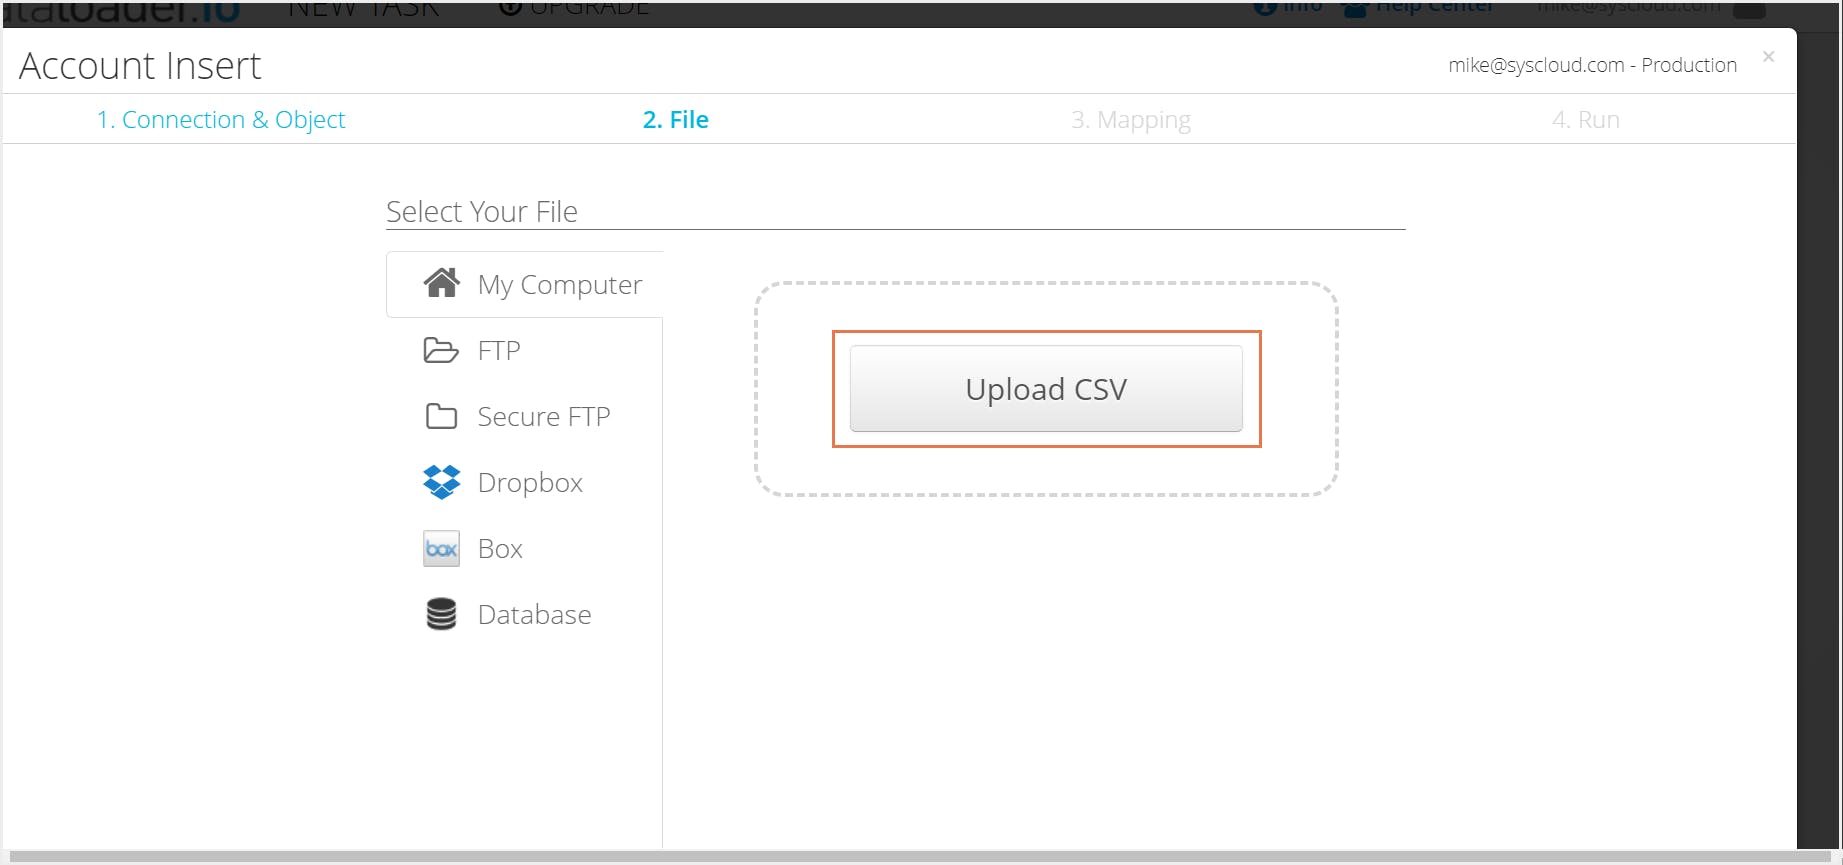
Step 7: Upload the CSV file containing the records to be inserted and click Next.
Step 8: Ensure the data is mapping correctly to the existing data. Click Next > Save & Run.
| Data Loader | Dataloader.io |
|---|---|
Client application developed by Salesforce | 100% cloud-based solution, originally developed by MuleSoft |
Requires installation | Does not require installation |
Can import up to 5 million records at a time | A limit of 10,000 records per month in the free version |
2.4. Limitations of Salesforce data recovery using native import/export tools
- Tedious and time-consuming, since the import and export have to be set up manually
- Native Salesforce import/export options do not provide metadata backup and restore, which is critical to rebuild custom settings and relationships.
- To restore data from your exports, you will have to compare the data before and after the data loss incident so that you can identify what data has been lost or modified and what has not, which is a difficult and time-consuming process. It is also difficult to restore records with object relationships intact.
- Restoration from the exported data requires manual effort, deduplication, and the use of spreadsheets, all of which takes up a lot of time. To perform a manual restore, you must know exactly what data needs to be restored, where it needs to be restored, and in what order, so that object relationships are preserved. Failure to do this can result in incomplete restores or even data corruption.
- You will not have access to data that has been modified/deleted since the last export.
- The CSV files to be imported will be stored on laptops or other less secure media that can create potential IT security risks.
3. Salesforce data recovery using native Backup and Restore
In September 2021, Salesforce announced their plan to launch “Backup and Restore,” their new backup and recovery product. This service allows administrators to automate daily backups of standard and custom objects, metadata, files, and attachments in Salesforce. It also allows you to restore backed-up data into orgs with just a few clicks.
Click here to learn how to restore deleted Salesforce data using the native Backup and Restore tool.
3.1. Limitations of native Salesforce Backup and Restore tool
- Having a backup and restore solution built within the platform is risky. Even though Salesforce segregates the storage of backup data from production data, your point of data access is still the same - the Salesforce platform.
- Using a native backup solution means you will not be able to access your backups in the event of a Salesforce outage.
- Having the backup copy on the same platform also means a malicious user with access to the data in your Salesforce org can easily access your backup data as well.
- Backup centers are also regionally co located, so an outage in that region will disable both the backup and production data.
4. Recover deleted Salesforce data using Salesforce Data Recovery Service
Note that Salesforce themselves mentions that the Salesforce Data Recovery Service may not be your best option to restore deleted Salesforce data and recommends using third-party cloud backup tools. Don’t take our word for it; here is an extract from the Salesforce documentation on the best practices to back up Salesforce data.
There are a number of data backup solutions offered by our partners on our AppExchange. Some of these are more comprehensive in that they allow you to automate backups of both your data and your metadata and provide a mechanism by which to restore that data easily.
4.1. Limitations of using Salesforce Data Recovery Service to restore deleted Salesforce data
- Salesforce Data Recovery Service is a paid service that costs $10,000 per recovery.
- The recovery process is time-consuming; it can take up to six to eight weeks to complete after you raise the restore request.
- The service does not cover metadata restoration.
- As the recovered data will be in CSV files, you will have to manually upload the data into Salesforce (after resolving import errors).
- Data deleted more than three months cannot be recovered through the data recovery service.
- If Salesforce has an outage, so does its recovery service.
- Salesforce does not guarantee that the service will successfully restore 100% of your data.
5. Salesforce data recovery using third-party cloud backup tools
As mentioned above, the native backup and restore tools offered by Salesforce have serious limitations when it comes to data recovery. Third-party cloud backup applications like SysCloud are better options to effortlessly back up and restore your Salesforce data.
5.1. How to recover deleted records in Salesforce using SysCloud
Step 1: Log in to SysCloud using your admin credentials.
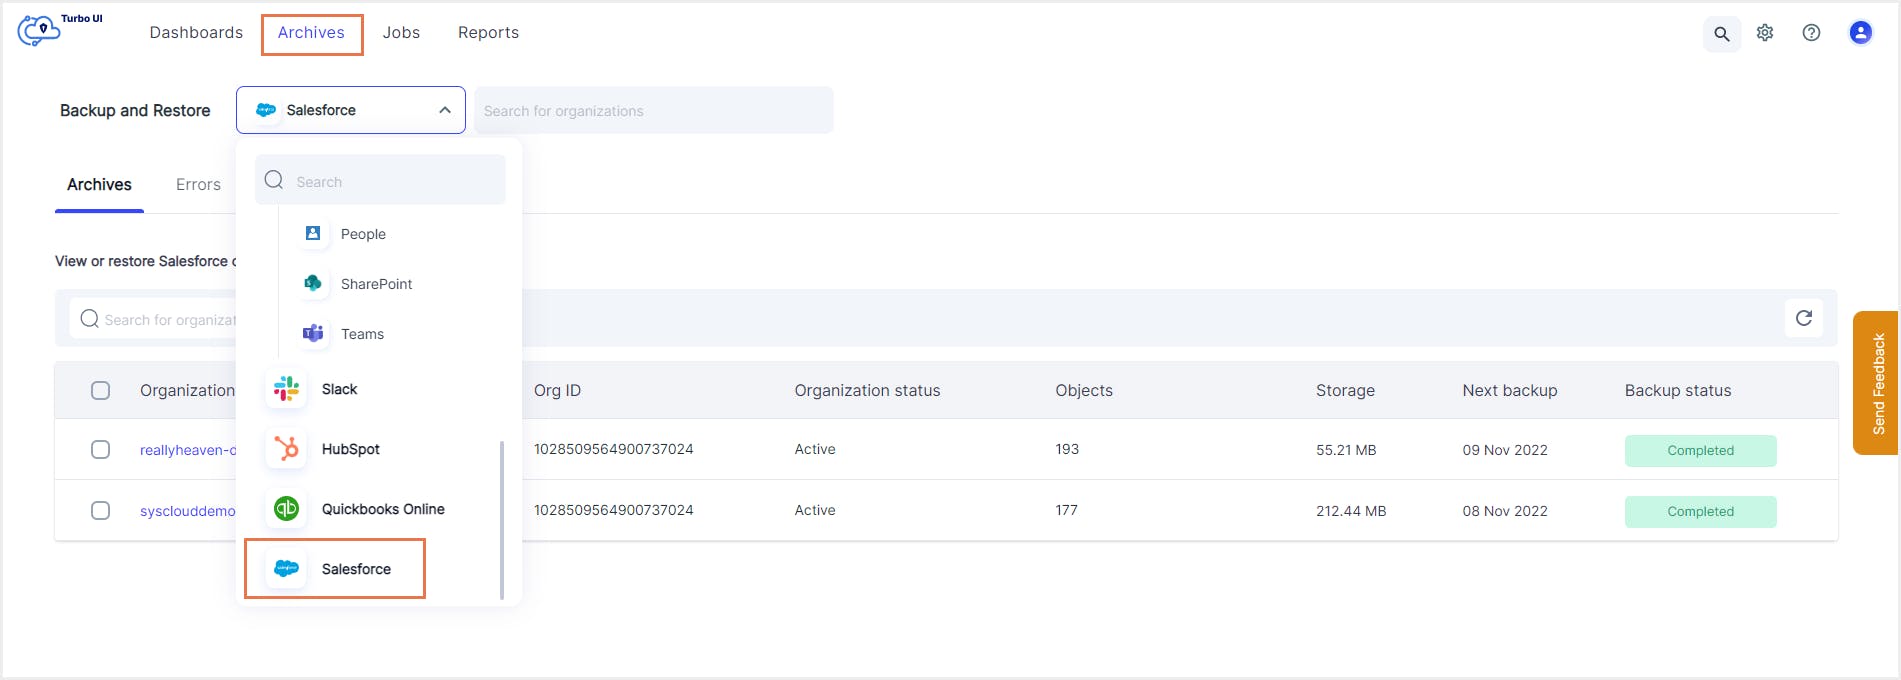
Step 2: Click Archives and select Salesforce from the Backup and Restore drop down.
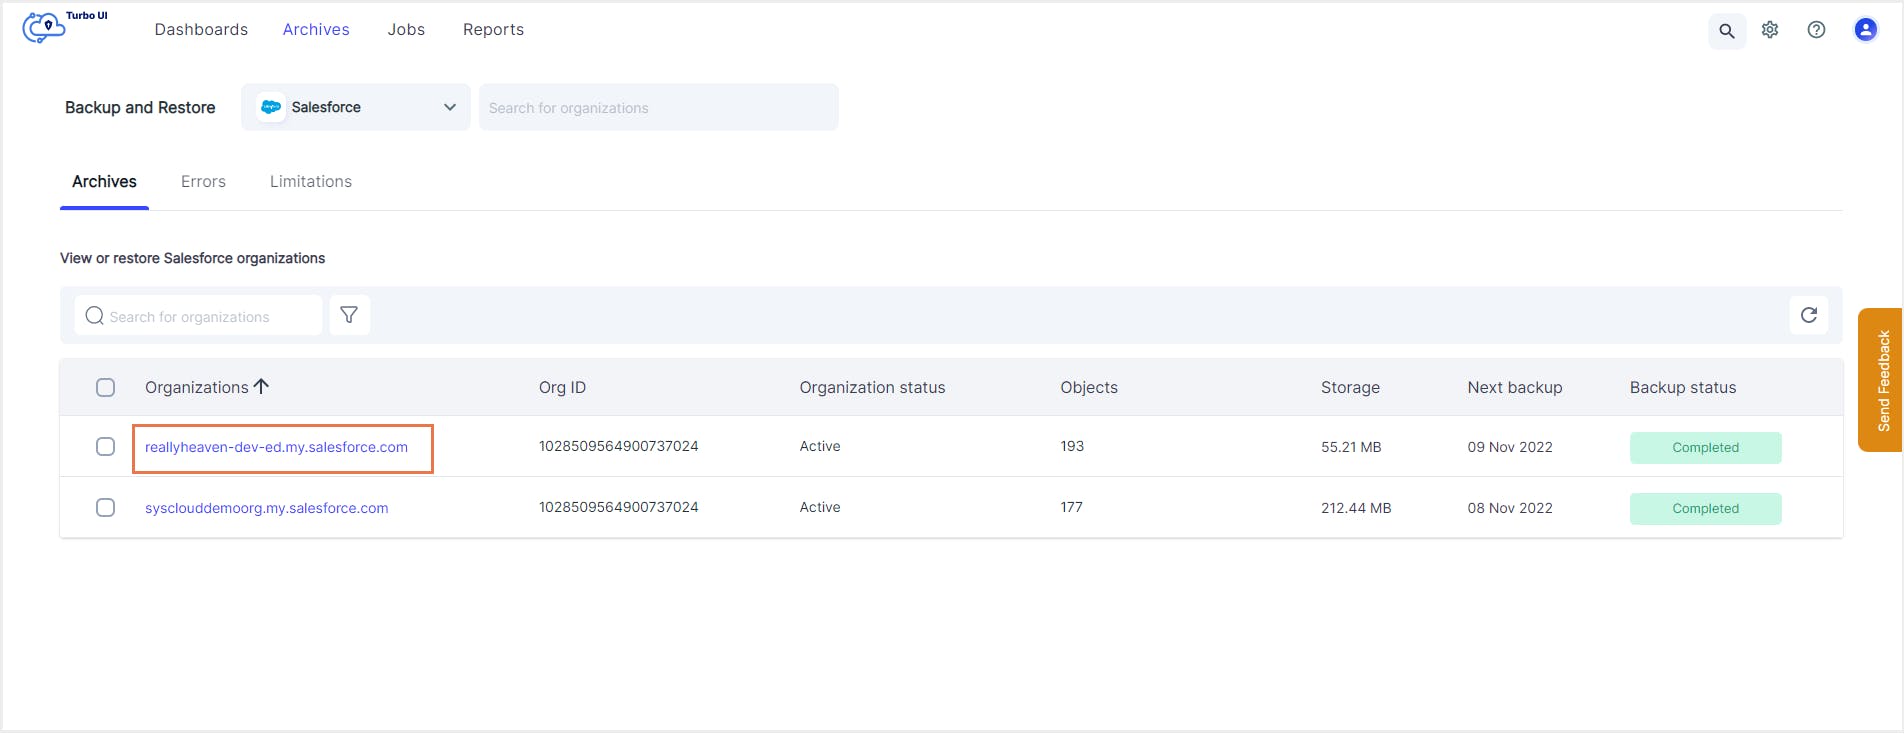
Step 3: Click on the organization you want to restore the record(s) from.
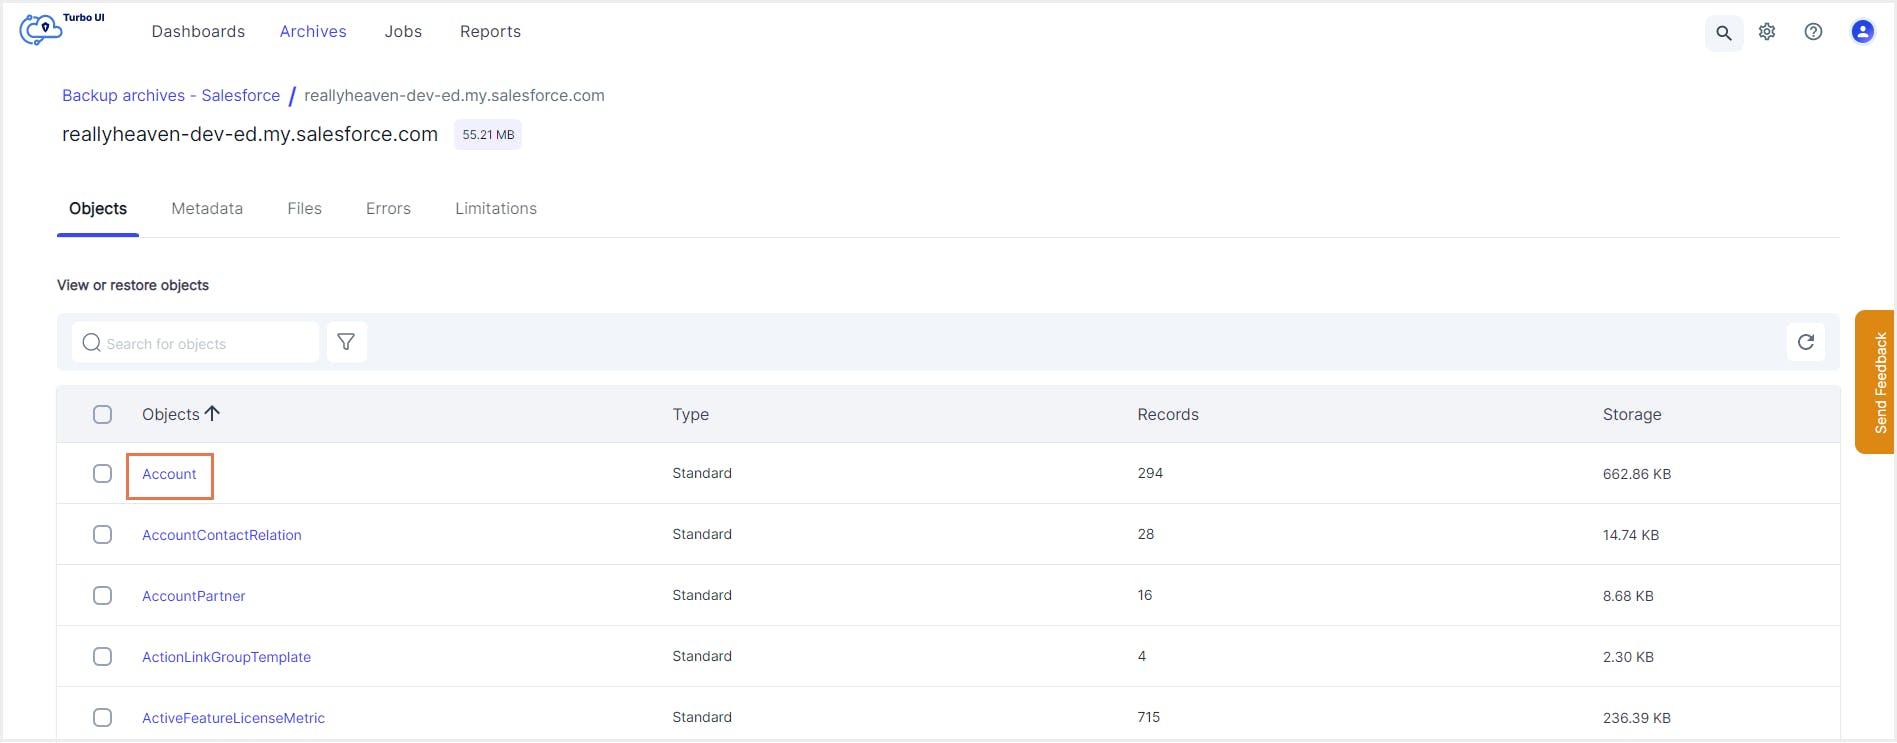
Step 4: Click on the object you want to restore the record(s) from.
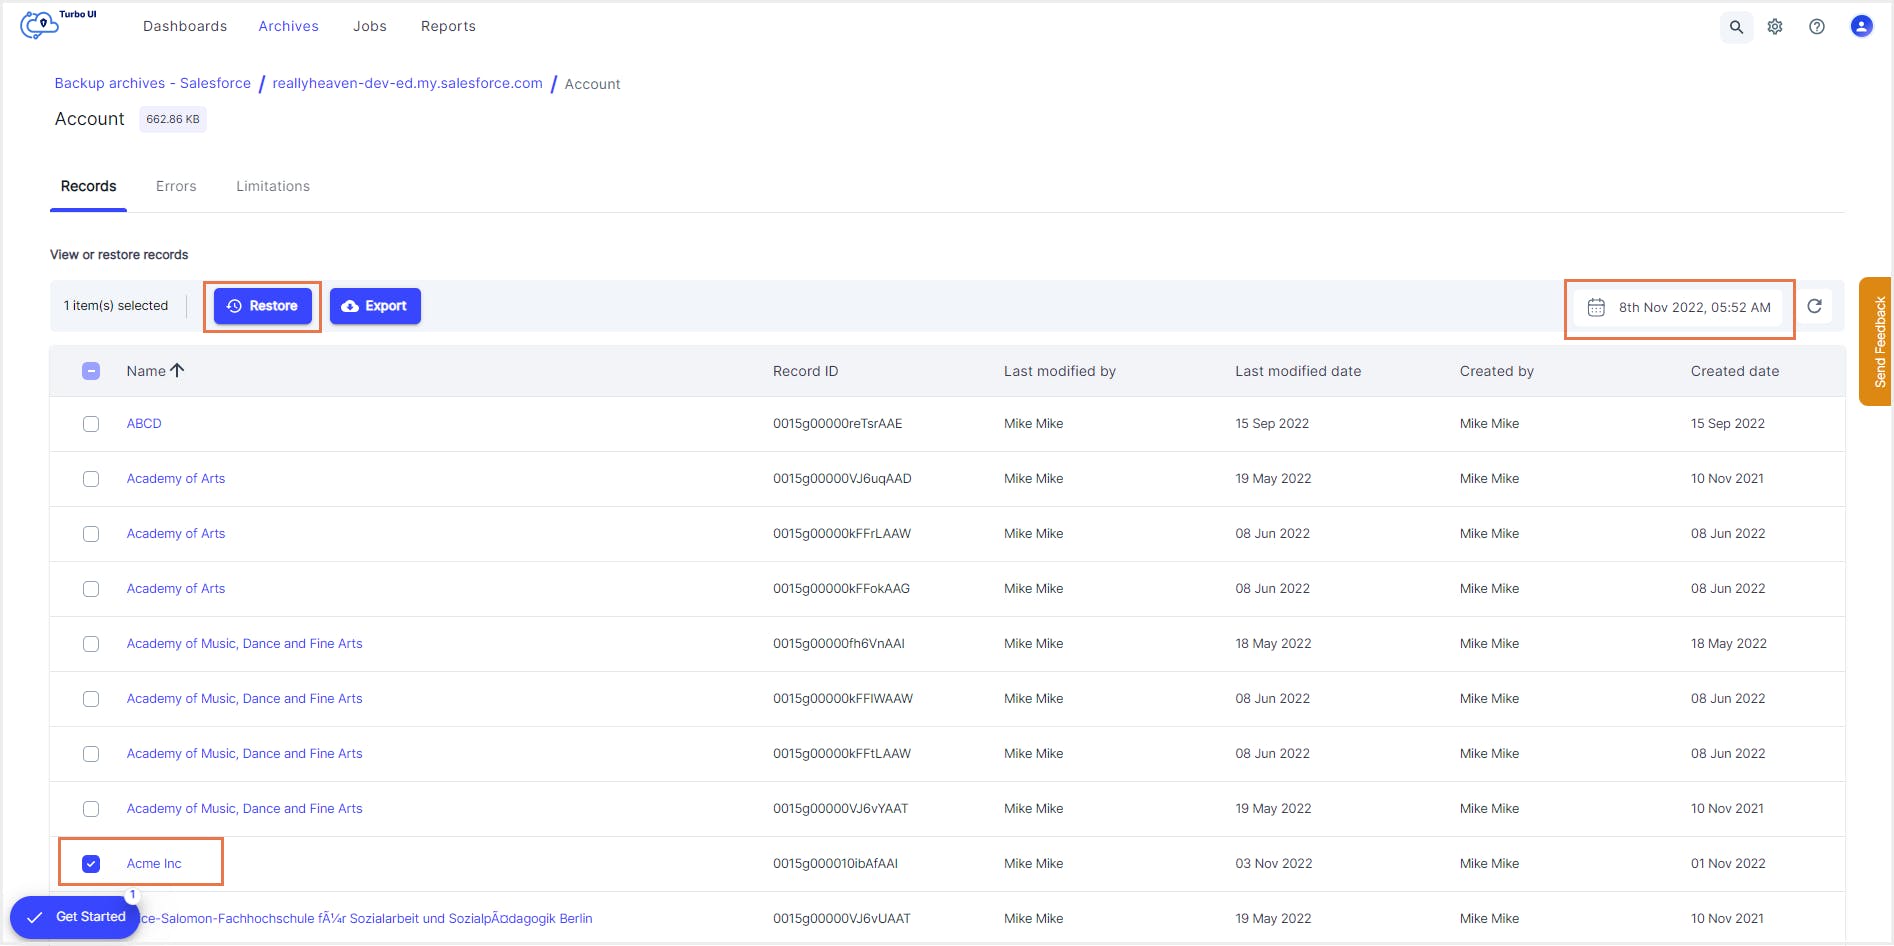
Step 5: Choose the required backup snapshot. Select the record(s) you want to restore by clicking the checkbox next to the record name and click Restore.
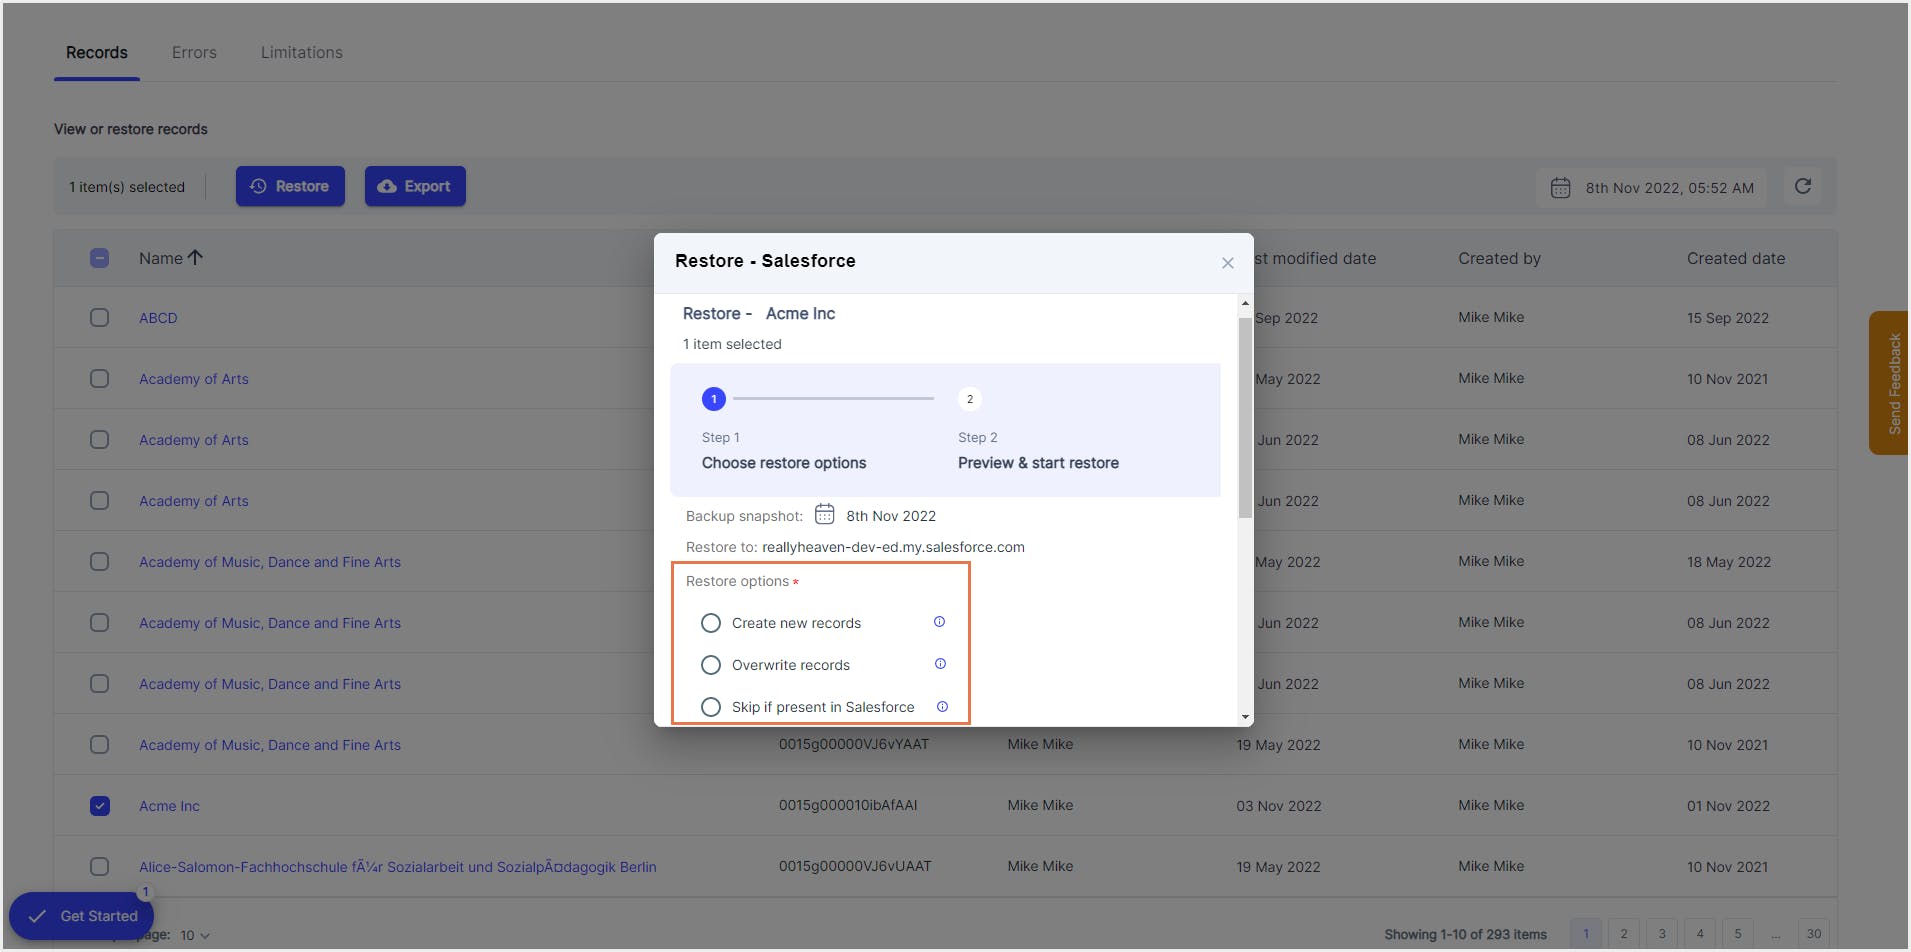
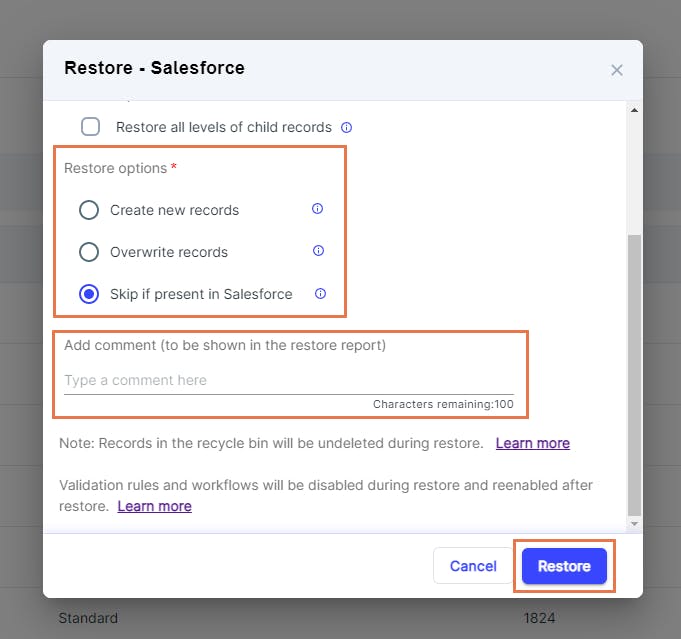
Step 6: In the restore pop-up, choose one of the three restore options under “Restore options” depending on how you want the data to be restored.
a. Create new records: SysCloud will create a new record with the data in the backup snapshot irrespective of whether the record already exists in Salesforce or not.
b. Overwrite records: SysCloud will replace the existing record with the data in the backup snapshot (the record id remains unchanged). If the record has been deleted, it will be recreated with a new id.
c. Skip if present in Salesforce: If the record already exists in Salesforce, the record will not be restored even if the data in the backup snapshot is different from the one in Salesforce. If the record does not exist, a new record will be created.
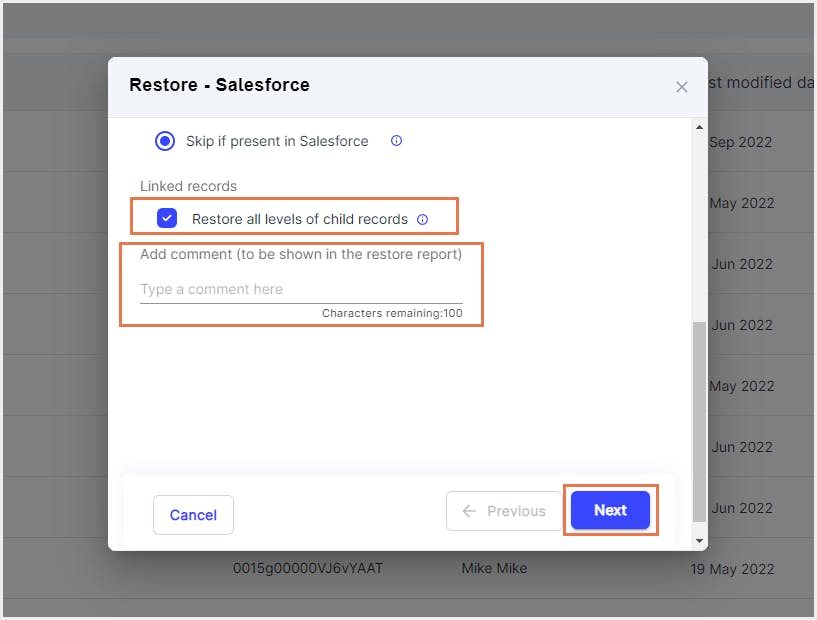
Step 7: Select the checkbox next to Restore all levels of child records if you want to restore all the child records associated with the record. If this is left unchecked, only the selected record(s) and the other mandatory record(s) associated with it (if any) will be restored.
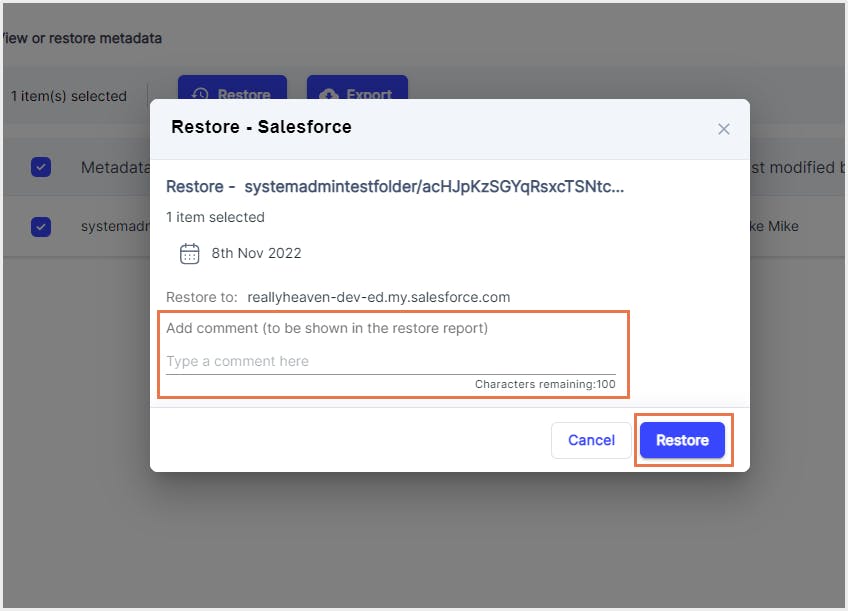
Step 8: Add comments (if any) to be shown in the restore report and click Next to preview the records that will be restored.
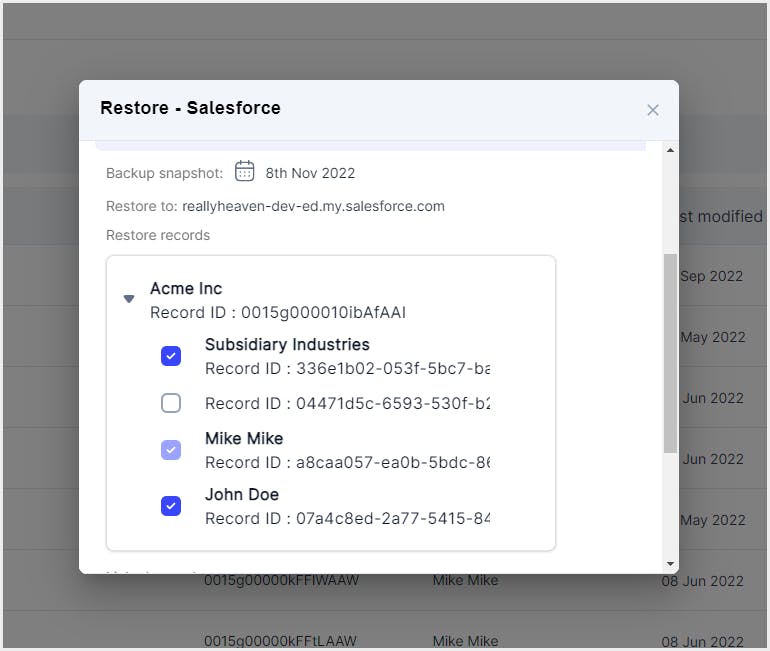
Step 9: This page allows more granular control over Salesforce data recovery. Here, you will be able to preview the records and can choose exactly what records to restore. Note that you will not be able to deselect a record that has a mandatory relationship with the record being restored.
To see the restore progress, navigate to Reports and select Restore report under Salesforce.
5.2. How to restore Salesforce metadata using SysCloud
Step 1: Log in to SysCloud using your admin credentials.
Step 2: Click Archives and select Salesforce from the Backup and Restore drop down.
Step 3: Click on the organization you want to restore the metadata from.
Step 4: Navigate to the Metadata tab. Select the metadata type that you need to restore. Choose the required backup snapshot. Select the metadata type member by checking the box next to it and click Restore.
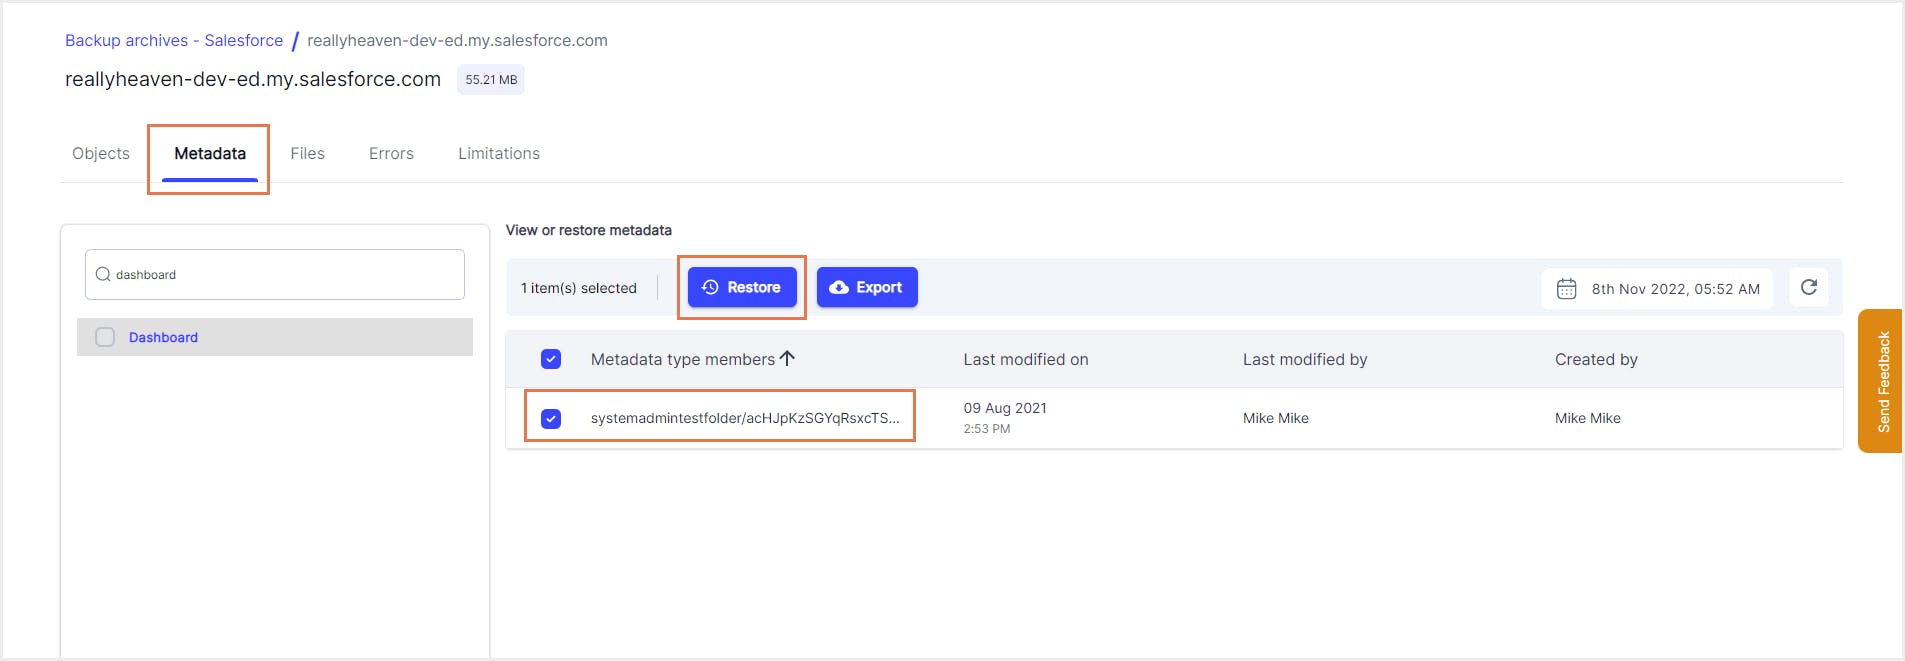
To see the restore progress, navigate to Reports and select Restore report under Salesforce.
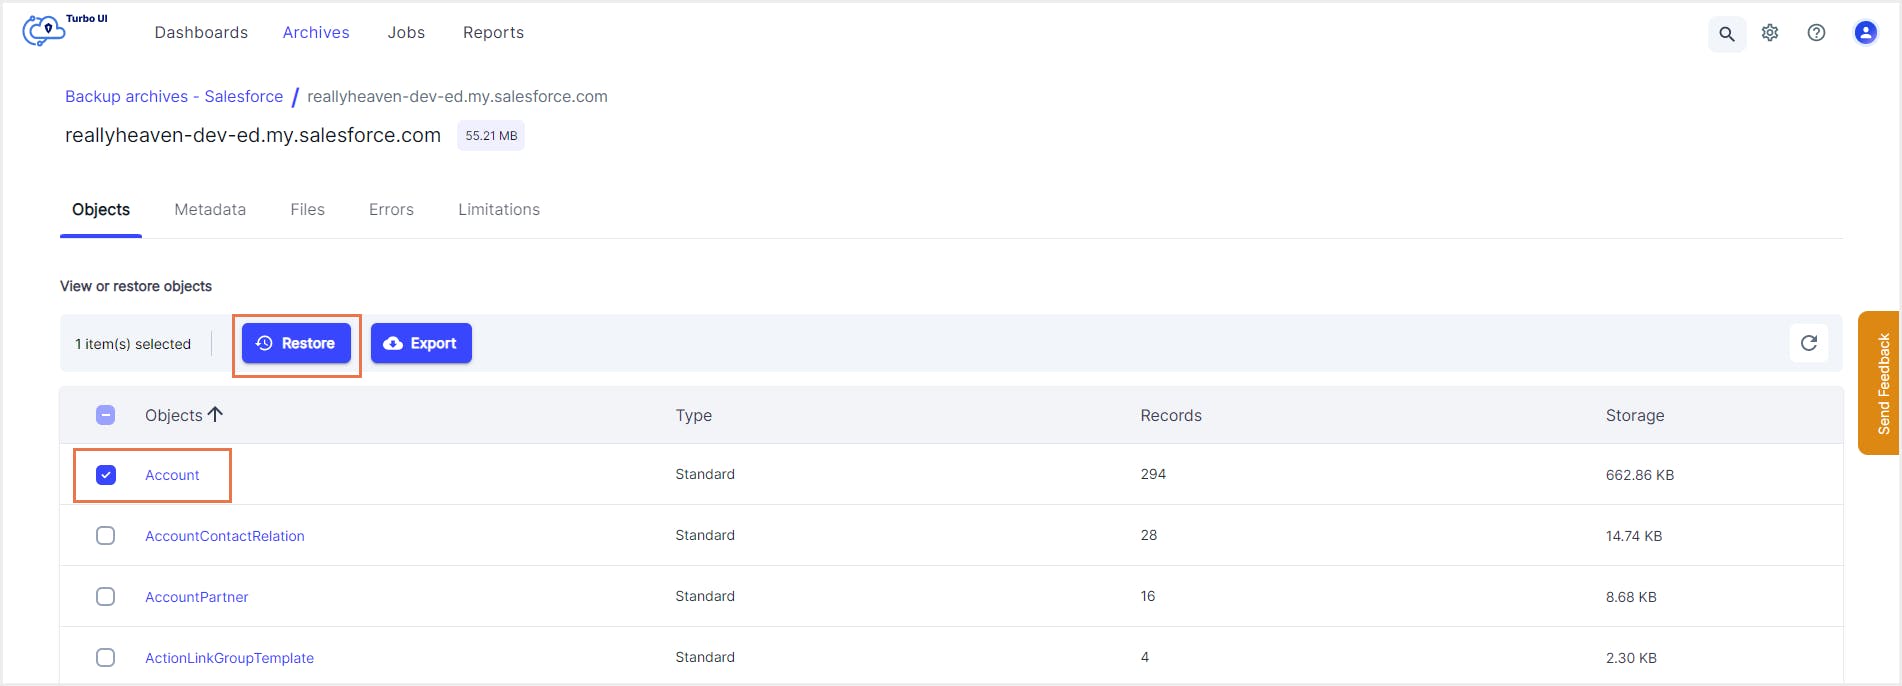
5.3. How to restore deleted objects in Salesforce using SysCloud
Step 1: Log in to SysCloud using your admin credentials.
Step 2: Click Archives and select Salesforce from the Backup and Restore drop down.
Step 3: Click on the organization you want to restore the record(s) from.
Step 4: Select the object you want to restore by checking the box next to it and click Restore.
Step 5: In the restore pop-up, choose the required backup snapshot. Select the checkbox next to Restore all levels of child records if you want to restore all the child records associated with the record.
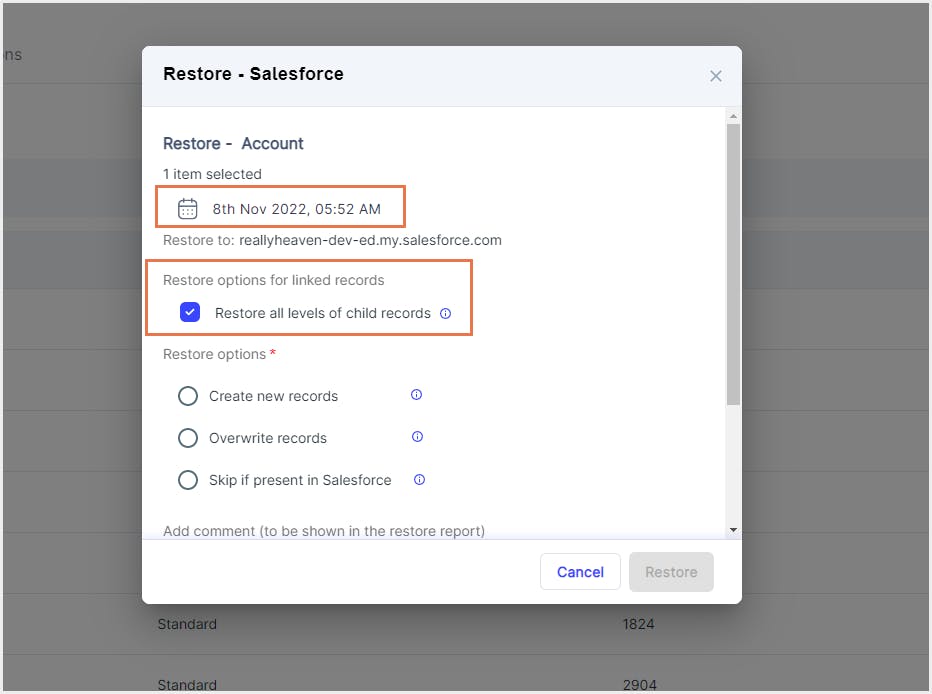
Step 6: Chooseone of the three restore options under “Restore options” depending on how you want the data to be restored.
a. Create new records: SysCloud will create a new record with the data in the backup snapshot irrespective of whether the record already exists in Salesforce or not.
b. Overwrite records: SysCloud will replace the existing record with the data in the backup snapshot (the record id remains unchanged). If the record has been deleted, it will be recreated with a new id.
c. Skip if present in Salesforce: If the record already exists in Salesforce, the record will not be restored even if the data in the backup snapshot is different from the one in Salesforce. If the record does not exist, a new record will be created.
Step 7: Add comments (if any) to be shown in the restore report and click Restore.
To see the restore progress, navigate to Reports and select Restore report under Salesforce.
Recommended content
13 May 2022
7 min read
16 May 2022
20 min read
16 May 2022
5 min read
16 May 2022
15 min read
Get actionable SaaS administration insights
We don’t spam. Unsubscribe anytime.
In this article
- Restore deleted Salesforce records from the Recycle Bin
- Salesforce data recovery using native data import/export tools
- Recover deleted Salesforce data using native Backup and Restore
- Recover deleted Salesforce data using Salesforce Data Recovery Service
- Salesforce data recovery using third-party cloud backup tools

