Categories
In this article
- Salesforce Data Export Service
- Salesforce Data Loader
- Dataloader.io
- Report Export
- Excel Original Interface
- Limitations
- Salesforce data export using third-party backup solutions
Export Data from Salesforce: A Complete Guide for IT Admins
20 Apr 2023
8 min read
Anju George
Salesforce data export- article at a glance
- Salesforce offers manual and scheduled data exports, but these are infrequent and require active management to ensure completeness.
- The data export process can be time-consuming and may not cover all data, leaving gaps in protection and increasing the risk of data loss.
Read more
Salesforce is the world’s leading enterprise software company that provides Customer Relationship Management (CRM) services to over 150,000 businesses globally. Given the large amount of data that is stored in Salesforce, it is the responsibility of IT administrators to ensure that data is stored securely in the cloud so that business data is always available. Even though Salesforce is a secure platform, data loss due to human error is inevitable. Here is an extract from Salesforce documentation highlighting the importance of backing up your Salesforce data.
Even with the best of intentions, users and administrators have been in situations where they have either deleted large amounts of data or have modified records, only to later realize that a mistake was made. With tools like the data loader, it is very easy to mass delete or update records and a simple mistake in your source file or field mapping could spell disaster for your data. It is recommended that you keep a regular backup of your data and to do a manual point-in-time backup before you proceed with any major data project within your org.
While Salesforce recommends using third-party cloud backup solutions, more than 30% of businesses still rely on Salesforce Data Export Service or similar tools to back up their Salesforce data. This article explores the various options available to export Salesforce data, and its limitations as a backup solution.

*All the steps and screenshots used in the article are corresponding to Salesforce Lightning experience. (Since its launch in 2015, Salesforce has been actively promoting Lightning experience over Salesforce Classic, encouraging all Classic users to switch to Lightning)
1. Export data from Salesforce using Salesforce Data Export Service
1.1. Required editions and user permissions
Available in both Salesforce Classic (not available in all orgs) and Lightning Experience
User permissions needed:
Note: Users with the “Weekly Data Export” permission can view all exported data and all custom objects and fields in the Export Service page. This permission is granted by default only to the System Administrator profile because it enables wide visibility.
1.2. How to export data from Salesforce using Salesforce Data Export Service
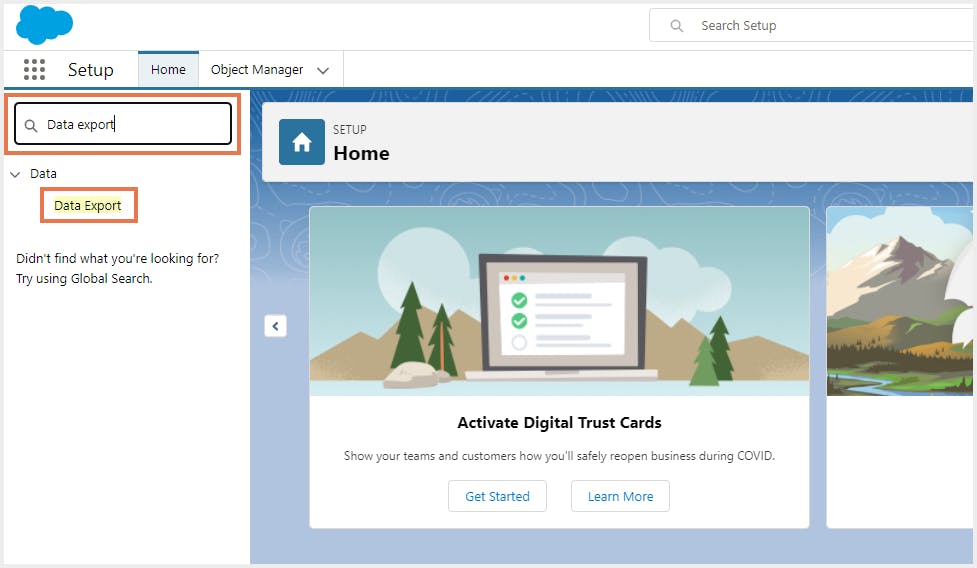
Step 1: Go to Setup, enter “Data Export” in the Quick Find box, and select Data Export.
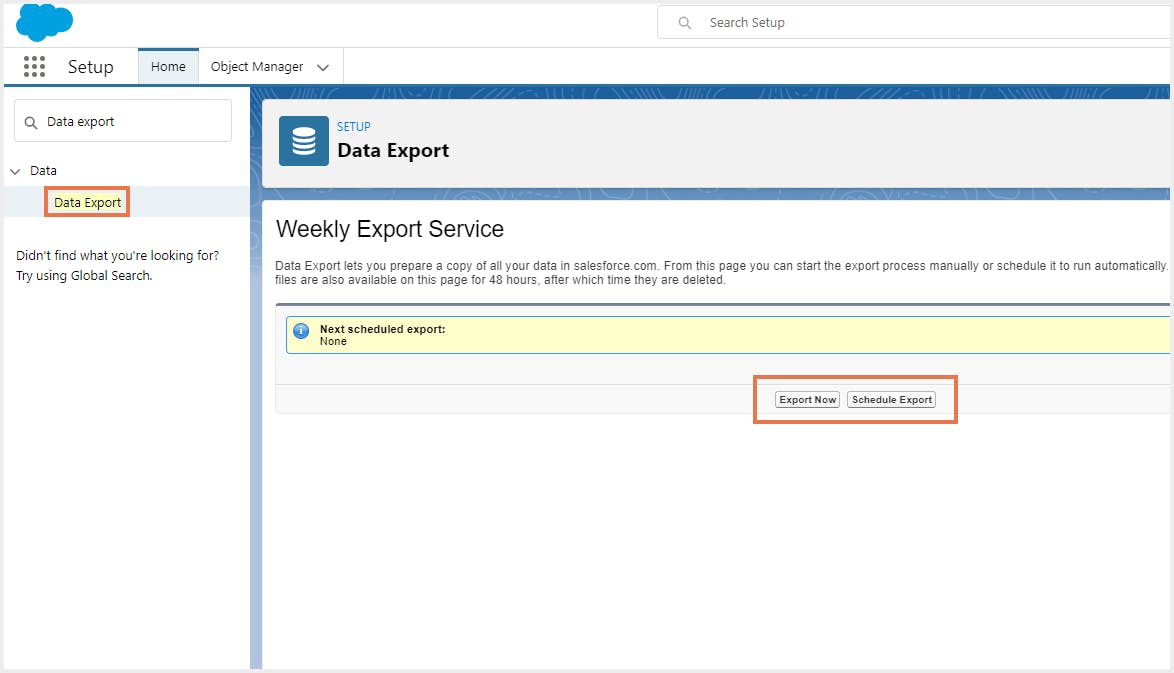
Step 2: Click Export Now or Schedule Export.
The Export Now option prepares your files for export immediately. This option is only available if enough time has passed since your last export.
The Schedule Export option allows you to schedule the export process weekly or monthly.
Step 3: Choose the preferred export settings and click Start Export (if you chose Export Now in Step 2) or Save (if you chose Schedule Export in Step 2).
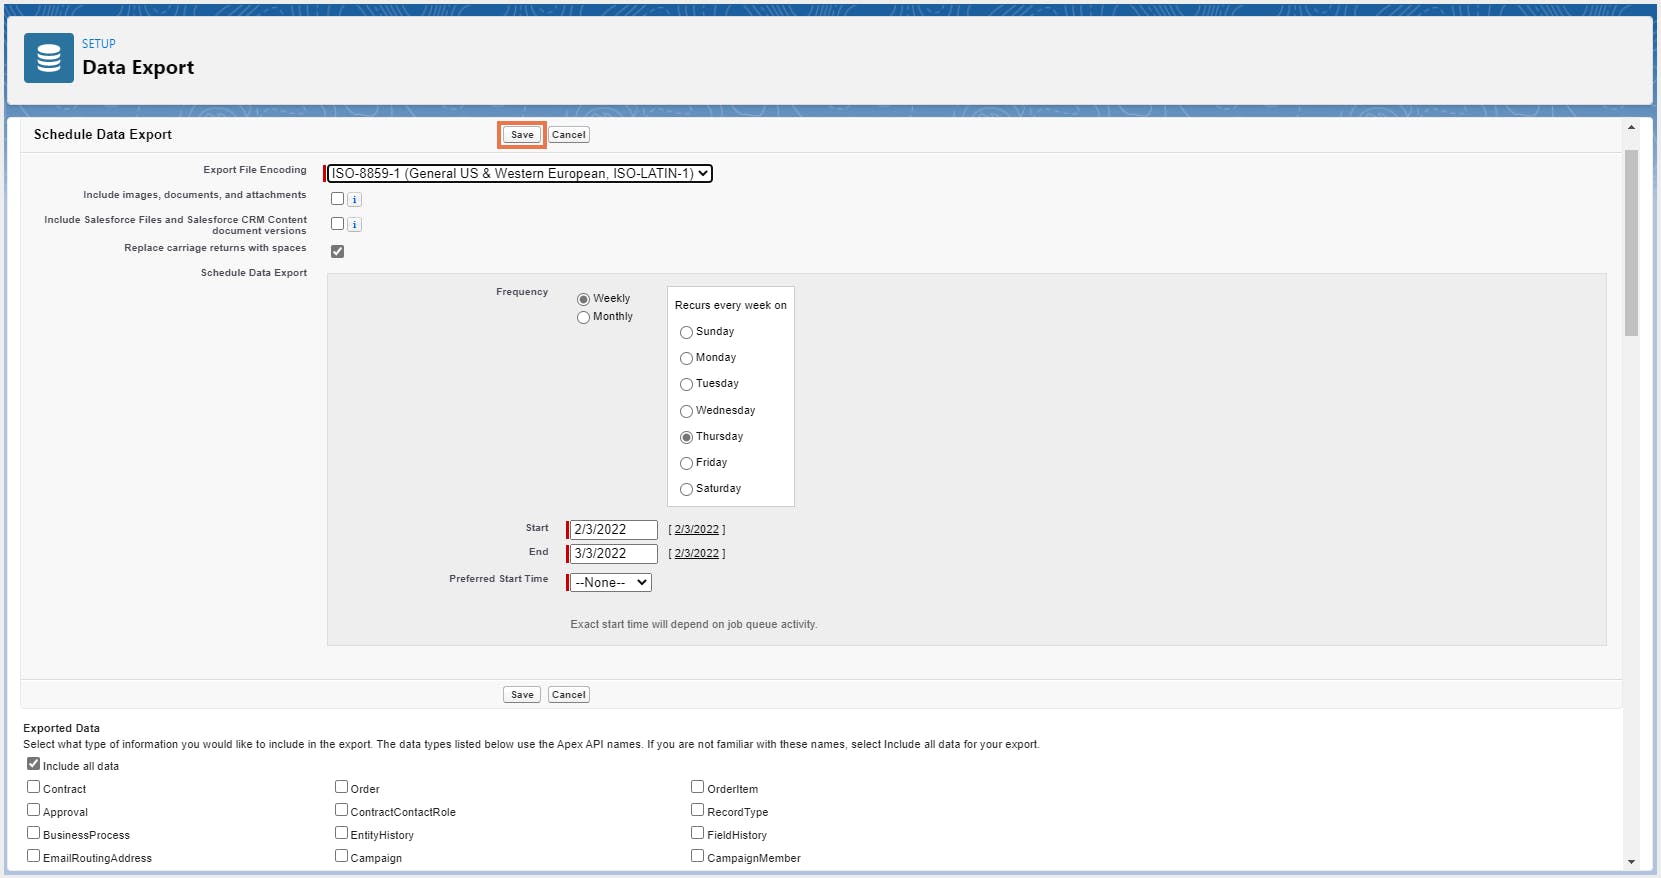
Note:
- Including special content in the export increases data export processing time.
If you want to have spaces instead of carriage returns or line breaks in your export files, select Replace carriage returns with spaces. This selection is useful if you plan to use your export files for importing or other integrations.
When you have to select the types of data to include in your export under the option Exported Data, keep the following in mind:
-The Include all data option selects all objects for export at the time the checkbox is selected. For a recurring scheduled export, be sure to reselect the Include all data option to include newly created objects. (Source: https://help.salesforce.com/s/articleView?id=sf.admin_exportdata.htm&type=5)
1.3. Pros of exporting data using Salesforce Data Export Service
- Available out of the box; no need to install any third-party app since it is a native Salesforce tool
- Relatively quick and easy to use for small Salesforce environments
1.4. Cons of exporting data using Salesforce Data Export Service
- Tedious and time-consuming since export has to be set up manually. Every time you update your Salesforce records, you will have to repeat the export process.
- There is no option to select specific records to be exported. All the records of a particular object will be exported, thus increasing the size of the export.
- There is no option to select specific fields to be exported. All the fields of a selected object will be exported.
- The exported files will only be available for 48 hours after the email has been sent and will be deleted afterwards.
Heavy Salesforce traffic can delay export delivery. Sometimes, your first request will still be in the queue when your next request is made, as specified in the Salesforce Help page.
- The Weekly Export can only run once a week, not daily or hourly. This means you will lose up to seven days' worth of data- that was changed or deleted in between backups.
Check out our comprehensive guide comparing all the Salesforce backup vendors in 2023.

2. Export data from Salesforce using Salesforce Data Loader
Data loader is a client application developed by Salesforce that needs to be installed separately. The application allows you to perform mass data operations like import, export, update, or delete in Salesforce. It can be operated either through the user interface or by generating the command line. The latter option is useful if you want to automate the data export process or integrate to another system through API. Learn more about Data Loader.
2.1. Required editions and user permissions
Available in both Salesforce Classic (not available in all orgs) and Lightning Experience
User permissions needed:
2.2. How to export data from Salesforce using Salesforce Data Loader
Step 2: Open the Data Loader. Click Export. If you also want to export archived activity records and soft-deleted records, click Export All instead.
Step 3: Enter your Salesforce username and password, and click Log in. When you are logged in, click Next.
Note: If your organization restricts IP addresses, logins from untrusted IPs are blocked until they are activated. Salesforce automatically sends you an activation email that you can use to log in. The email contains a security token that you need to add to the end of your password. For example, if your password is "example” and your security token is “1234567890”, you must enter example1234567890 to log in.
Step 4: Choose the object to be exported. If your object name is not listed, select Show all objects to see all the objects that you can access. The objects are listed by localized label name, with the developer name in parentheses.
Step 5: Choose the CSV file to which the data needs to be exported. Click Next.
Step 6: From the list of fields of the given object, choose the ones that need to be exported. You also have the option to add conditions to filter the records. If you do not select any conditions, all the data to which you have read access will be exported. An SOQL query will be auto generated based on your selections. Click Finish. Select Yes to confirm the export process.
Step 7: To view the CSV file, click View Extraction. To open the CSV file in associated external program such as Microsoft Excel, click the button Open in external program.
Note: Data Loader does not support exporting attachments. Alternately, one can use the weekly export feature in the online application to export attachments.
2.3. Pros of exporting data using Salesforce Data Loader
- Provides support for large files with up to 5 million records compared to Data Export Service which allows only up to 50,000 records.
- The user interface is easy to navigate and understand. It automatically translates the query into SOQL as you select your preferred object fields to build your query.
- In addition to the easy-to-use UI, Data Loader also provides an alternate command-line interface for automated batch operations (Windows only).
- Provides support for all objects, including custom objects.
- Provides detailed success and error log files in CSV format.
- Integrates easily with the Salesforce platform and can be used by multiple team members.
2.4. Cons of exporting data using Salesforce Data Loader
- Needs to be installed separately on your system.
- Does not support exporting attachments.
- Data Loader can only produce output in CSV formats.
- It takes multiple steps to complete the migration, taking a lot of time.
- There is difficulty in creating object relationships automatically.
2.5. Salesforce Data Export Wizard vs Data Loader
| Data Export Wizard | Data Loader |
|---|---|
For simpler/smaller exports of data | For complex/larger exports of data |
Can load up to 50,000 records | Can load up to 5 million records |
Supports all custom objects and only a few standard objects | Supports all custom and standard objects |
Supports scheduled export | Does not support scheduled export |
Delete operation is not available | Delete operation is available |
Does not require installation | Requires installation |
No option to select specific fields to be exported | Option to select the fields that need to be exported |
Only lets you export all the records for a specific object | Set conditions to filter the records that are exported |
3. Export data from Salesforce using Dataloader.io
Dataloader.io is a 100% cloud-based solution to import, export, update, and delete data in Salesforce. Originally developed by MuleSoft, dataloader.io has been brought into Salesforce family through Salesforce’s acquisition of MuleSoft. It can be accessed through your browser and has all the features available in Salesforce Data Loader, with some additional functionality such as the ability to schedule tasks, pull/push information from/into remote directories like FTP, Dropbox, and Box, and automatically find parent records based on text, not an ID.
3.1 Required editions and user permissions
3.2. How to export data from Salesforce using dataloader.io
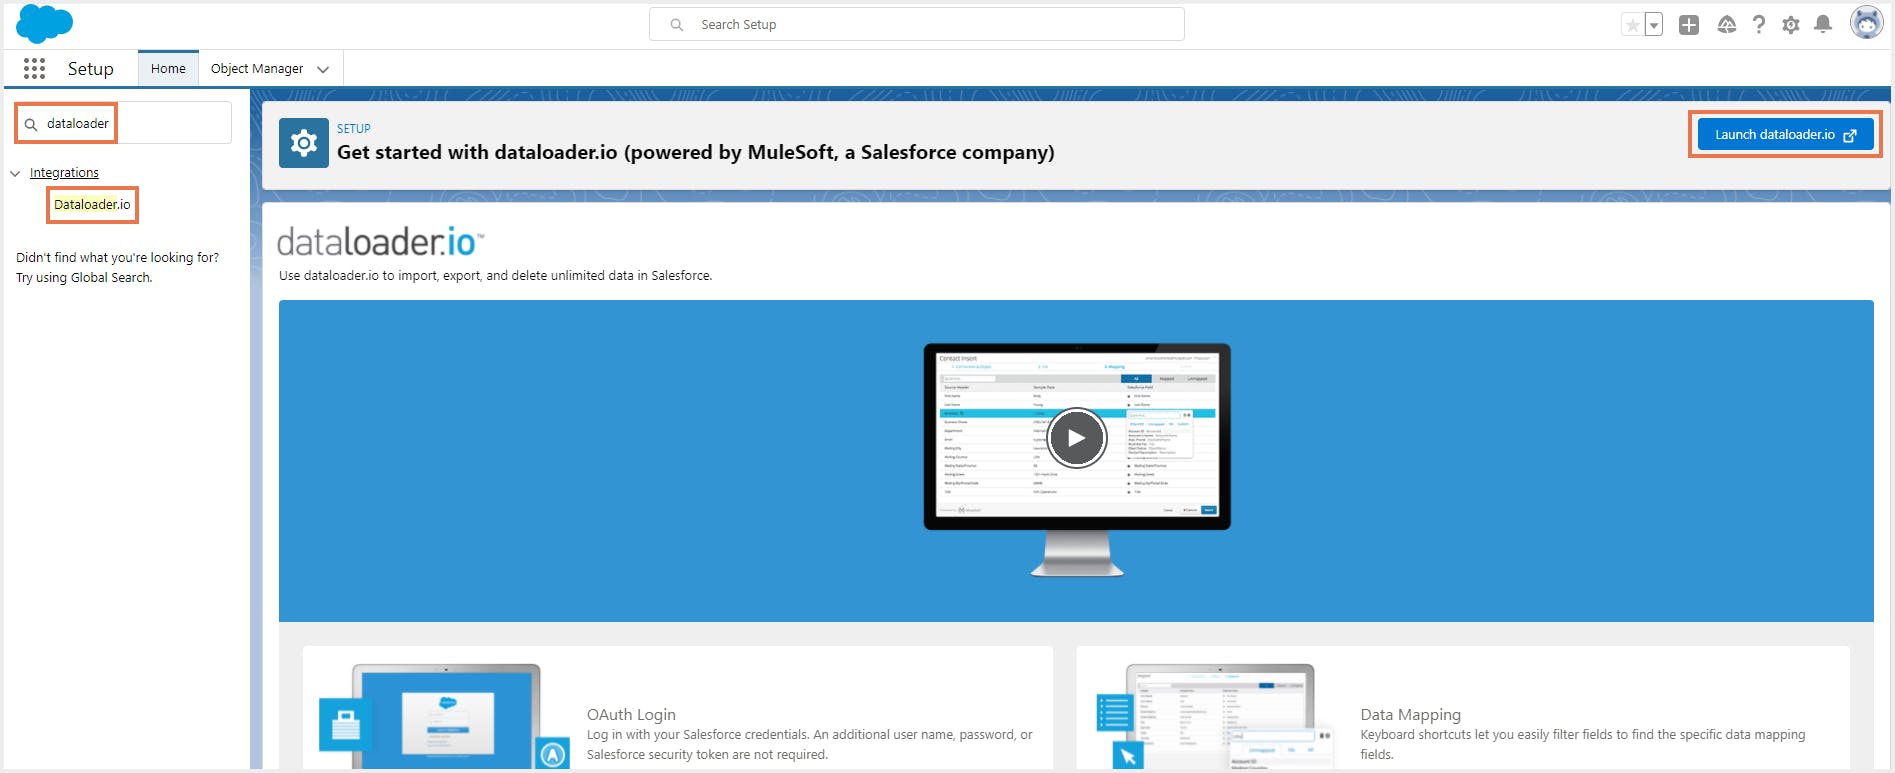
Step 1: From Setup, enter Dataloader.io in the Quick Find box, then select Dataloader.io.
Step 2: Click Launch dataloader.io.
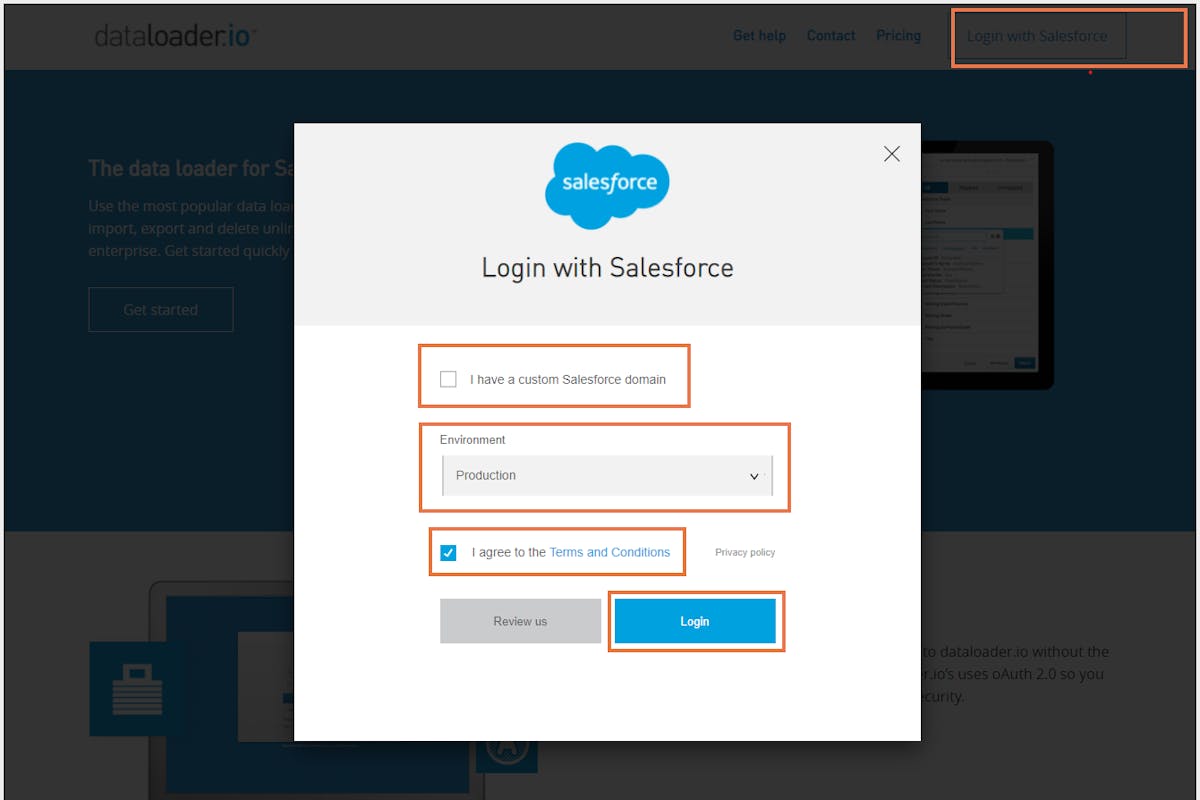
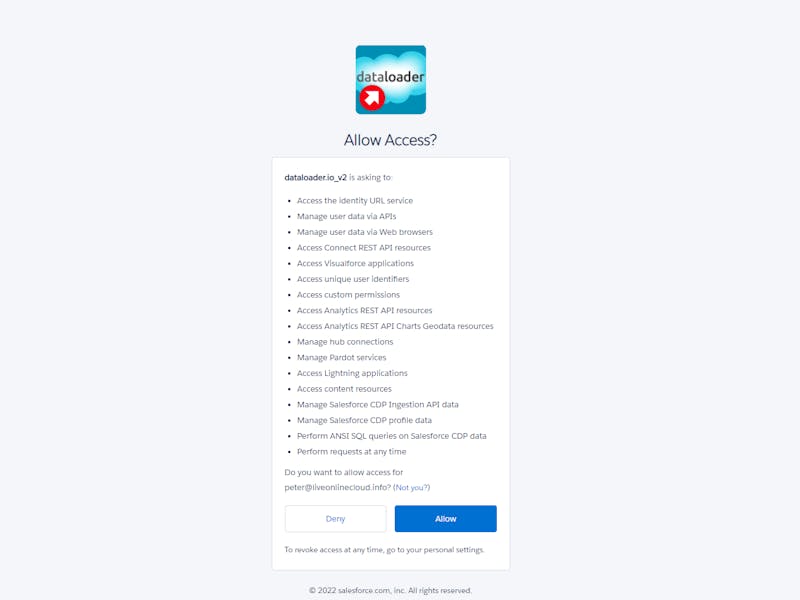
Step 3: Click Login with Salesforce. Uncheck the option I have a custom Salesforce domain and choose Production as the Environment. Check the option I agree to the Terms and Conditions and click Login. Click Allow.
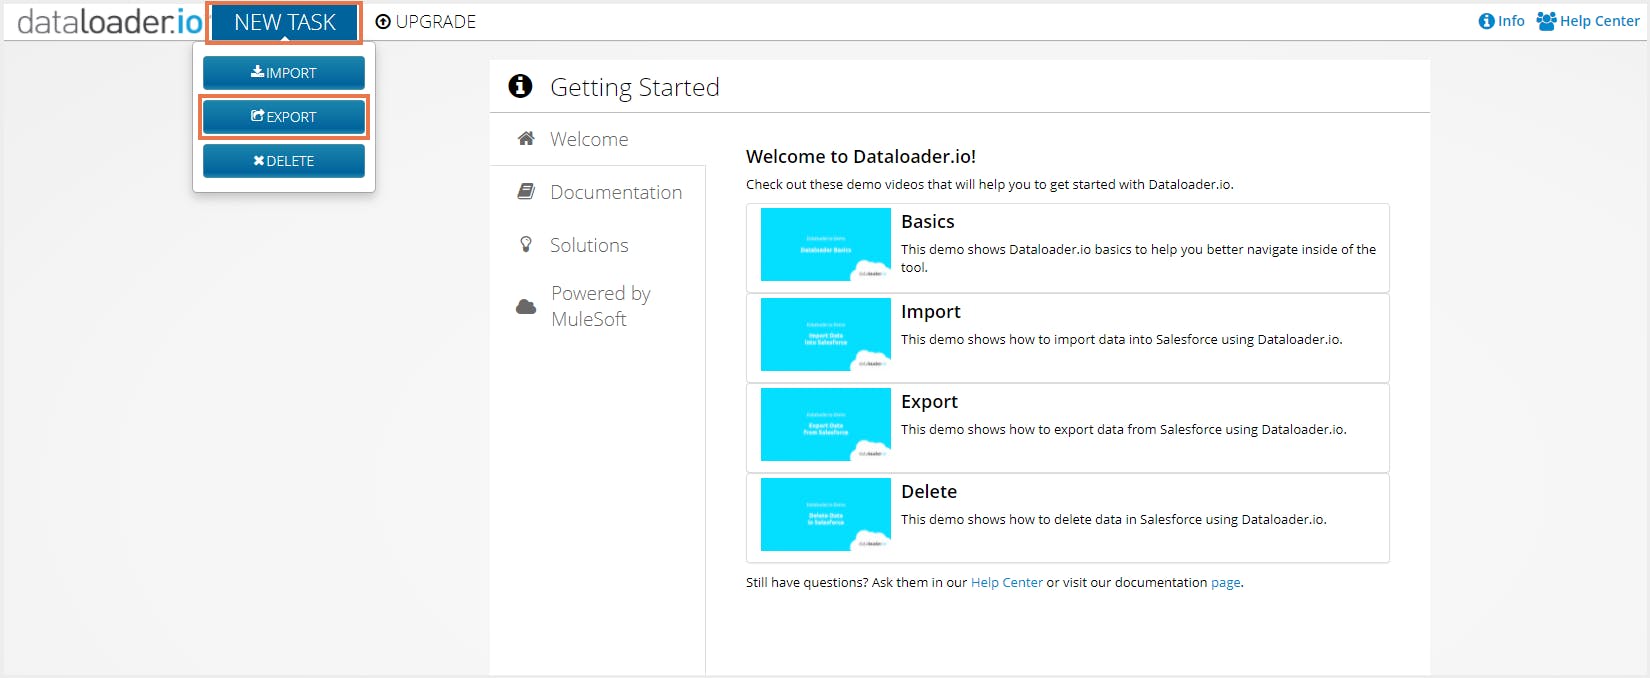
Step 4: In the dataloader.io application, click NEW TASK-> EXPORT.
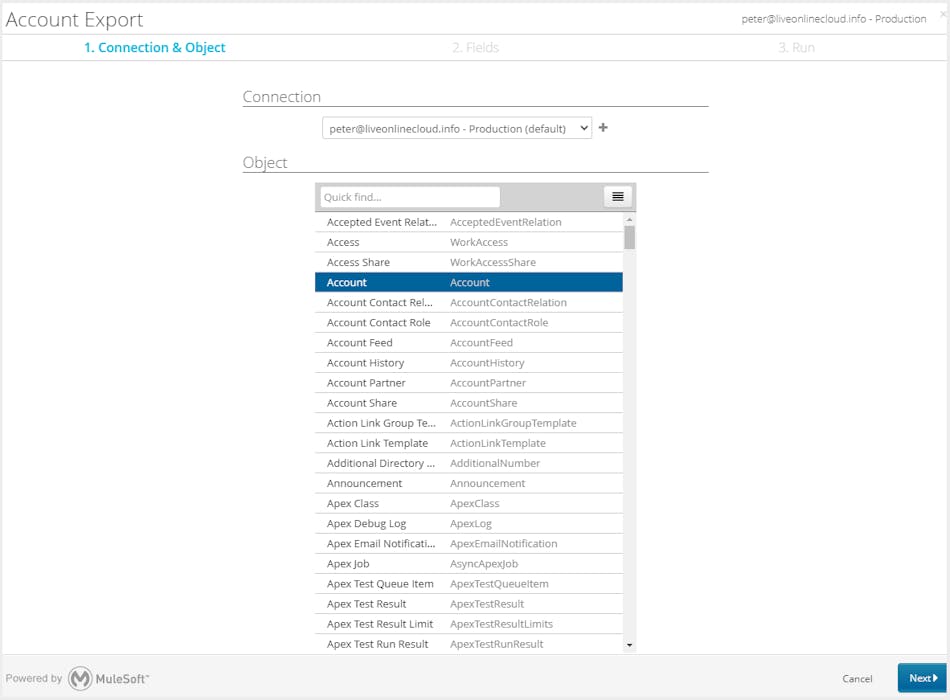
Step 5: Leave the Connection selection as it is and select the object that needs to be exported from the Objects list. For example, select Account. Click Next.
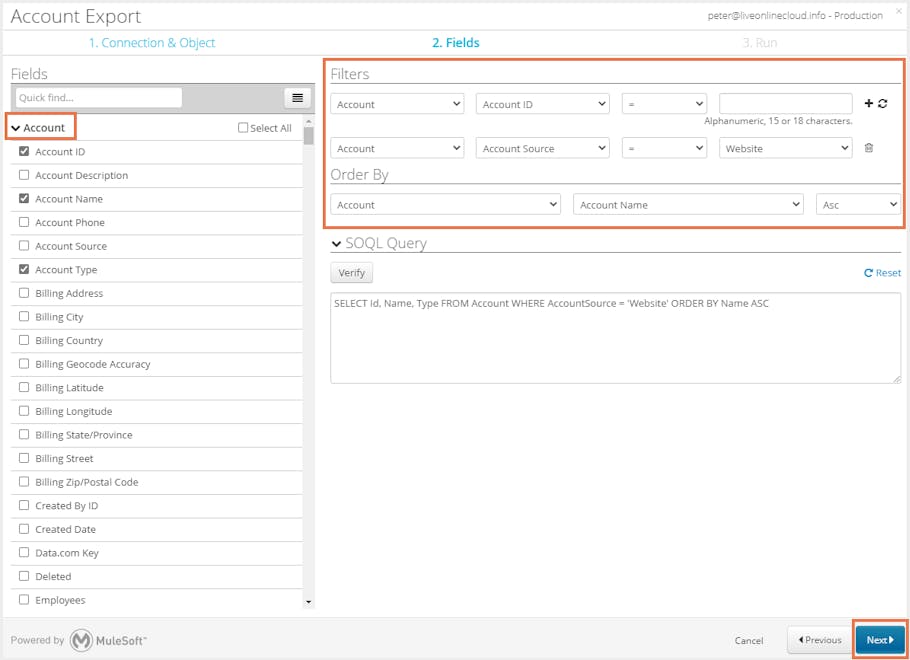
Step 6: Select the fields that need to be exported. You can select the fields you want from the selected object and its related objects too. You can also filter the records to be exported by selecting the required conditions. You can also specify the order in which the records will be listed. An SOQL query will be auto generated based on your selections. Alternately, you can add a custom SOQL query to meet specific requirements. Click Next.
Step 7: A summary of the export task will be displayed.
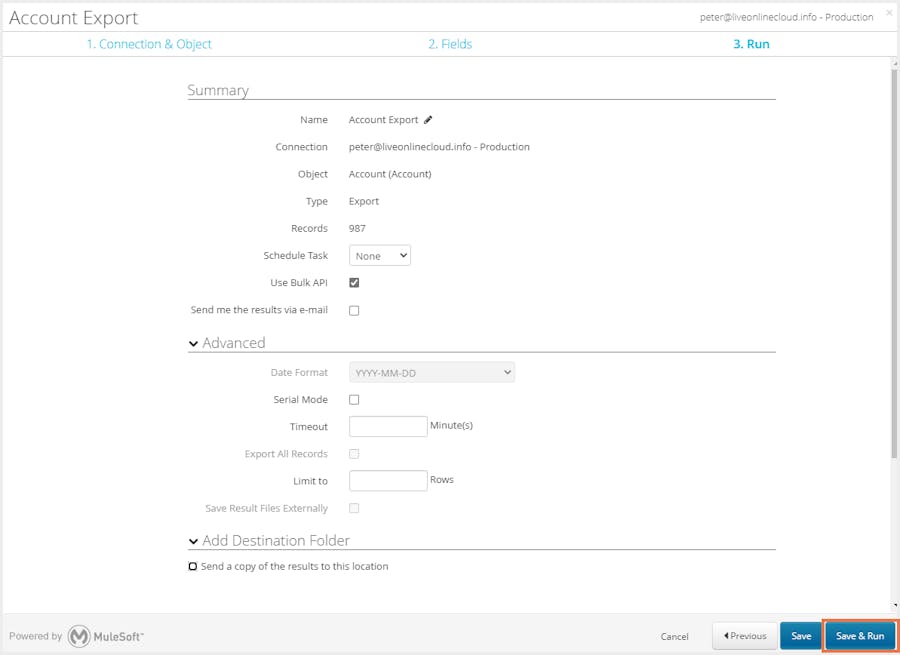
You can choose to schedule the export hourly, daily, weekly, or monthly. Choose None if you want to export the data just once. Check the option Send me the results via email if you want to receive email notifications every time the task runs. Under the Advanced tab, you can specify the data format, timeout, and set the limit to a specific number of records. By default, once an export task runs in the Data Loader, you can obtain its output by either clicking on the latest run displayed in the task manager, or by looking at the task's history; you then download the file through your browser. Alternately, you can select a location under the tab Add Destination Folder to send the exported data to. (Since Data Loader provides direct connectivity to FTP, SFTP, Dropbox, and Box.)
Step 8: After selecting your specific requirements in Step 7, click Save & Run.
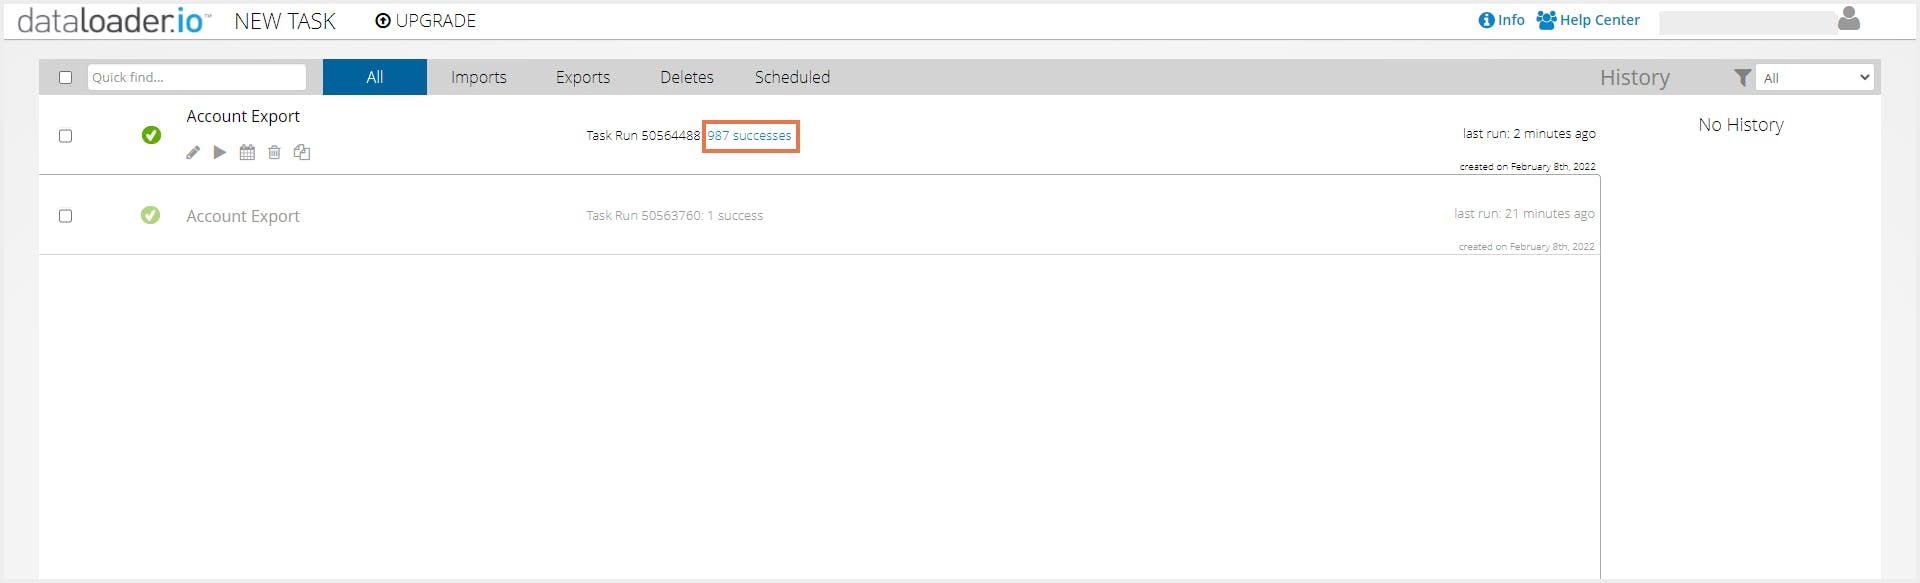
Step 9: Once the task is completed, click on the link next to the Task Run number to download the CSV file containing your export.
3.3 Pros of exporting Salesforce data using Data Loader.io
- Easy-to-use and advanced user interface
- Extract Salesforce attachments in original file format
- Provides cross-object data extract: You can pull data from related objects as long as there is a populated lookup from the object you are extracting, to another object (child or parent)
- Compatible with all custom and standard Salesforce objects
- Keeps a history of tasks performed with success and error files
- No installation required
3.4. Cons of exporting Salesforce data using Data Loader.io
- The free version has a limit of 10,000 records per month; Professional and Enterprise editions are very costly ($99/user/month and $299/user/month respectively)
- Only one task can be scheduled at a time in the free version
- It is a freemium product so you will have to pay for advanced features
- Supports only CSV file format
3.5. Salesforce Data Loader vs Dataloader.io
| Data Loader | Dataloader.io |
|---|---|
Client application developed by Salesforce | 100% cloud-based solution, originally developed by MuleSoft |
Requires installation | Does not require installation |
Does not support exporting attachments | Supports exporting attachments |
Does not support scheduled export | Supports scheduled export |
Can load up to 5 million records in a single export | A limit of 10,000 records per month in the free version |
4. Export Salesforce data using Report Export
4.1. Required editions and user permissions
Available in: Salesforce Classic (not available in all orgs) and Lightning Experience
User permissions needed:
4.2. How to export Salesforce data using Report Export
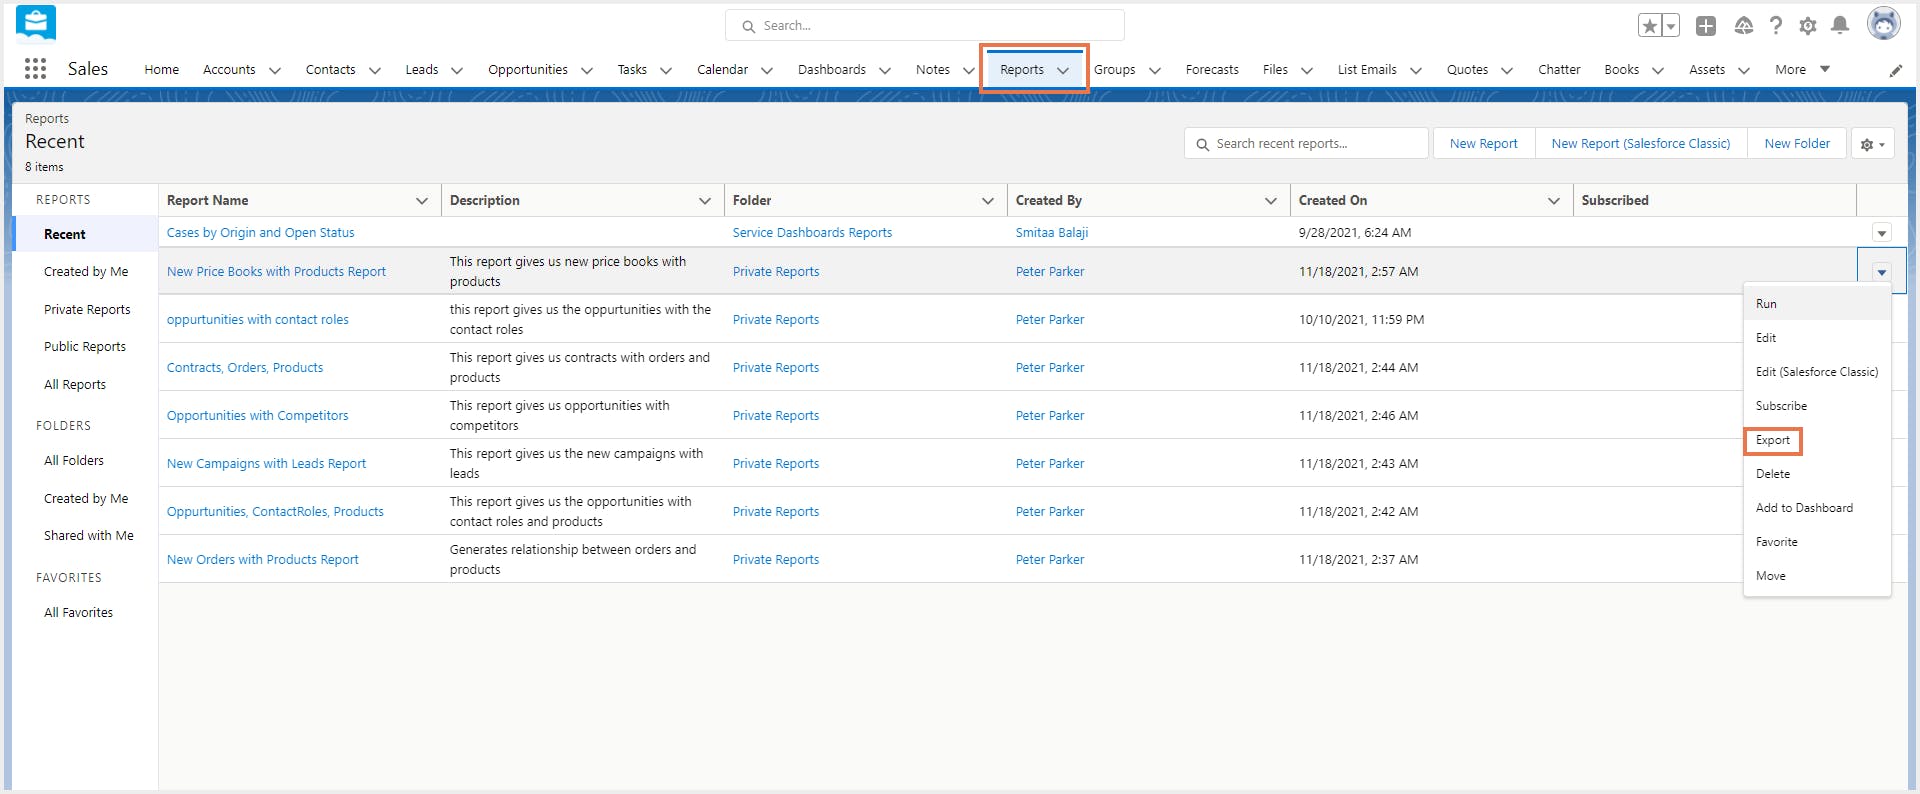
Step 1: Navigate to the Reports tab. Click on the drop-down arrow next to the report you want to export and select Export.
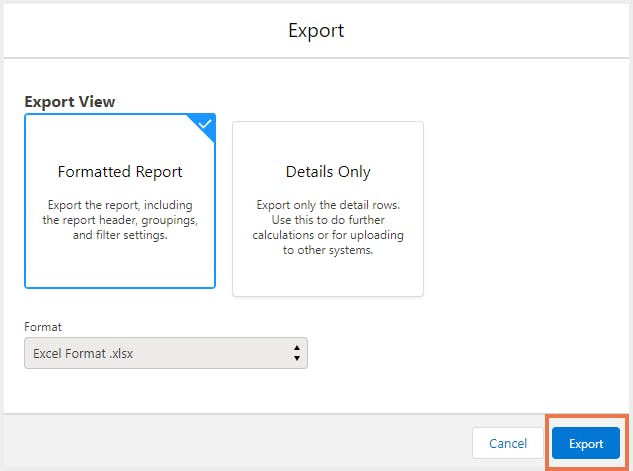
Step 2:Choose an Export View from the two choices: - Formatted Report view exports the report as it appears in Salesforce, with the report header, groupings, and filter details. Since the formatting is retained, you cannot choose an encoding and the only supported file type is .xlsx. - Details Only view exports each detail row without the formatting. Choose this view if you need to do further calculations or upload it to other systems. If you choose Details Only, select the preferred formatting and encoding options.
Step 3: Click Export.
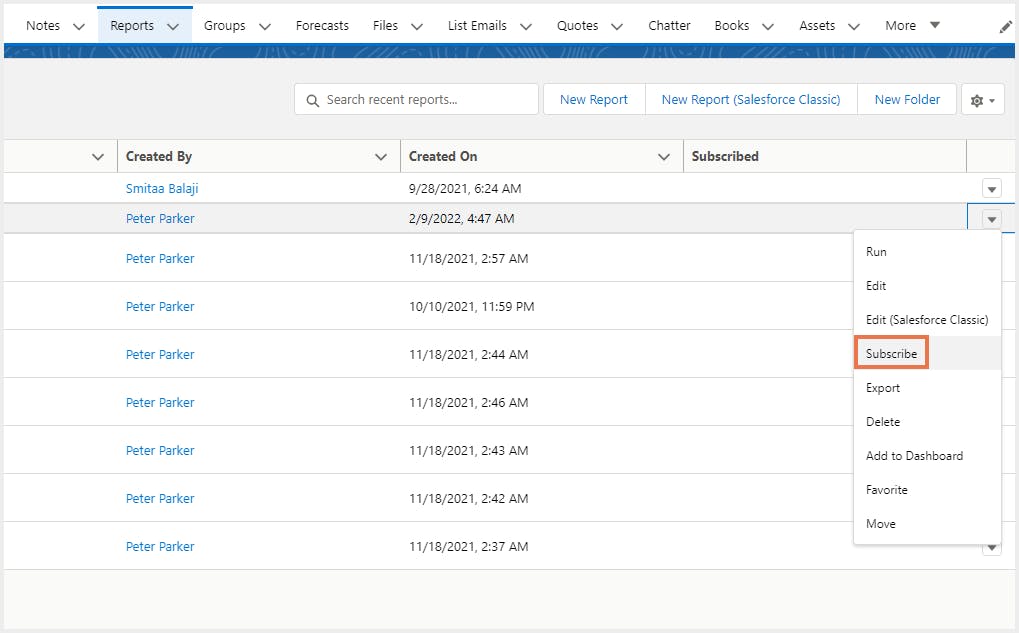
Additionally, if you want to receive the report via email, use the Subscribe option from the drop-down list to subscribe to email notifications. This will send you a report on a daily, weekly, monthly, or condition-based basis with the report details.
4.3. Pros of Salesforce data export using Report Export
- No need to install any third-party app since it is a native Salesforce tool
- Easy to perform as it does not involve too many steps
4.4. Cons of Salesforce data export using Report Export
- Each user can only subscribe to five reports.
When exporting a report in Lightning Experience as Formatted Report or .xlsx Details Only, you can export only up to 100,000 rows and 100 columns.
- If a report takes 10 minutes or more to export, then the report export times out and fails. As a workaround, create a copy of the report, filter both reports so that they each return half the data of the original, and then export each report.
- Each user can export up to 5 reports at once. Formatted report exports from Lightning Experience do not count against this limit.
Historical trending reports cannot be exported.
Joined reports can include a maximum of 2000 rows and are available for export only as a Formatted Report.
5. Export Salesforce data using Excel Original Interface
5.1. How to export data from Salesforce to Excel using Excel Original Interface
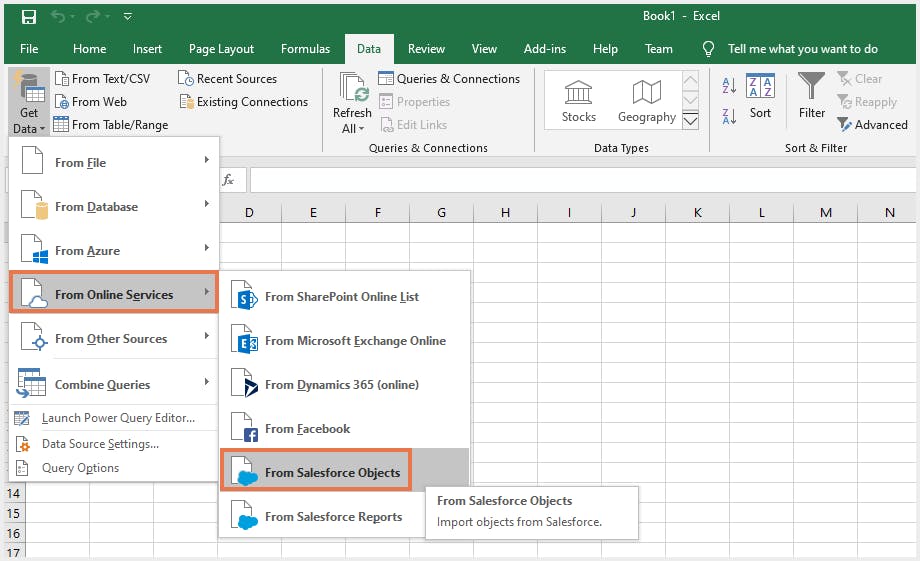
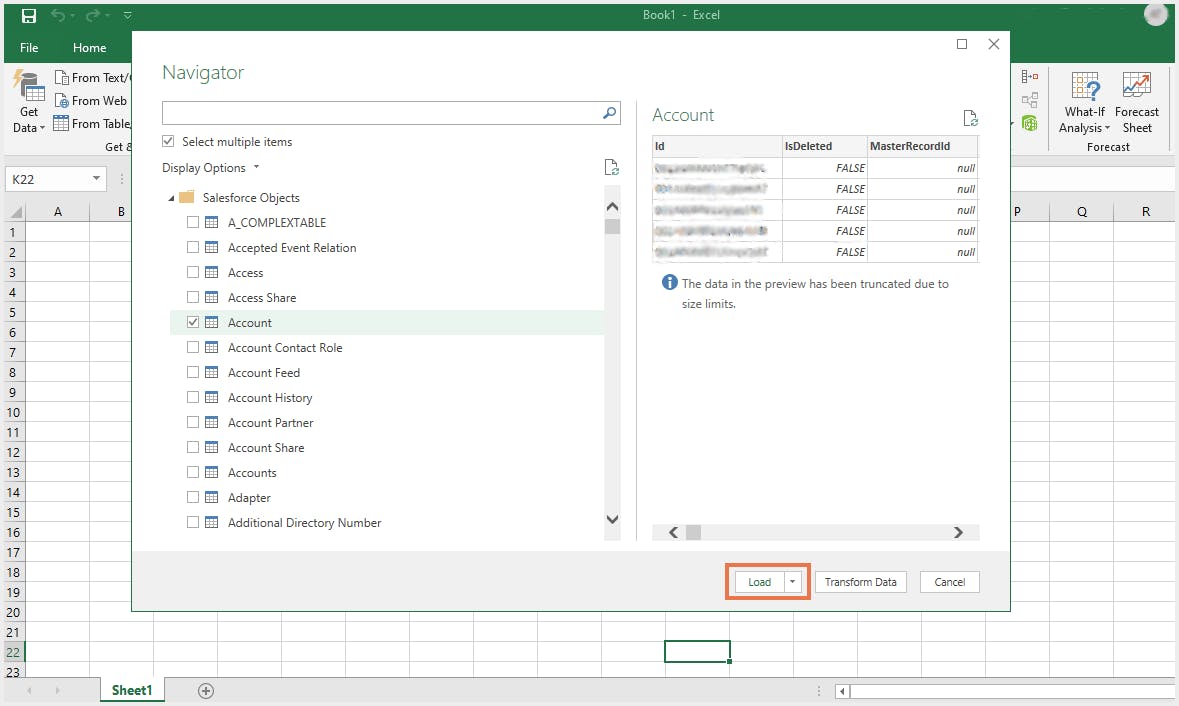
Step 1: To export data, open a blank Excel workbook, click on the Data tab, select Get Data -> From Online Services -> From Salesforce Objects
Step 2: In the new window that opens, select the environment you want to connect to and sign into Salesforce.
Step 3: Once you log in to Salesforce, select the objects you would like to extract to Excel from the Navigator window. If you want to export more than one object, click on the Select multiple items check box. On the right, you can preview a table. Click Load to export the data to Microsoft Excel.
5.2. Pros of Salesforce data export using Excel Original Interface
- All-in-one solution
- Direct data export without using intermediate CSV files
5.3. Cons of Salesforce data export using Excel Original Interface
Expensive ($439.99 per Microsoft Office Professional license)
- Not possible to load the modified data back to the source
6. Limitations of using native Salesforce data export options as a backup solution
- Although you can schedule an export, you do not have control over when it will be executed. The exports can be delayed depending on the Salesforce traffic. This means you might lose data that has been modified or deleted since the last export.
- Native export options do not provide metadata backups which are critical to rebuild custom settings and relationships.
Though native data export options are useful for creating backups of your Salesforce data, they fall short in several ways when it comes to data restoration. Restoration from the exported data requires manual effort, deduplication, and the use of spreadsheets, all of which takes up a lot of time. To perform a manual restore, you must know exactly what data needs to be restored, where it needs to be restored, and in what order, so that object relationships are preserved. Failure to do this can result in incomplete restores or even data corruption.
- With native export options, you cannot easily compare what data has been lost or modified and what has not. It is also difficult to restore records with object relationships intact.
- With native data export options, the expense of storing, protecting, and managing the backup data falls on the business. Administrators will be responsible for all data security and compliance responsibilities, with all its associated risks.
- Backup files are often stored on laptops or PCs and can create potential IT security risks.
7. Export Salesforce data using third-party cloud backup solutions
With third-party cloud backup solutions such as SysCloud, administrators can easily export all Salesforce objects as .csv or .xlsx files, in addition to effortlessly backing up all standard and custom objects, metadata, Apex triggers, and chatter. Admins can easily restore data from any point-in-time backup snapshot and maintain object relationships. SysCloud can also identify ransomware files and compliance issues in the Salesforce data being backed up.

Click here to learn more about SysCloud backup for Salesforce.
Frequently asked questions on Salesforce data export
How do I export data from Salesforce to Excel?
Excel Original Interface is a built-in Salesforce to Excel connector that lets you export data from Salesforce into Excel. Learn how to export Salesforce data to Excel using Excel Original Interface.
Is there a way to export a Salesforce report to Excel?
Yes, you can export Salesforce reports to Excel from the Salesforce UI. You can export report data as a Microsoft Excel (.xlsx or .xls) file or comma-separated values (.csv) file. Learn how to export a Salesforce report to Excel
How do I export a list from Salesforce to CSV?
You can export a list from Salesforce to CSV using the List View Exporter, which enables you to create a list view button for any standard or custom object. This will allow you to export your list view to a CSV file.
Recommended content
Salesforce Data Recovery: How to Restore Deleted Records in Salesforce
Learn how administrators can take Salesforce metadata backup using Package Manager, change sets, sandbox refresh, Ant tool, native backup, and SysCloud.
Read nowAdmin's Guide to Salesforce Metadata Backup
Learn how administrators can take Salesforce metadata backup using Package Manager, change sets, sandbox refresh, Ant tool, native backup, and SysCloud.
Read nowAdmin's Guide to Salesforce Backup
Learn how to back up Salesforce data using Data Export Service, Report Export, Full Copy Sandbox, Data Loader, Salesforce native backup & third-party solutions.
Read nowGet actionable SaaS administration insights
We don’t spam. Unsubscribe anytime.
In this article
- Salesforce Data Export Service
- Salesforce Data Loader
- Dataloader.io
- Report Export
- Excel Original Interface
- Limitations
- Salesforce data export using third-party backup solutions

