Categories
In this article
- Recover a deleted team in Microsoft Teams
- Recover deleted Teams channels
- Recover deleted Teams files
- Recover deleted messages in Microsoft Teams
- Can you recover deleted tabs, bots, or connectors?
- Recover deleted Teams data using SysCloud
Tools
- Microsoft Teams Data Recovery Wizard
How to Recover Deleted Teams Data
12 Jun 2024
8 min read
Anju George
Teams data recovery at a glance
- Deleted chat messages, files, and channels may be unrecoverable if not restored within a certain timeframe.
- Microsoft 365’s native recovery capabilities are often limited and may not cover all scenarios, making it challenging to retrieve lost data.
What is the solution?
- SysCloud provides continuous, automated backups and advanced recovery options, ensuring that all Microsoft Teams data, including deleted messages, files, and entire channels, is securely backed up and can be restored easily whenever needed.
Microsoft Teams is a central hub for workplace conversations, teamwork, video chats, and document sharing. Over the last few years, there has been a dramatic increase in the number of Teams users, rising to over 320 million users in 2024, making Teams the fastest-growing business app in Microsoft’s history. With the rapid growth of Microsoft Teams as the hub for collaboration, there is an increased risk of data loss for various reasons.
Restoring deleted Teams data can be a challenge given the diverse sources of data and data storage locations in Teams. To know how Teams data is stored across different apps in Microsoft 365, read A Guide to Microsoft Teams Data Storage Location.
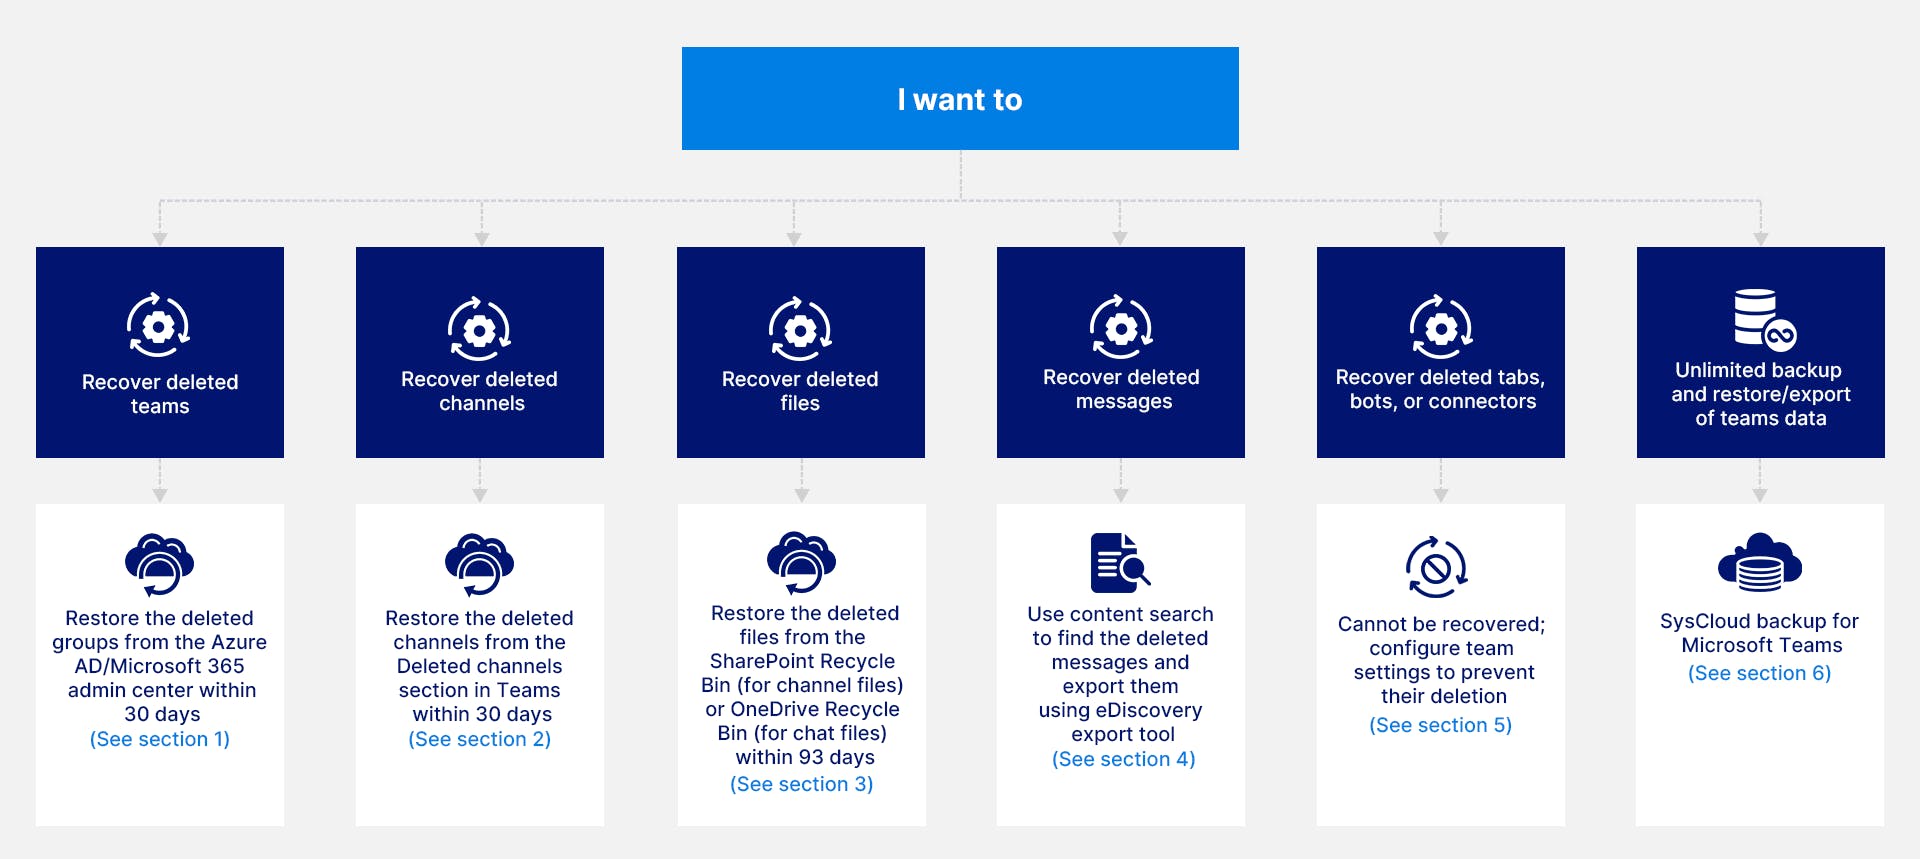
1. How to restore a deleted team in Microsoft Teams
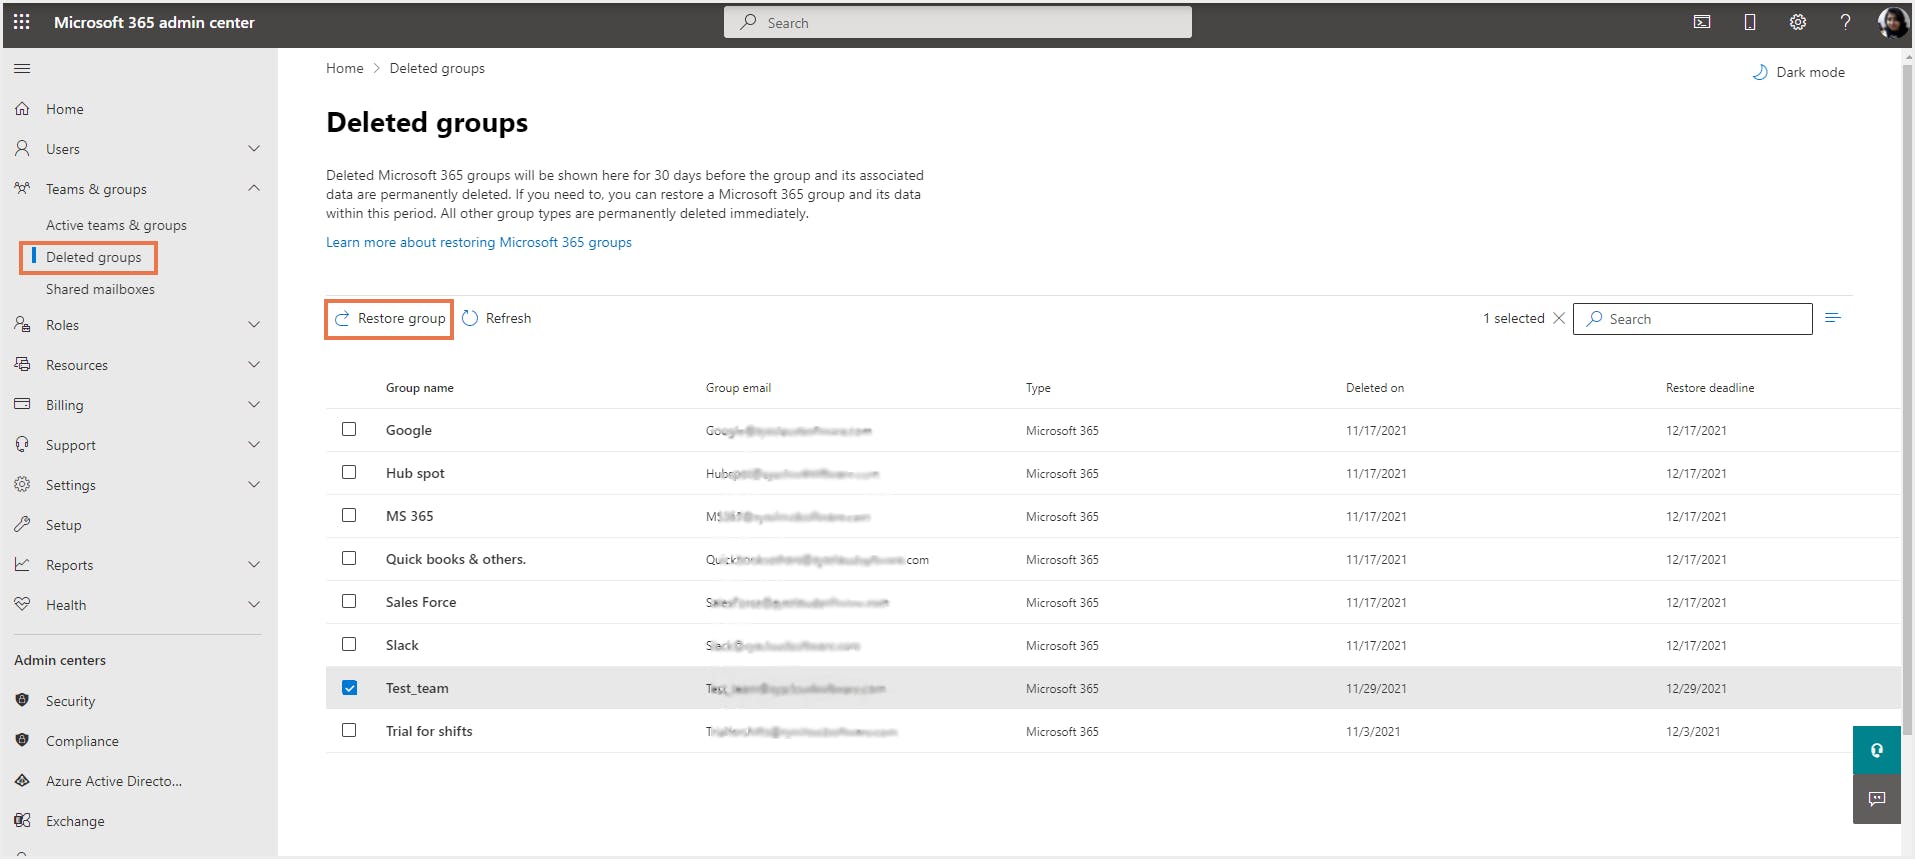
Step 1: In the Microsoft 365 admin center, go to Teams and groups -> Deleted groups.
Step 2: Select the group you want to restore and click Restore group.
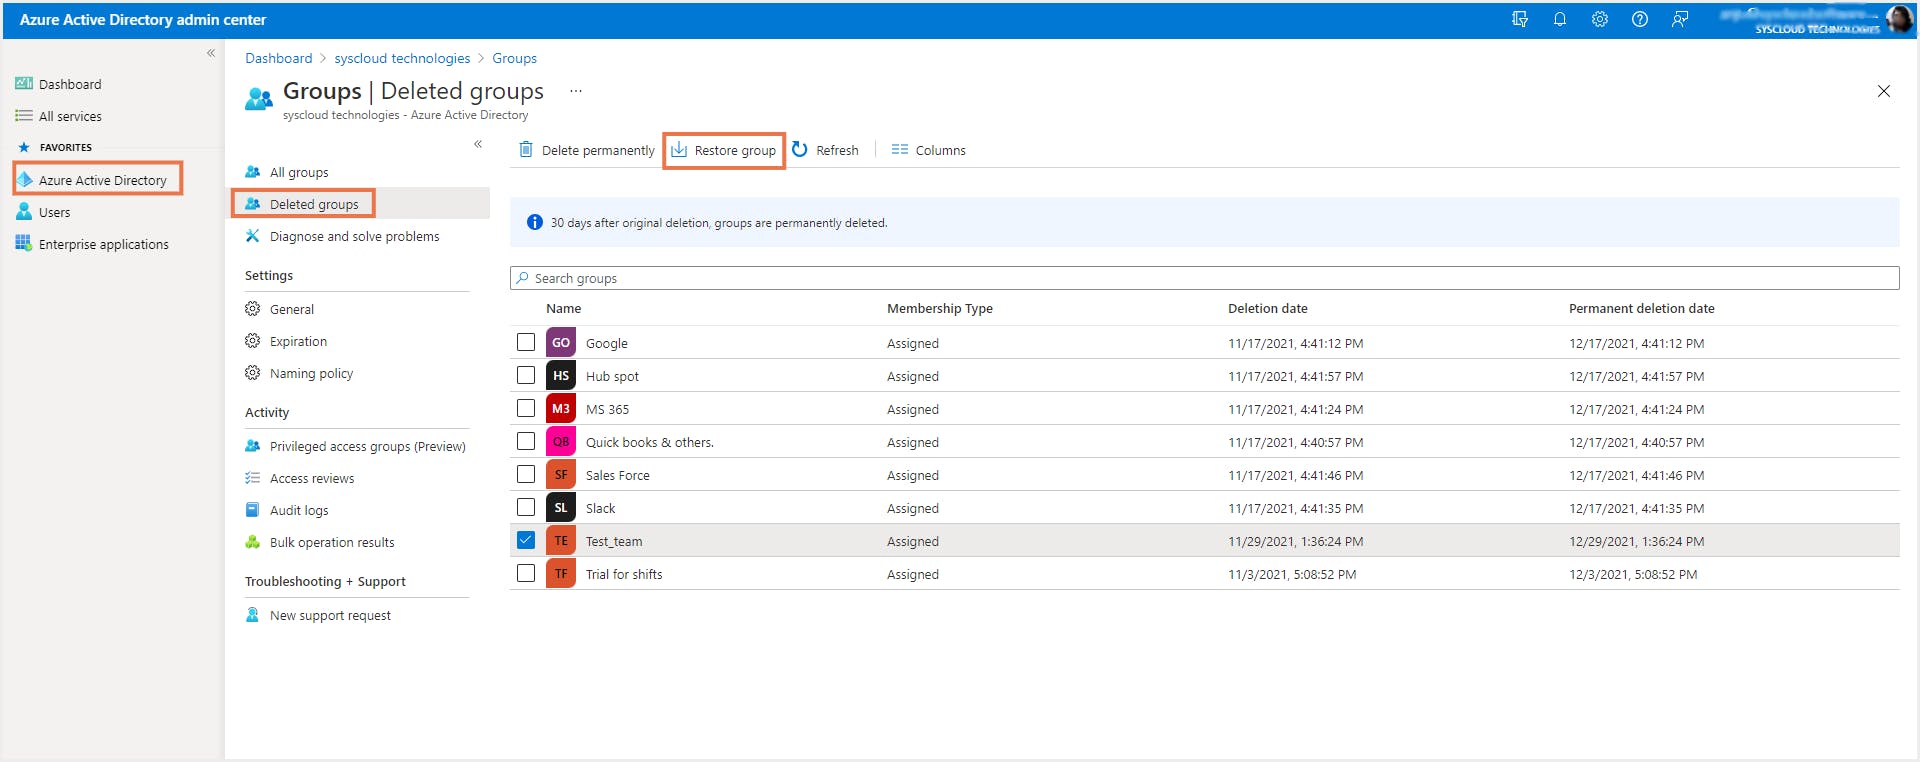
Step 1: In the Azure AD admin center, go to Azure Active Directory -> Groups -> Deleted groups.
Step 2: Select the group you want to restore and click Restore group.
If your team was deleted more than 30 days ago, it is permanently deleted (along with the channels, conversations, files, and the Microsoft 365 group) and cannot be restored, unless you have a third-party cloud backup solution in place. Use SysCloud backup for Microsoft 365 to effortlessly backup and restore Microsoft Teams.
2. How to restore deleted Teams channels
2.1. Restore a standard channel in Teams
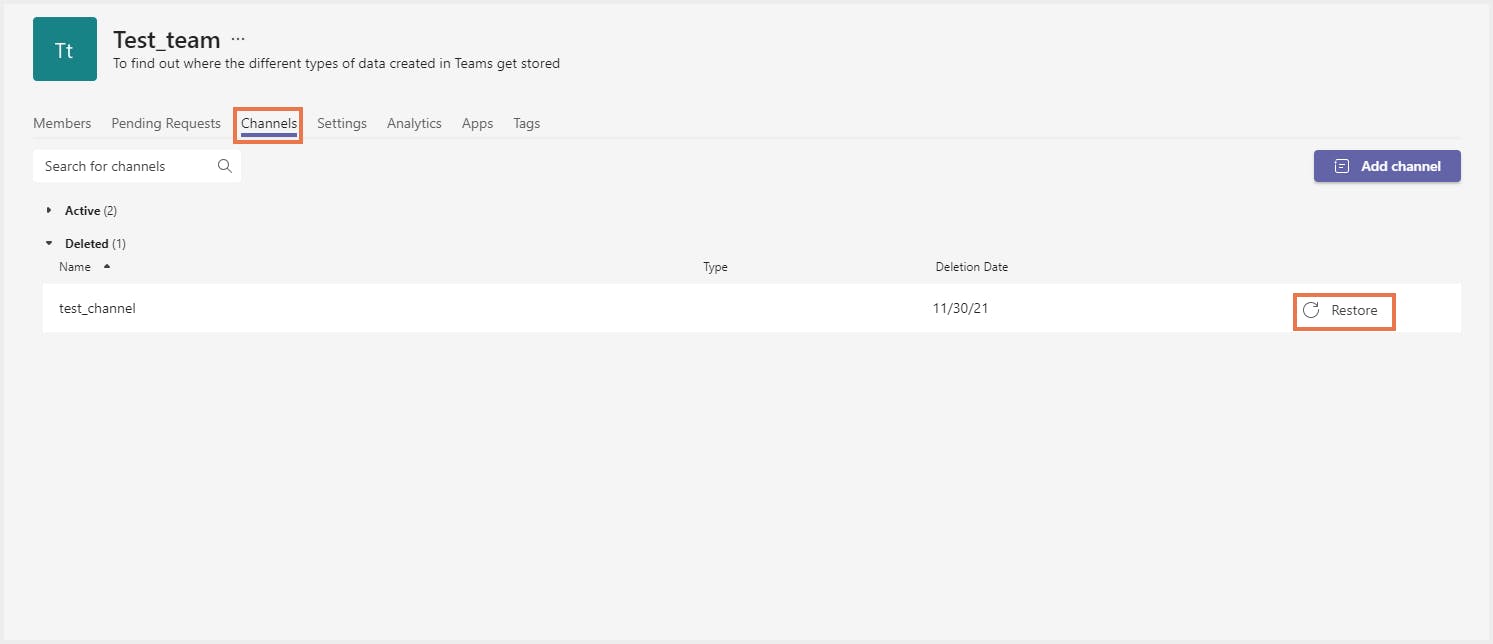
Step 1: In the Teams application, click the three dotted lines next to the team name, then choose Manage team from the drop-down menu.
Step 2: Navigate to the Channels tab, expand the Deleted list, and select Restore on the channel that you’d like to recover. This will restore the channel exactly as it was before the deletion.
If the 30-day limit has been exceeded, then the restore process is not that simple. You’ll have to manually create a new channel, then restore the deleted data to the channel. Since Teams channel messages are stored in a hidden folder in the group mailbox in Exchange Online for compliance reasons (see A Guide to Microsoft Teams Data Storage Location), you will have to perform a content search in the Compliance center to discover the Teams channel data before restoring it. Note that deleted messages can be recovered this way only if a compliance retention policy or legal hold has been enabled for Teams messages.
2.2. Restore a private channel in Teams
To discover all the messages in a private channel using content search, you need to include the mailbox of a user on the private channel. (Since private channel messages are stored in user mailboxes rather than the group mailbox - See data storage location for Teams channels) Since the channel files are also deleted, you need to include the SharePoint site collection connected to the private channel, in your content search.
3. How to recover deleted Teams files
3.1. Files shared in a Teams channel
- The site collection Recycle Bin exceeds its quota and starts purging the oldest items
- The items are manually deleted by the site collection administrator from the site collection Recycle Bin
The data retained by default Microsoft retention is counted towards your Microsoft 365 storage quota, and you will need to purchase additional storage if you exceed the limit. Try SysCloud backup for Microsoft 365 to save on additional storage costs.
To know more about SharePoint data retention, read this article.
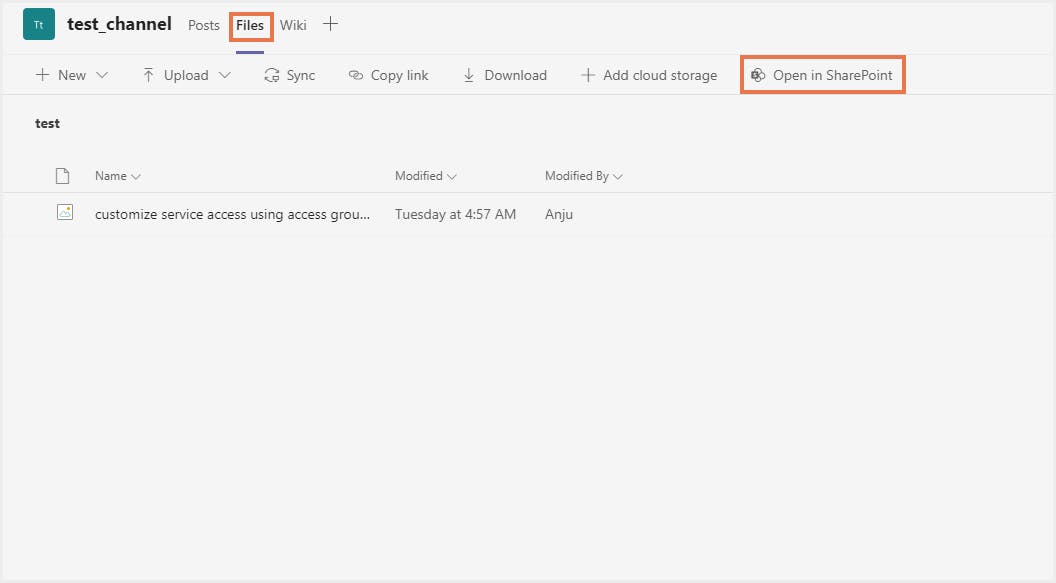
Step 1: From the Files tab in the Teams channel, click Open in SharePoint. This will open the SharePoint document library for that channel.
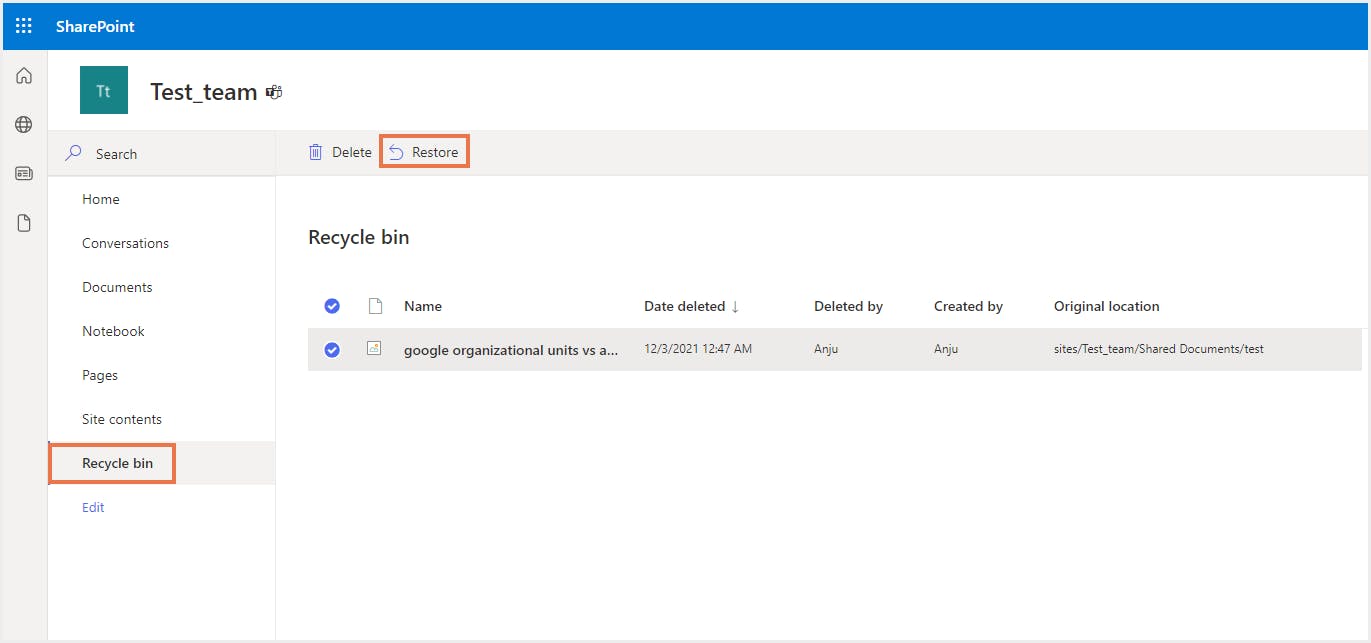
Step 2: Go to Recycle bin, select the files that need to be restored, and click Restore. If you cannot find a specific file in the first-stage Recycle Bin, go to step 3.
Step 3: At the bottom of the first-stage Recycle Bin page, click Second-stage recycle bin.

Step 4: Select the file that needs to be restored and click Restore.
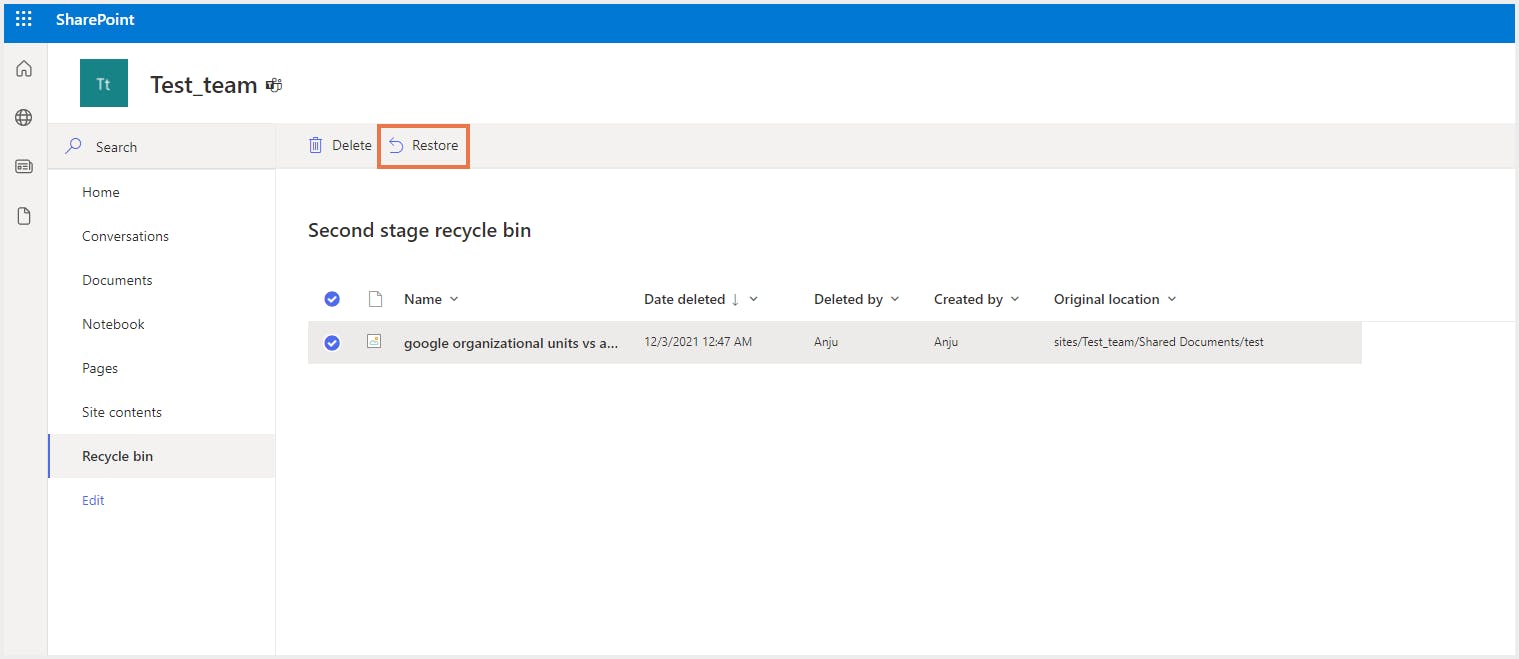
Note: Only administrators can access the second-stage Recycle Bin.
3.2. Files shared in a Teams chat
Files that are shared in a private or group chat are stored in the OneDrive for Business of the user who shared the file(in a folder called Microsoft Teams Chat Files), and are shared only with the people who are part of the conversation. Retention in OneDrive works similar to how it works in SharePoint. The user who shared the file can restore it within 93 days from the date of deletion, by following the below steps:
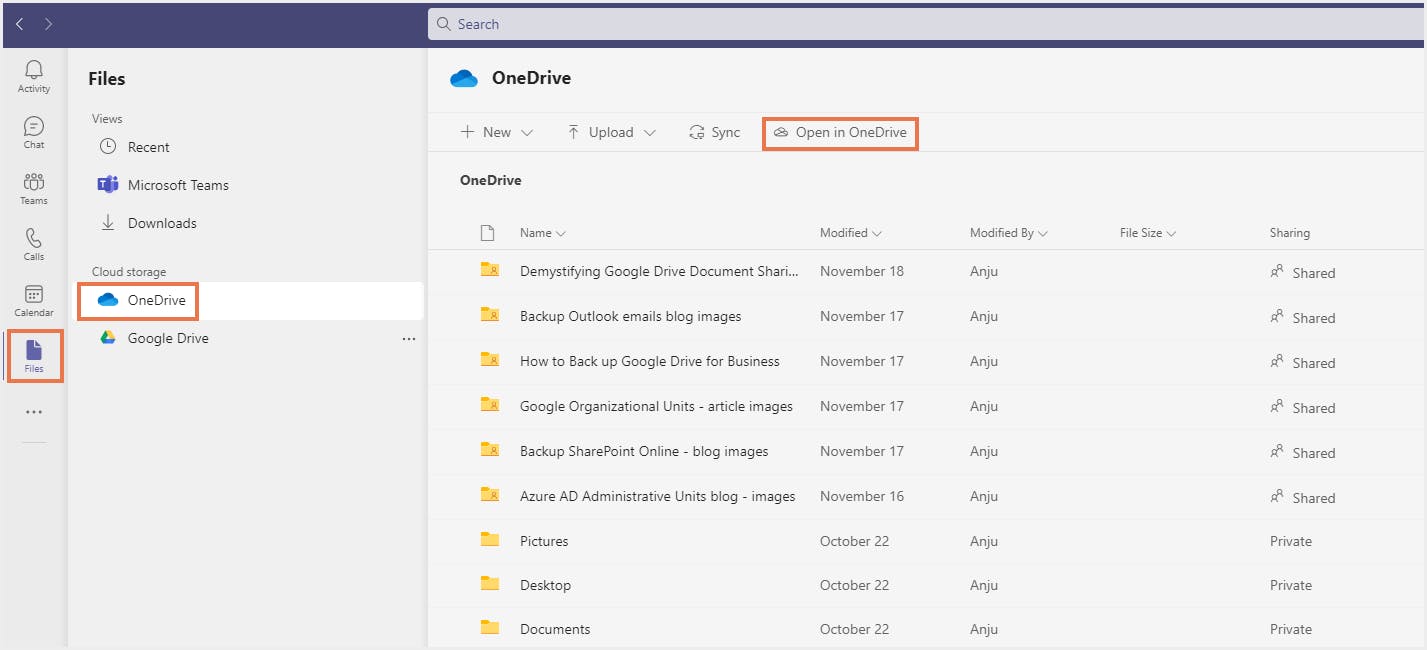
Step 1: Navigate to the Files tab in Teams, select OneDrive, and click Open in OneDrive.
Step 2: In My files, open the folder Microsoft Teams Chat Files.
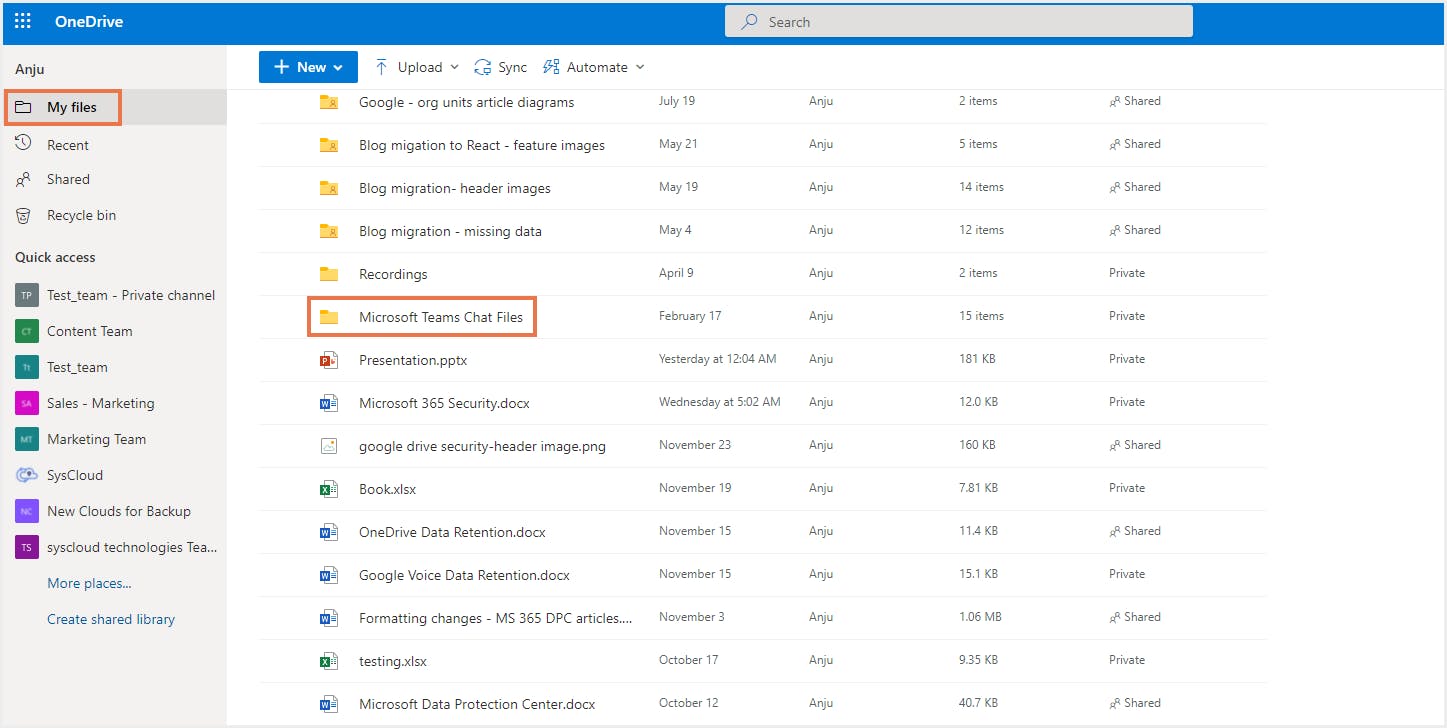
Step 3: Navigate to Recycle bin, select the files to be restored, and click Restore. If you cannot find a file in the first-stage Recycle Bin, click Second-stage recycle bin at the bottom of the page and restore it from there. (Requires admin access)
Beyond the 93-day retention period, deleted chat and channel files are permanently deleted and cannot be recovered, unless a compliance retention policy or legal hold is in place for these files. If compliance has been enabled for Teams files, an administrator can perform an eDiscovery search in the Compliance admin center to discover deleted items. Click here to know how to create a retention policy for Teams files.
Files that are retained by a retention policy or legal hold are stored in the Preservation Hold Library, and data in the Preservation Hold Library counts against your SharePoint storage quota. The total SharePoint storage limit per organization is set at 1TB plus 10GB x number of licensed Microsoft 365 users in your tenant. If you exceed the limit, you will have to purchase additional storage priced at $200/month/TB. To save on storage costs, you can opt for a third-party cloud backup solution, like SysCloud.
4. How to recover deleted messages in Microsoft Teams
4.1. How to run a content search for Teams messages
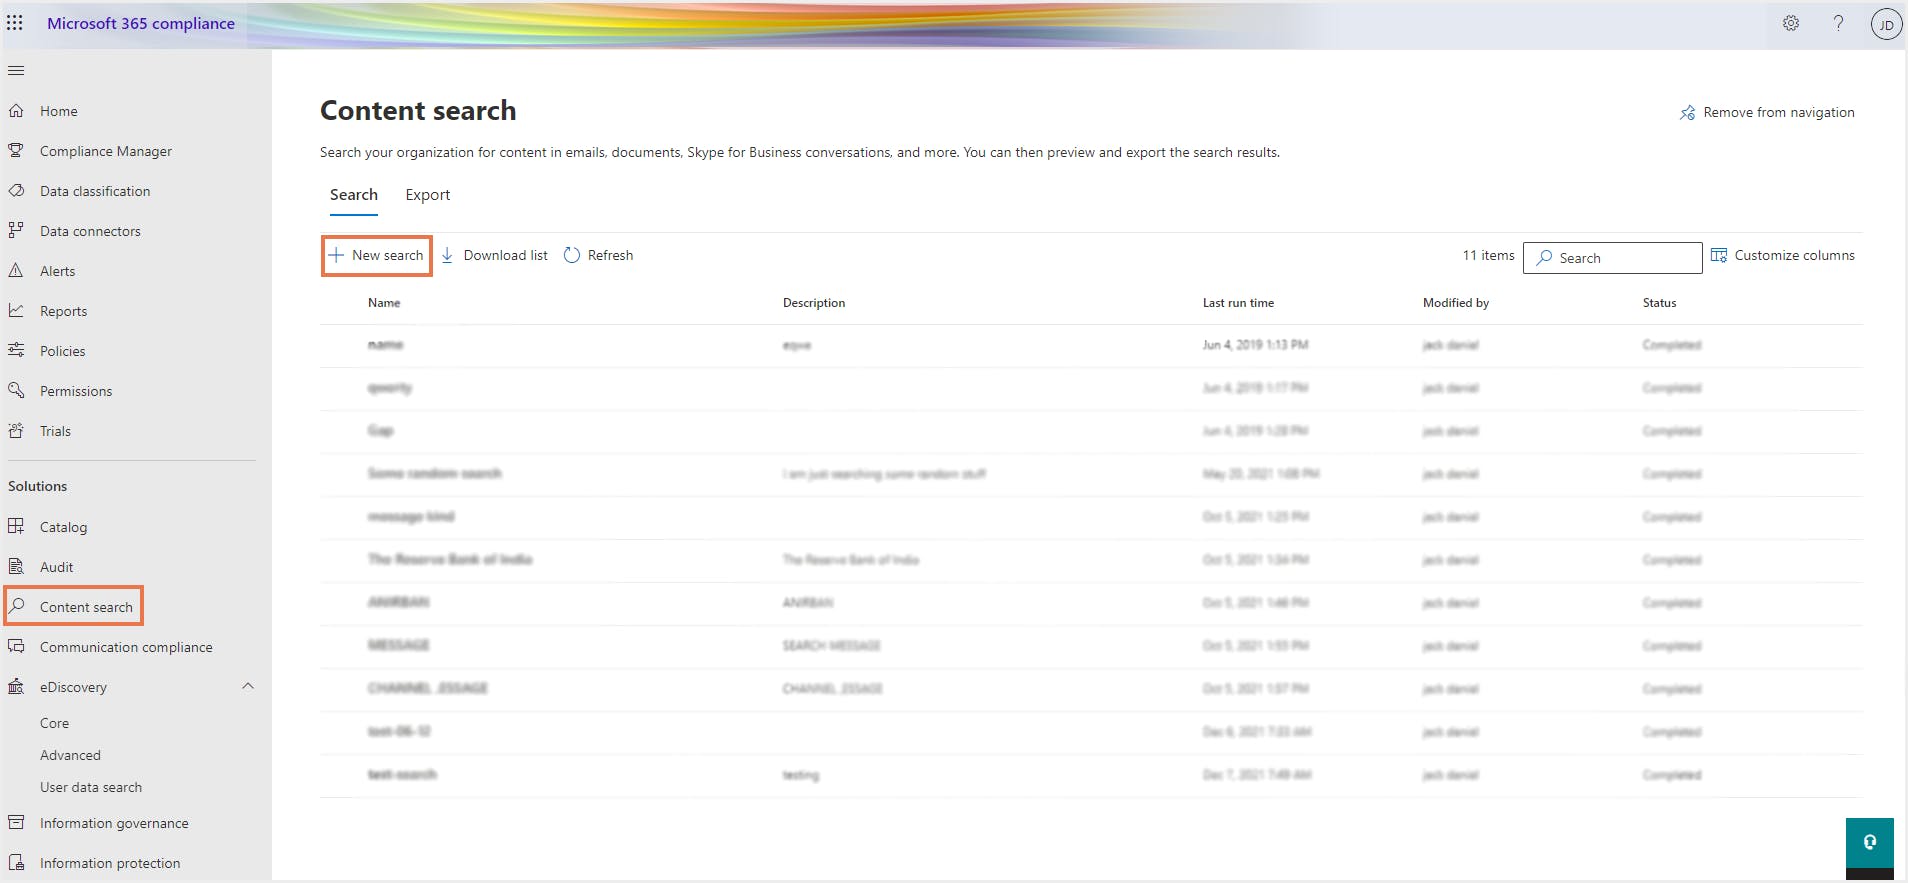
Step 1: Go to https://compliance.microsoft.com/ and navigate to Content search-> New search.
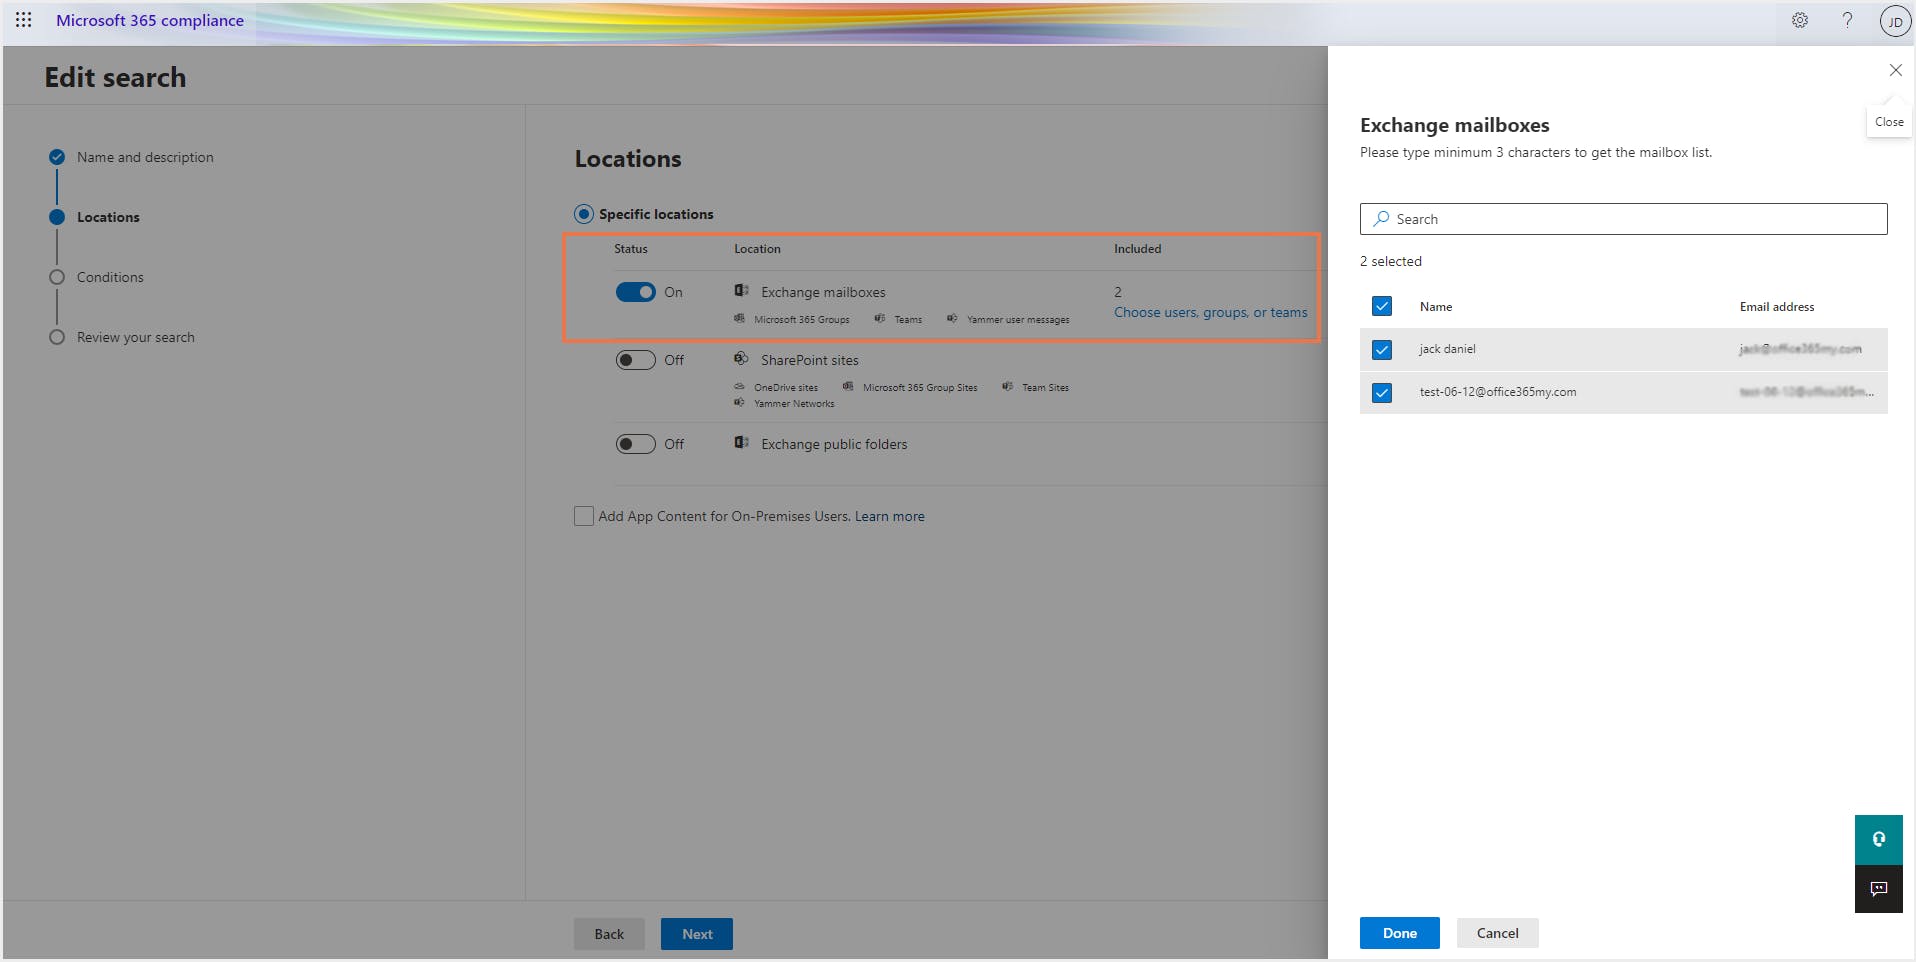
Step 2: Enter a name and description. For search locations, select Exchange mailboxes since Teams messages are stored in Exchange Online. Click Choose users, groups, or teams to narrow down the search to specific mailboxes. For channel messages, you can select the group mailbox corresponding to the team. For chat messages, you can select the specific user mailboxes.
Step 3: Define the conditions on which you need to narrow down your search. Tweak your conditions to narrow the search as much as possible to get the most relevant results.
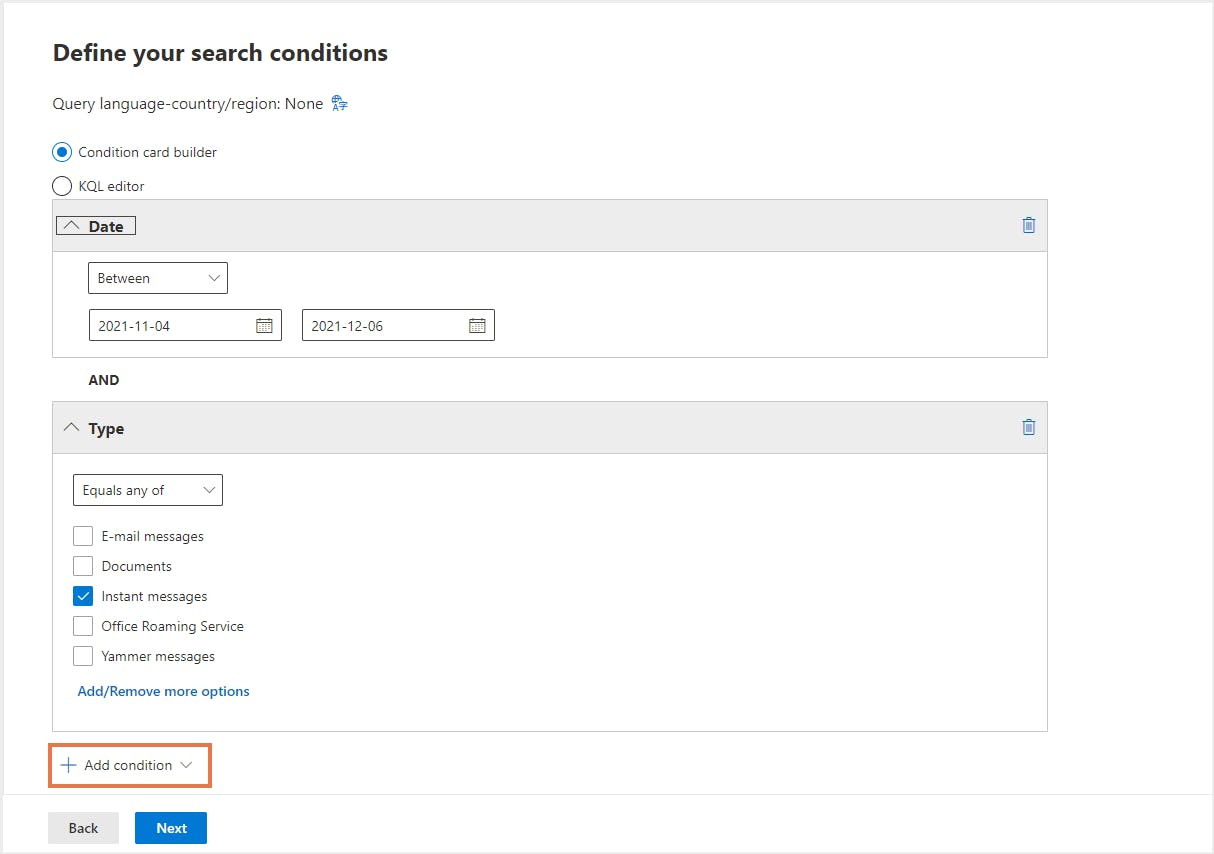
Note: Under search condition Type, select Instant messages because conversations are stored in Exchange as Instant messages.
Step 4: Review your search and click Submit.
Step 5: To preview the result, open the search you created and click on Review sample.
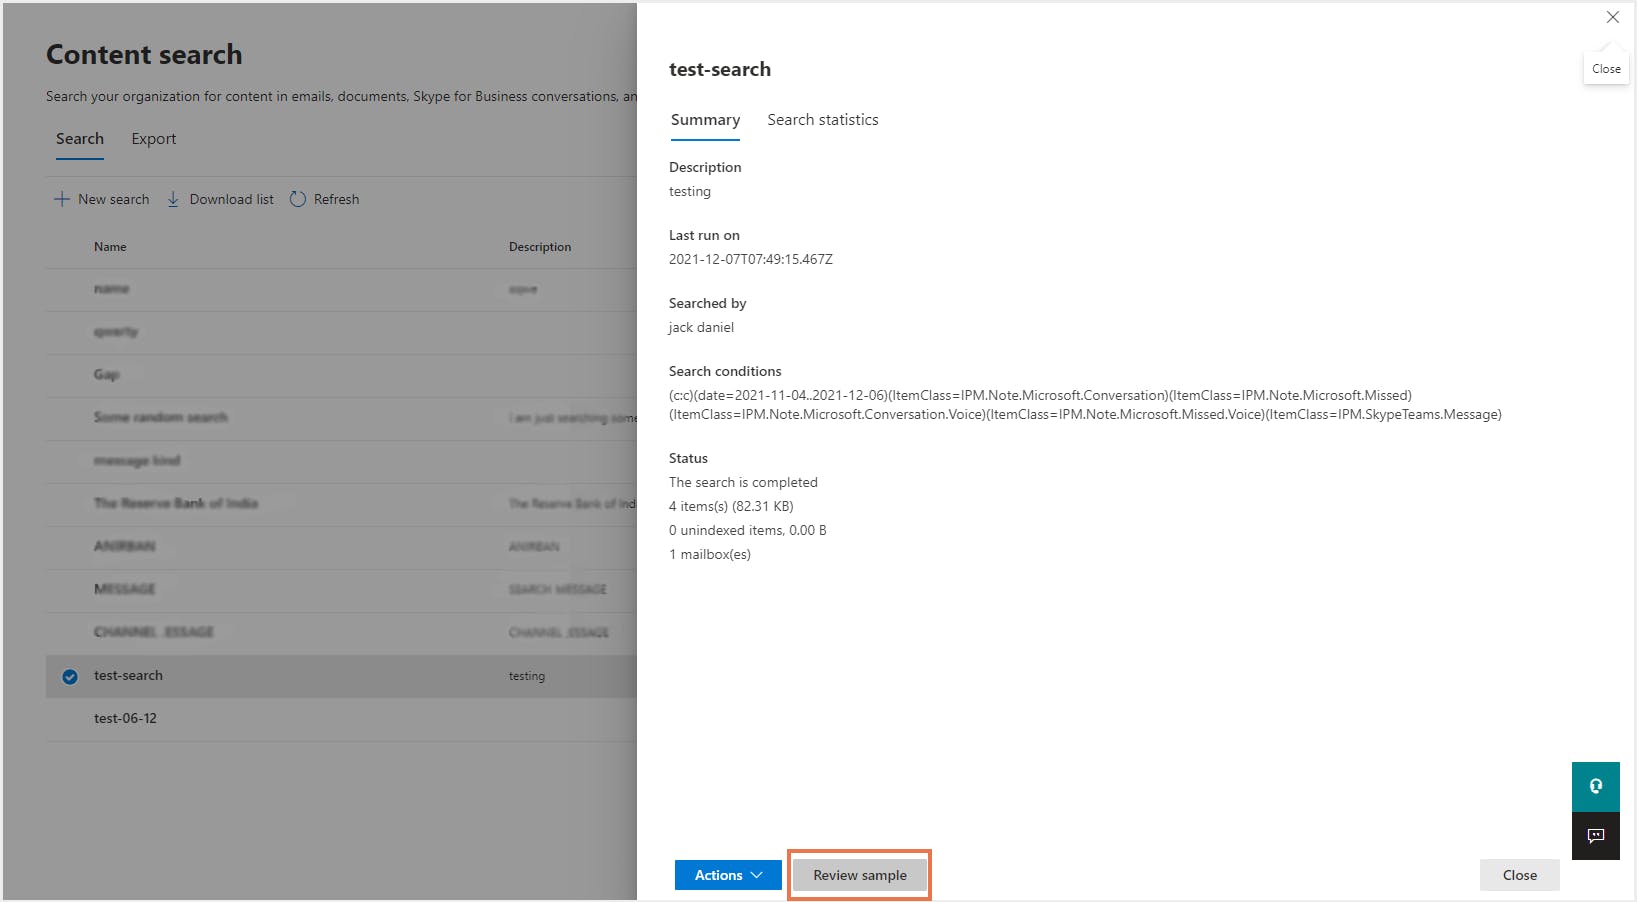
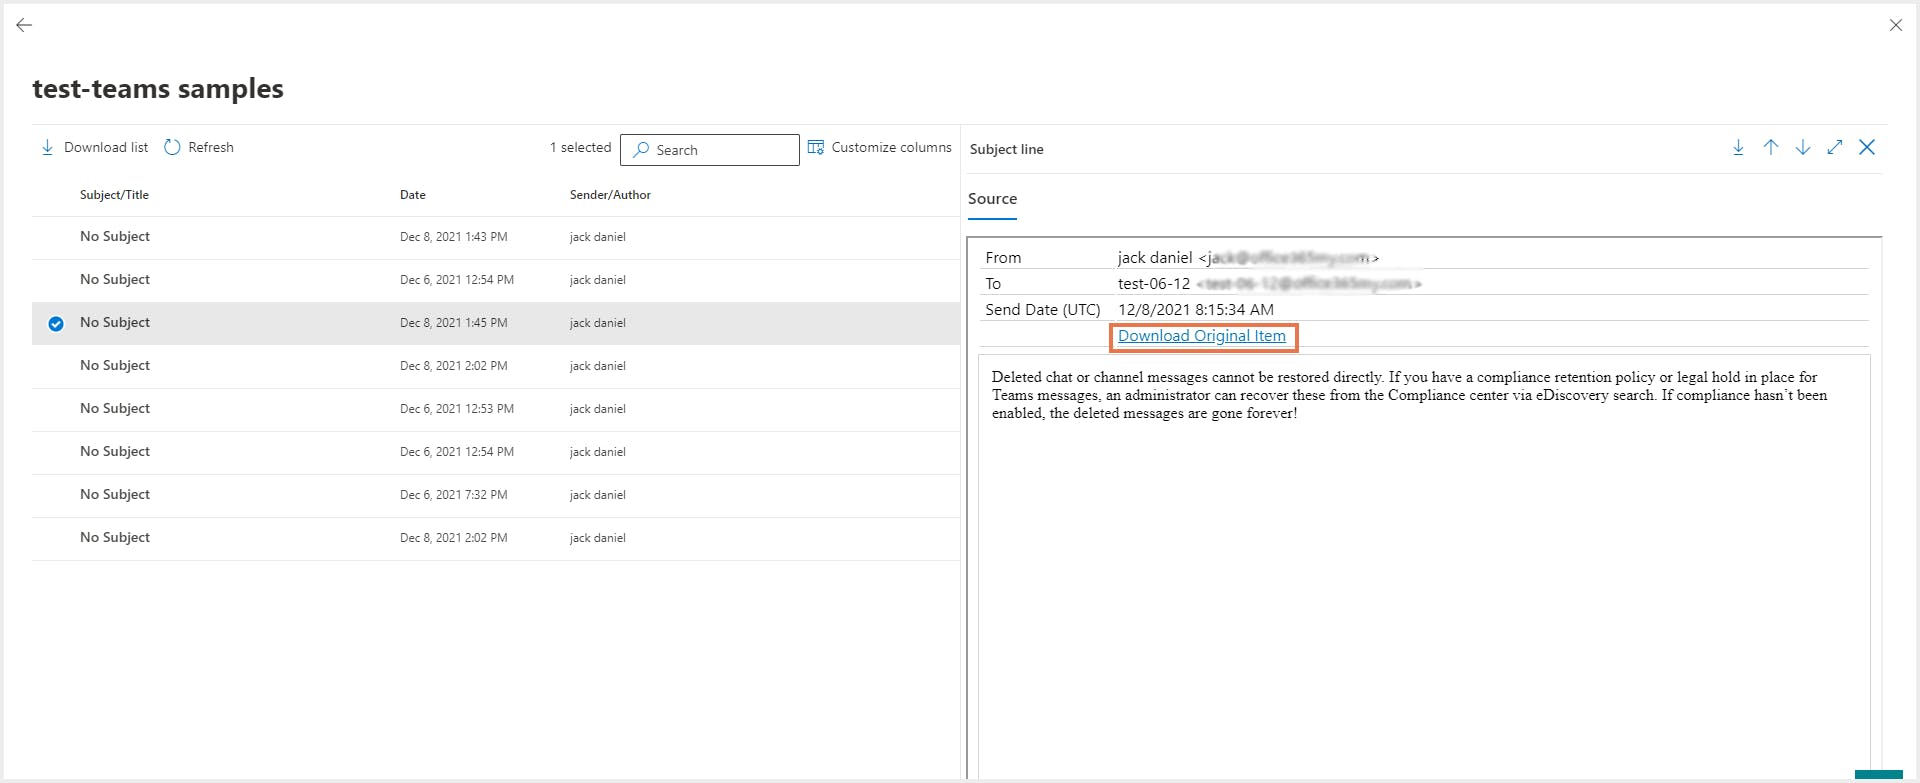
Clicking on Download Original Item will open it in Outlook as an email message. From there, you can send the email to the team’s channel using the channel’s email address.

Note: To find a channel’s email address, click on the three dots next to the channel name and select Get email address.
4.2. Exporting the results
Step 1: Open the respective search -> Actions-> Export results.
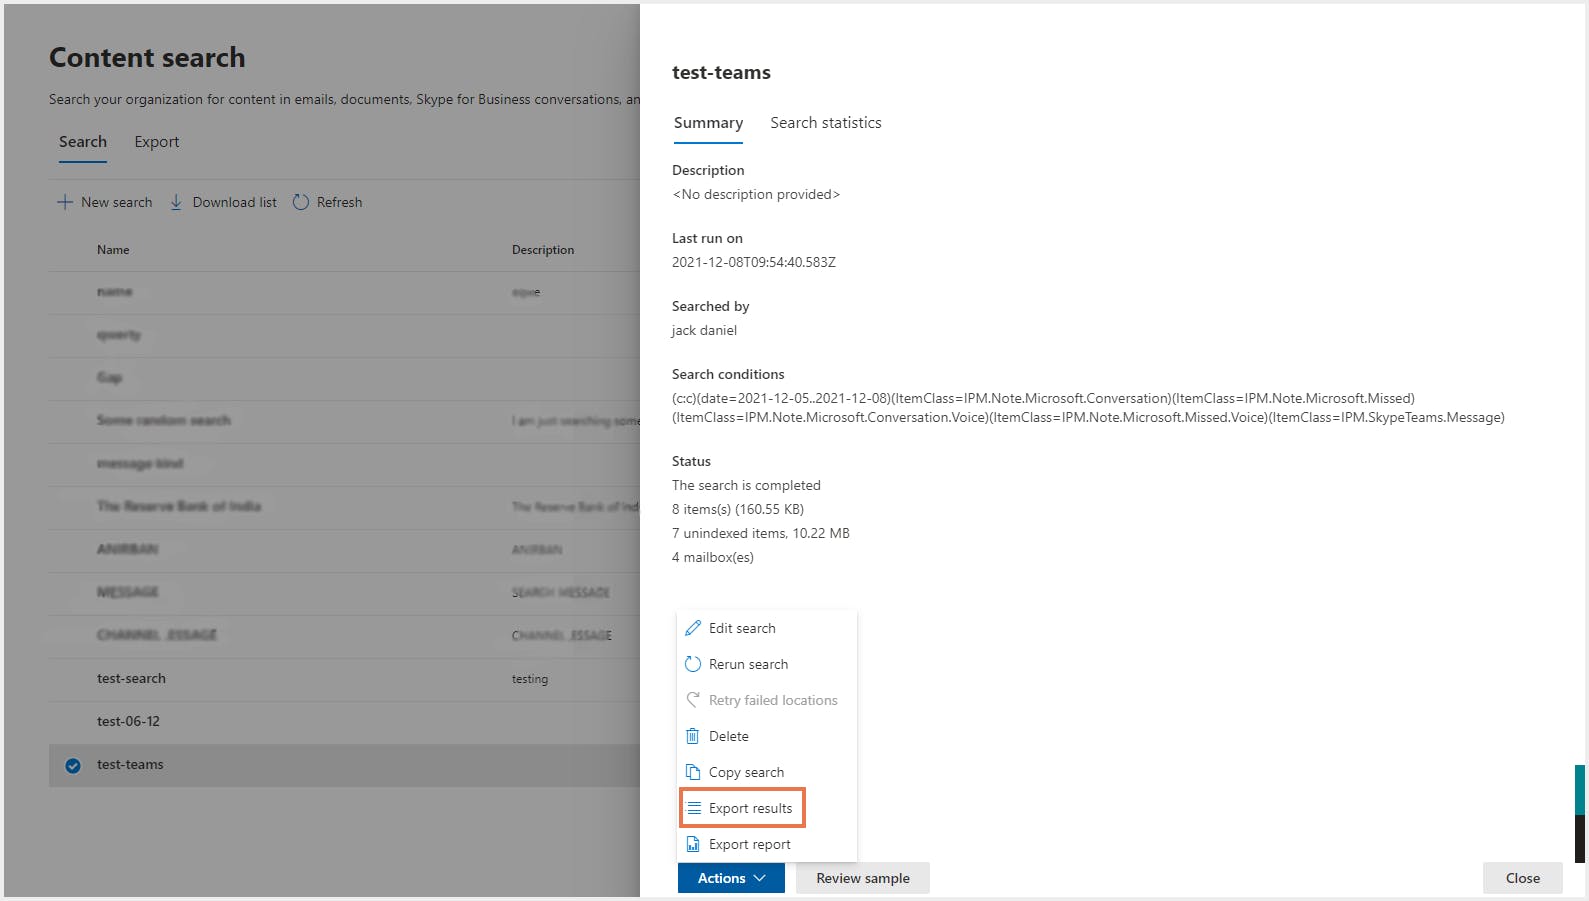
Step 2: From the list of available options, choose how you want the items to be exported, and click Export.
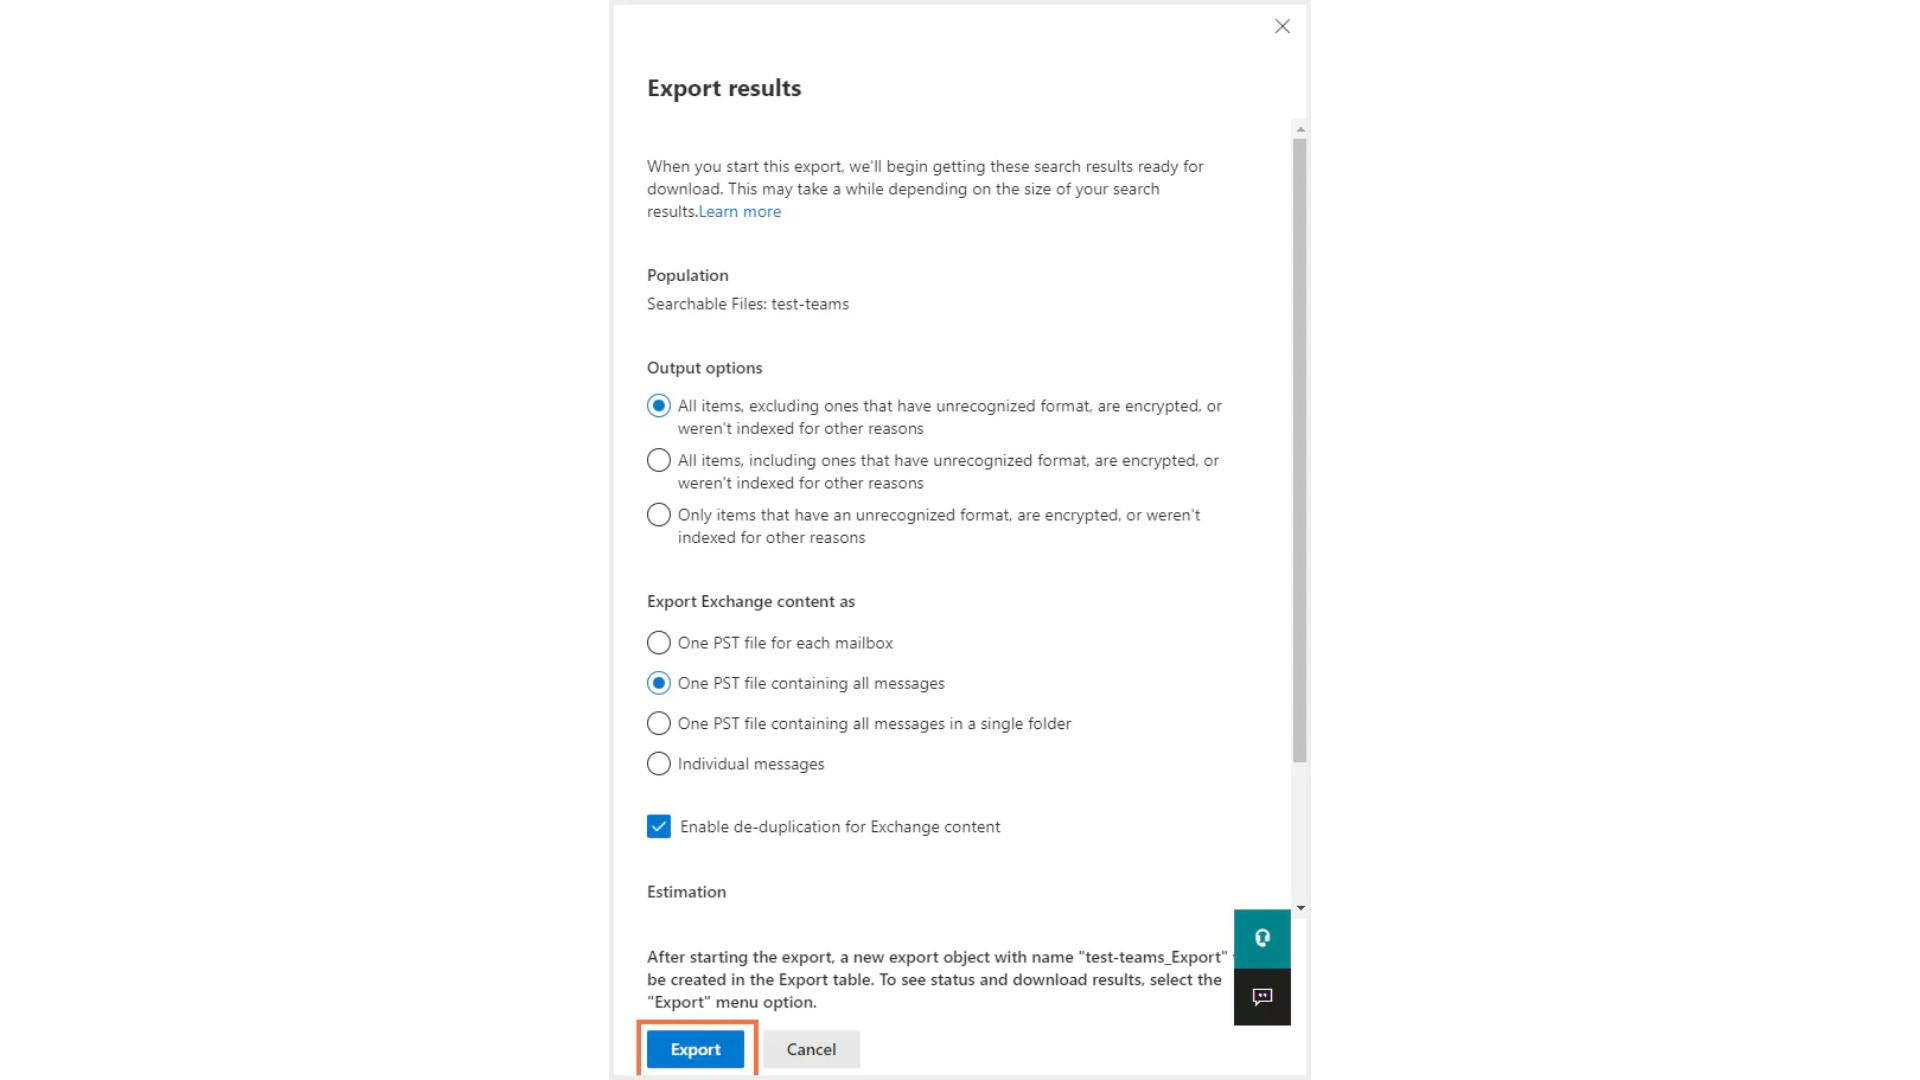
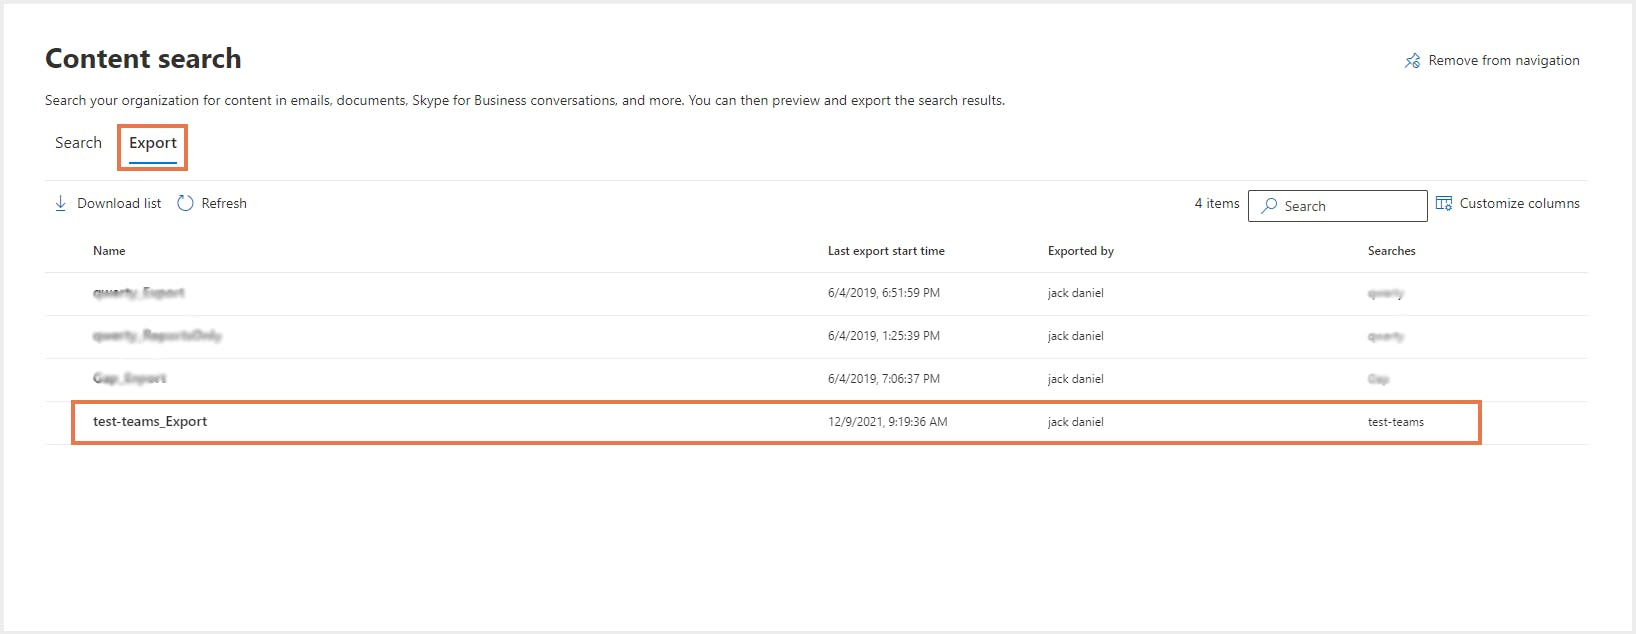
You can see the status of the export by selecting the Export tab. The name of the export object will be in the format search name_Export, for example, test-teams_Export.
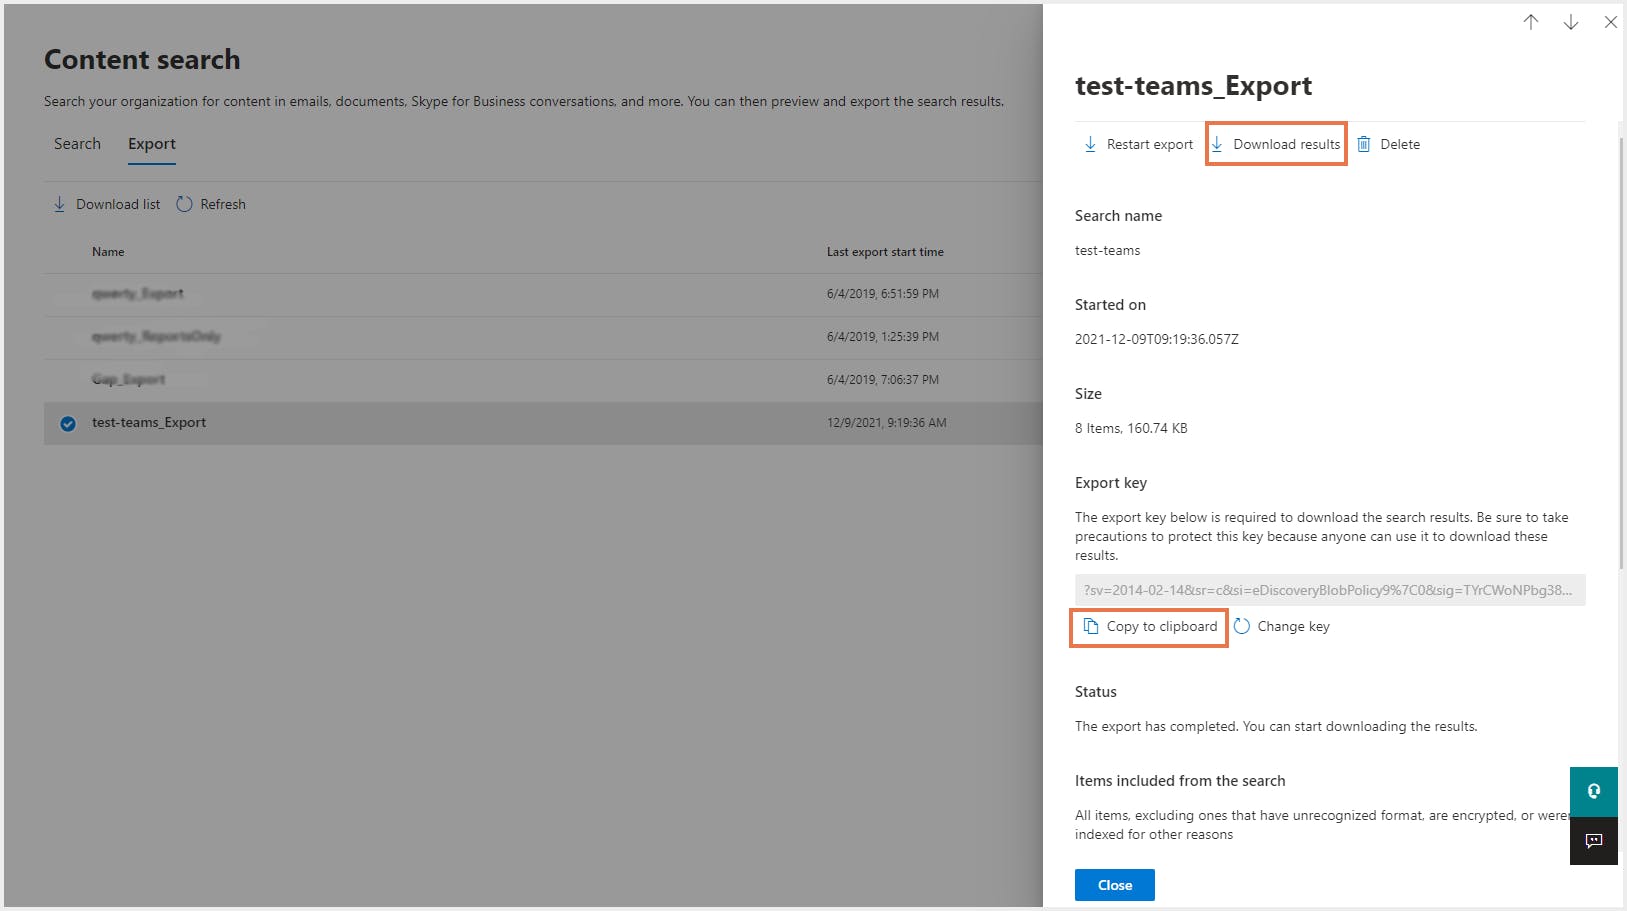
Step 3: Open the export object that has been created, copy the export key, and click Download results.
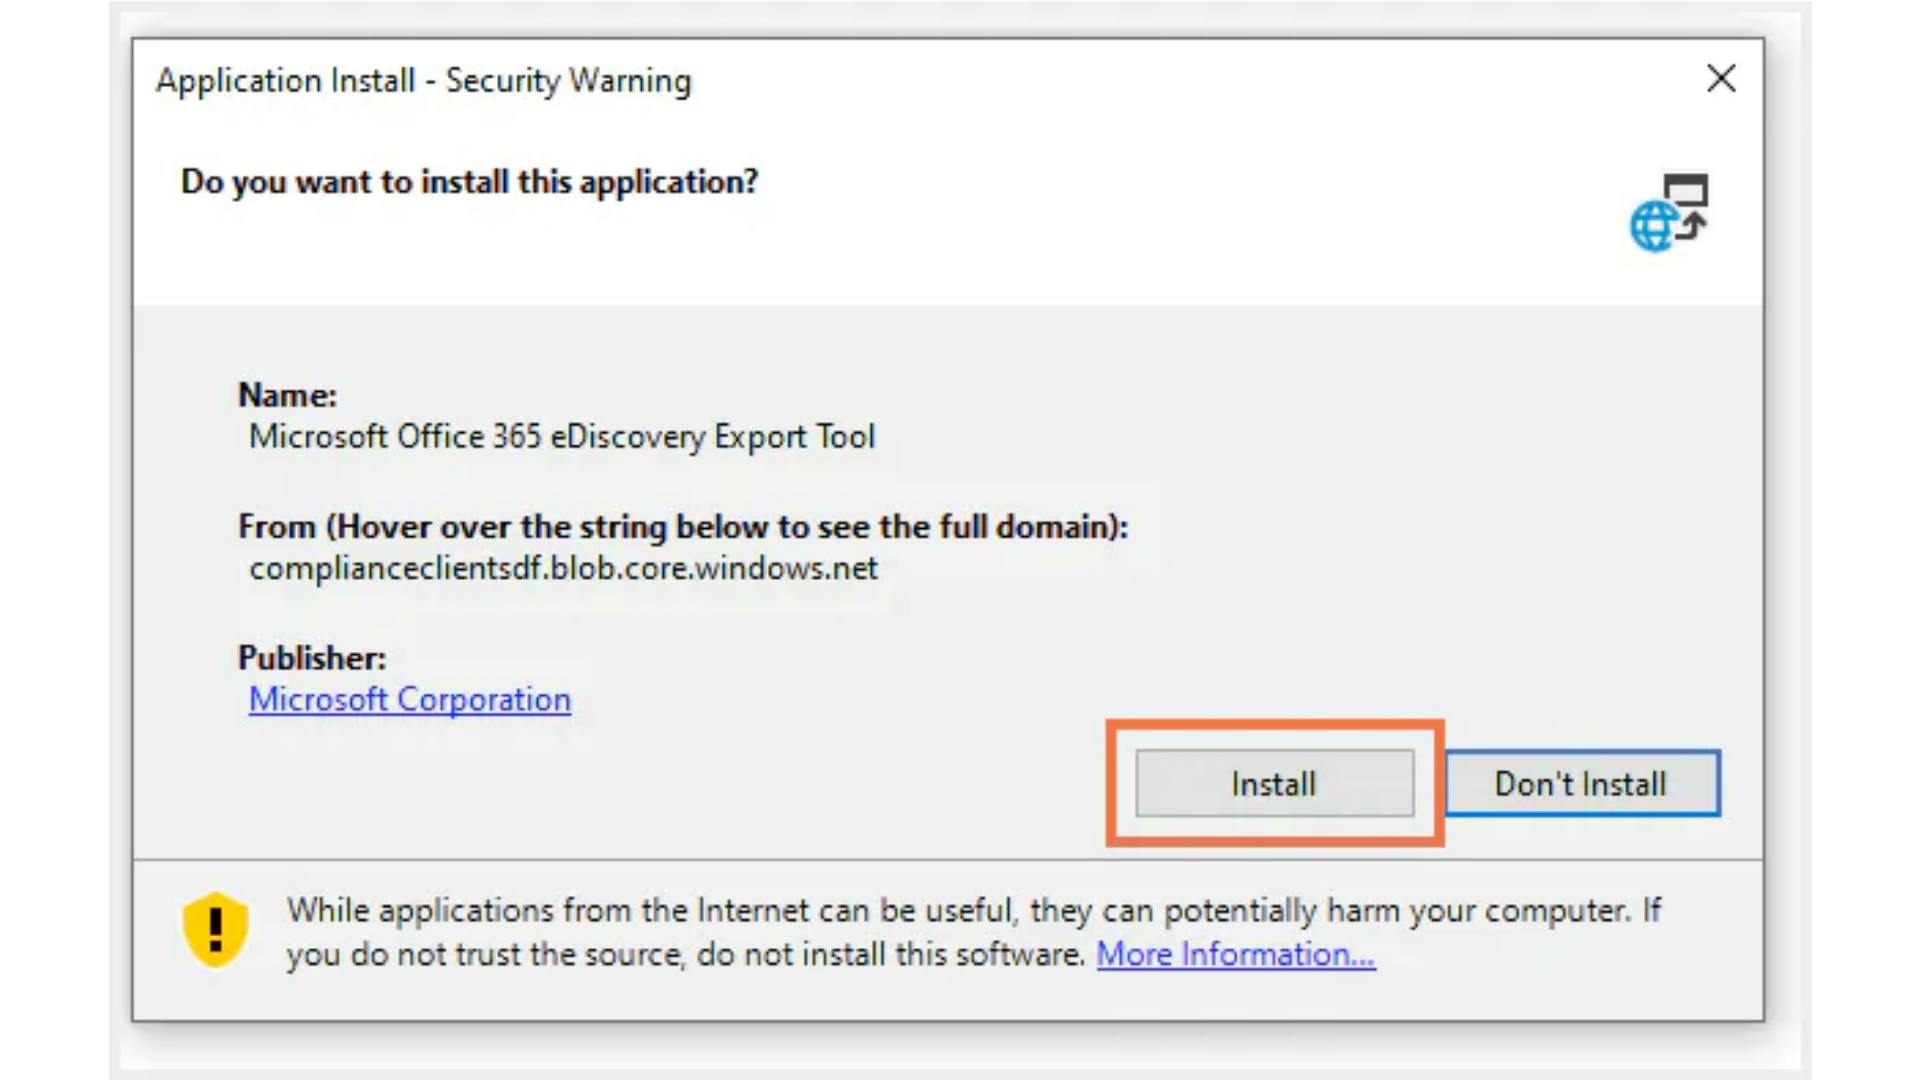
Step 4: You will be prompted to download an application called the eDiscovery Export Tool. Click Install.
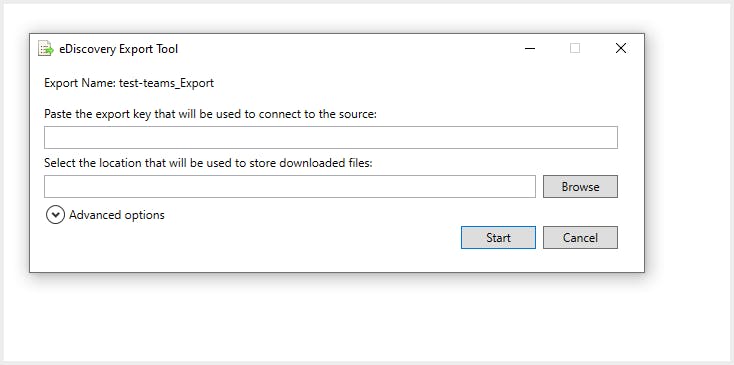
Step 5: Paste the export key that was copied in step 3, and choose a location to store the downloaded files. The downloaded folder will have the same name as the export object.

Step 6: Open the downloaded folder. This will take you to another folder with the export name and time. Inside this folder, you can find the required files, including the export summary and search results. Within the Exchange folder, there is a PST file.


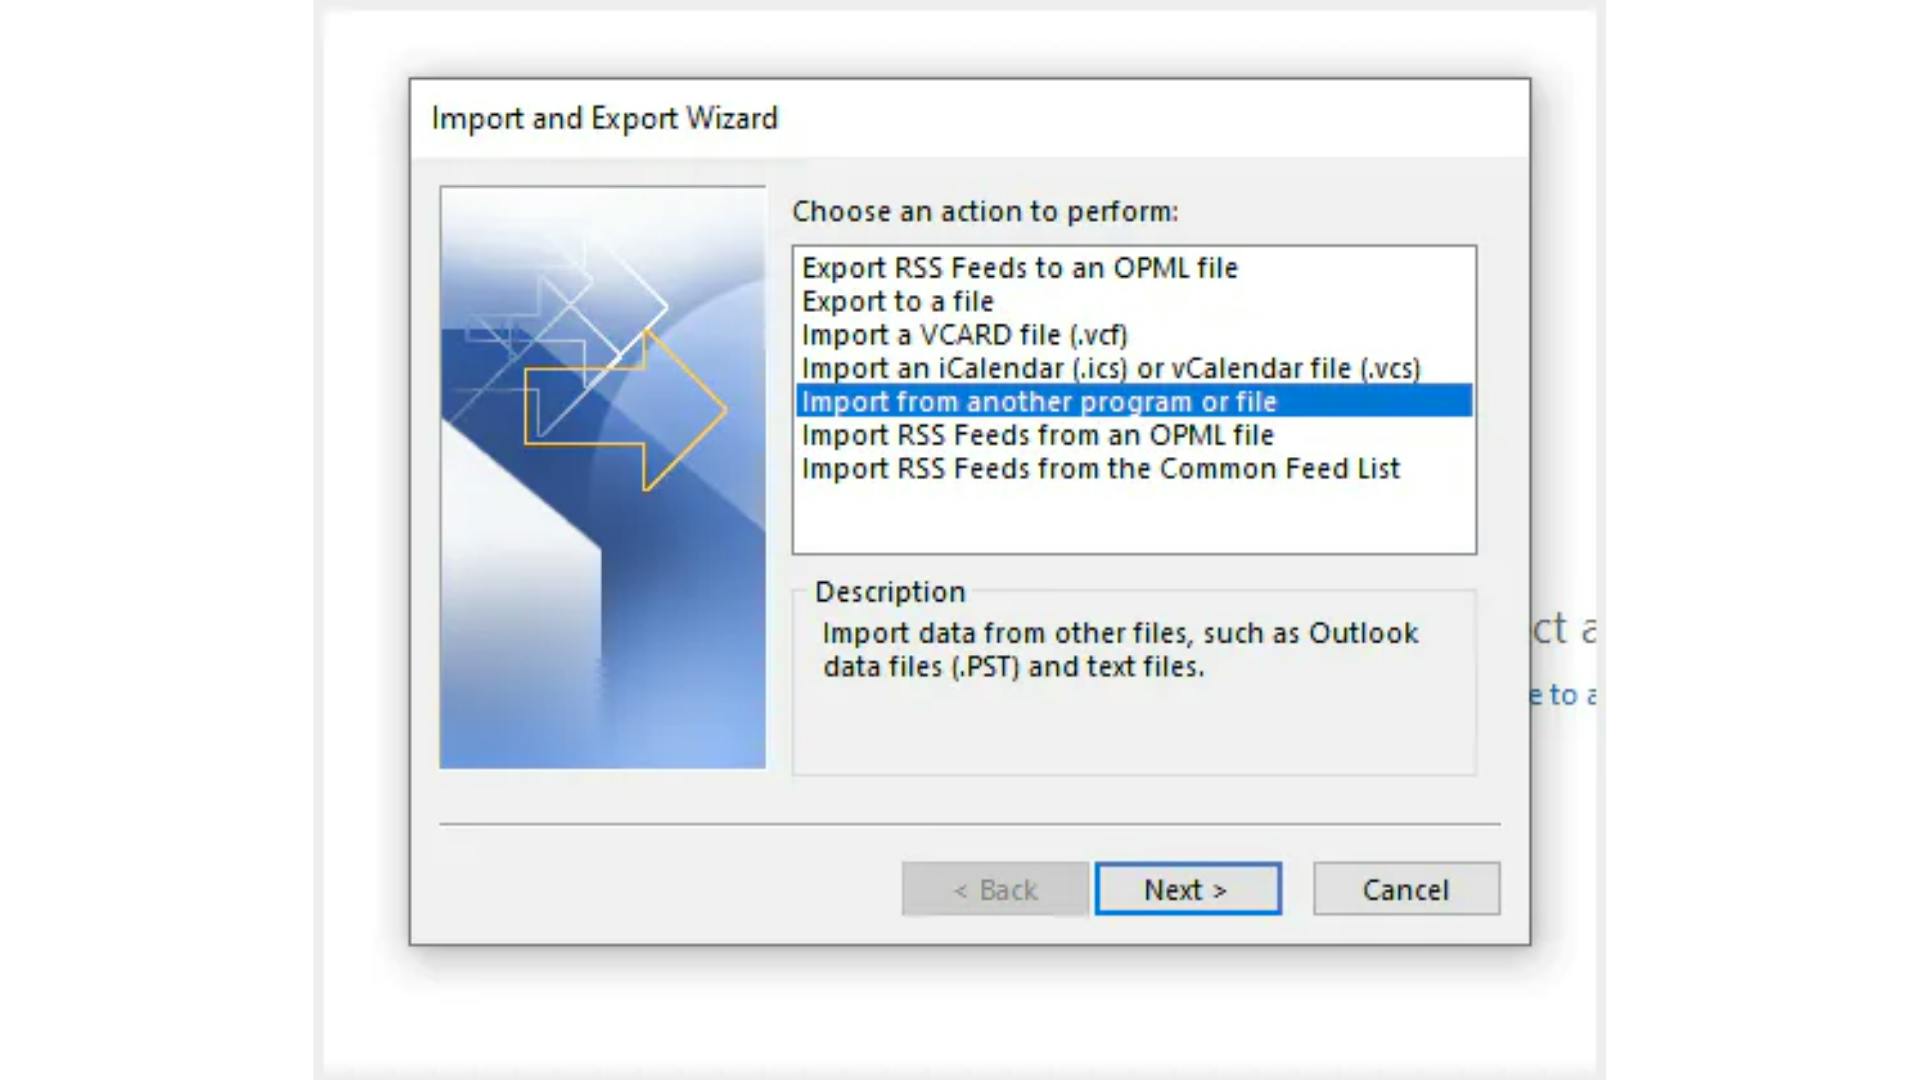
Step 7: In the Outlook desktop app, click on File ->Open & Export-> Import/Export. This will start the Import/Export wizard.

Step 8: Choose Import from another program or file. Select Outlook Data File (.pst).
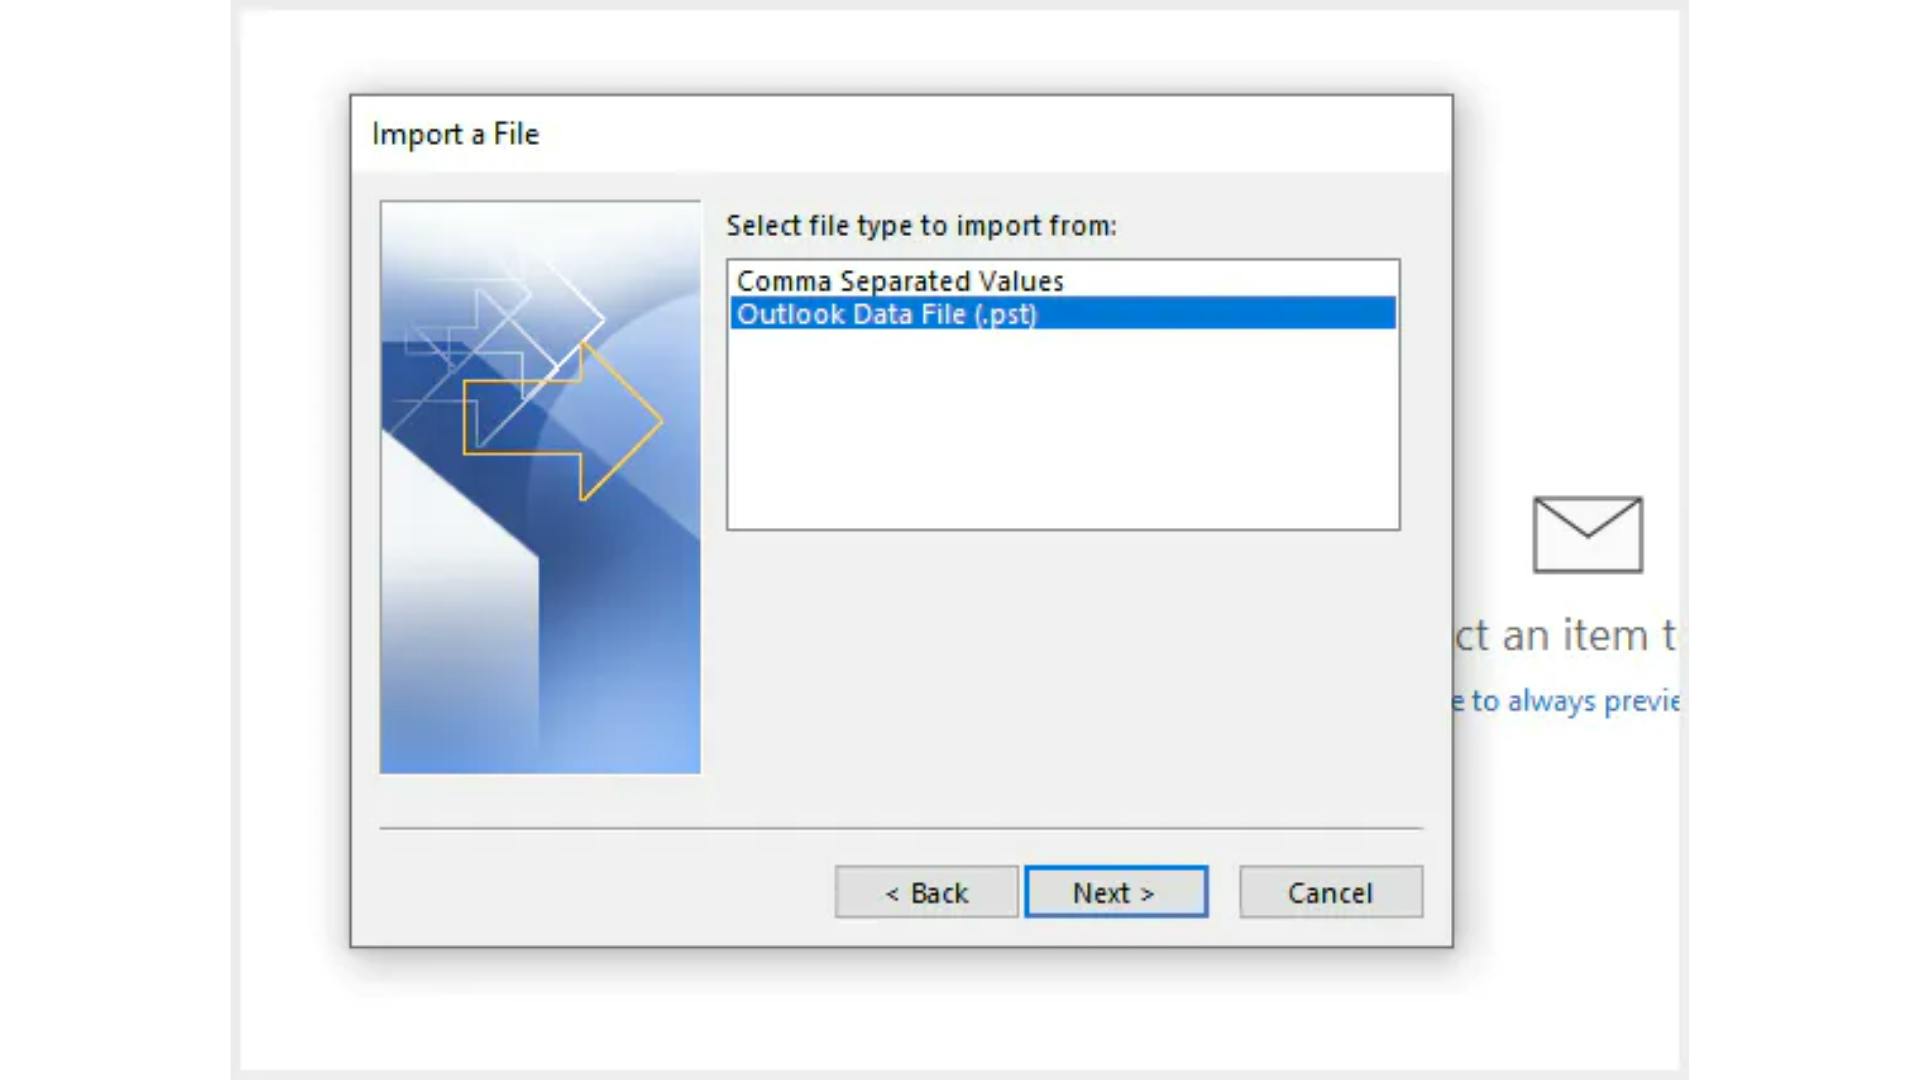
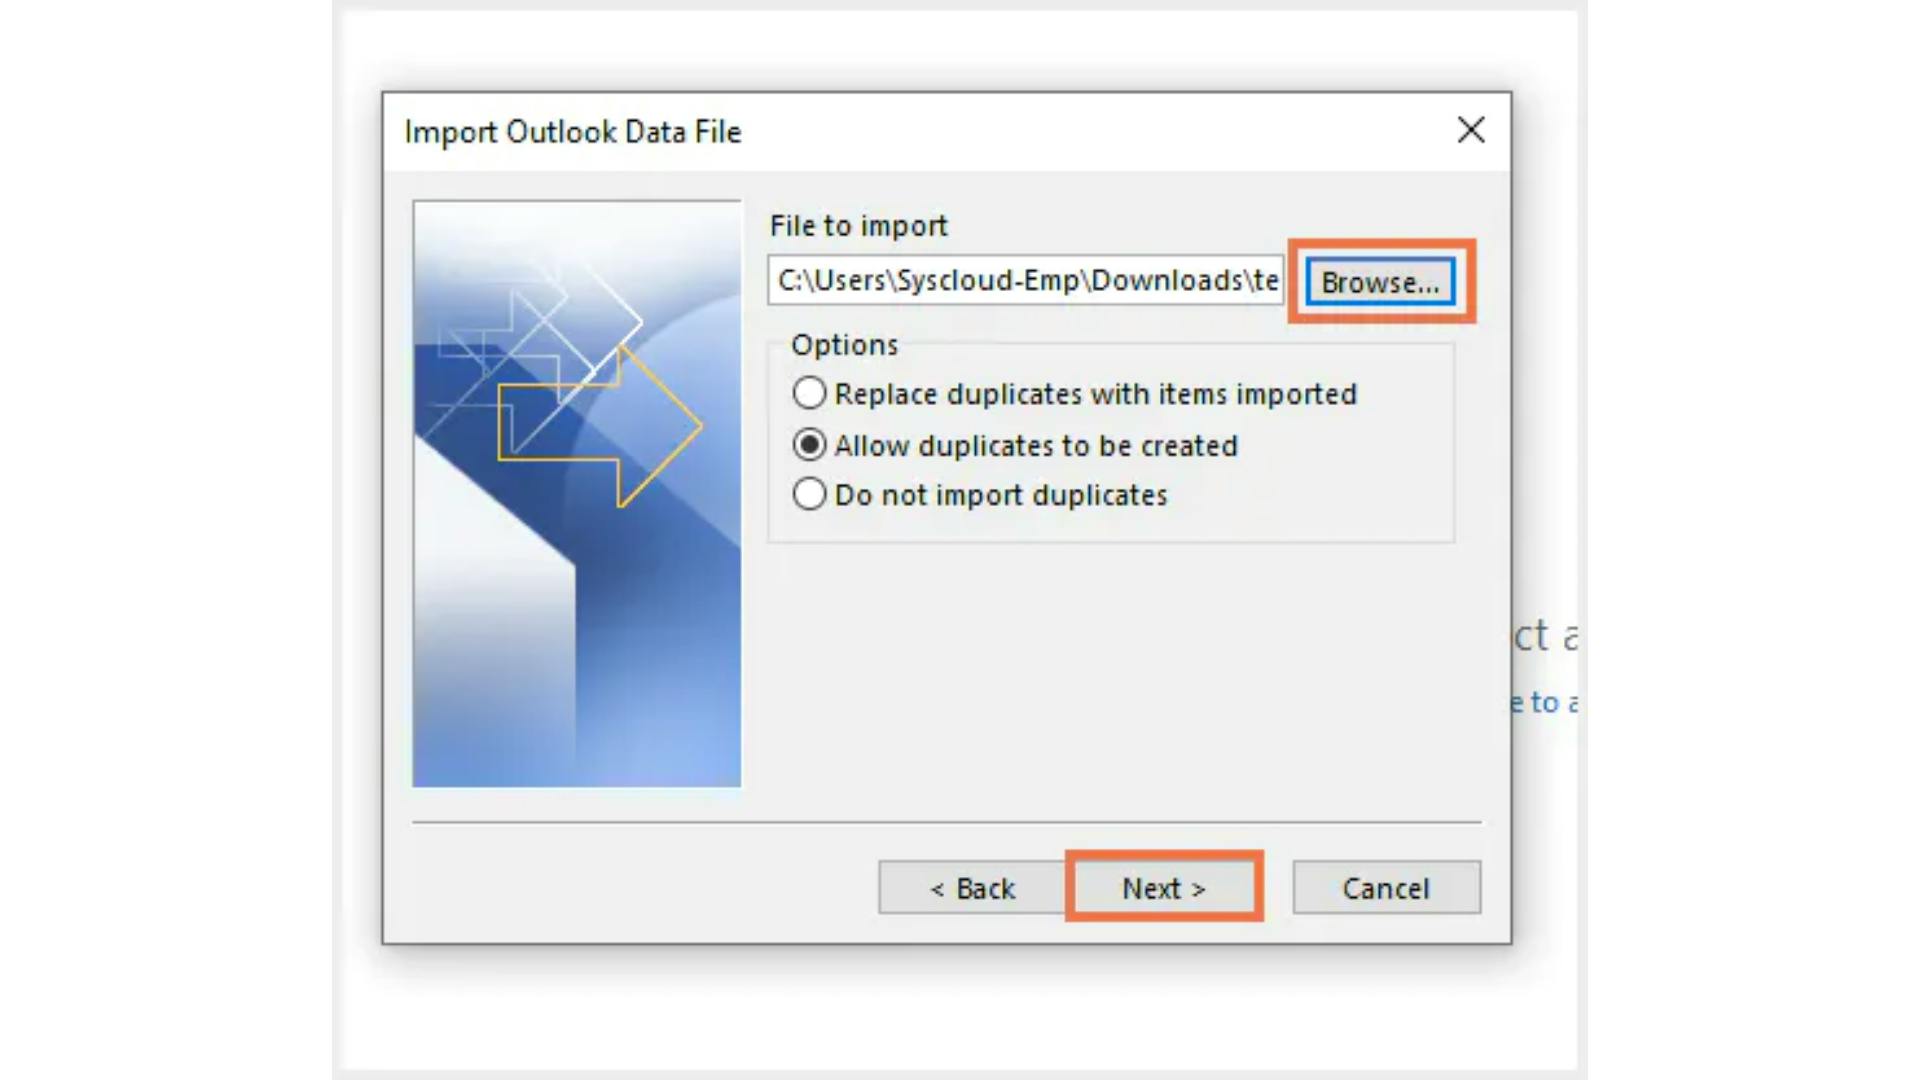
Step 9: Browse to the .pst file that needs to be imported and select one of the three options regarding duplicates.
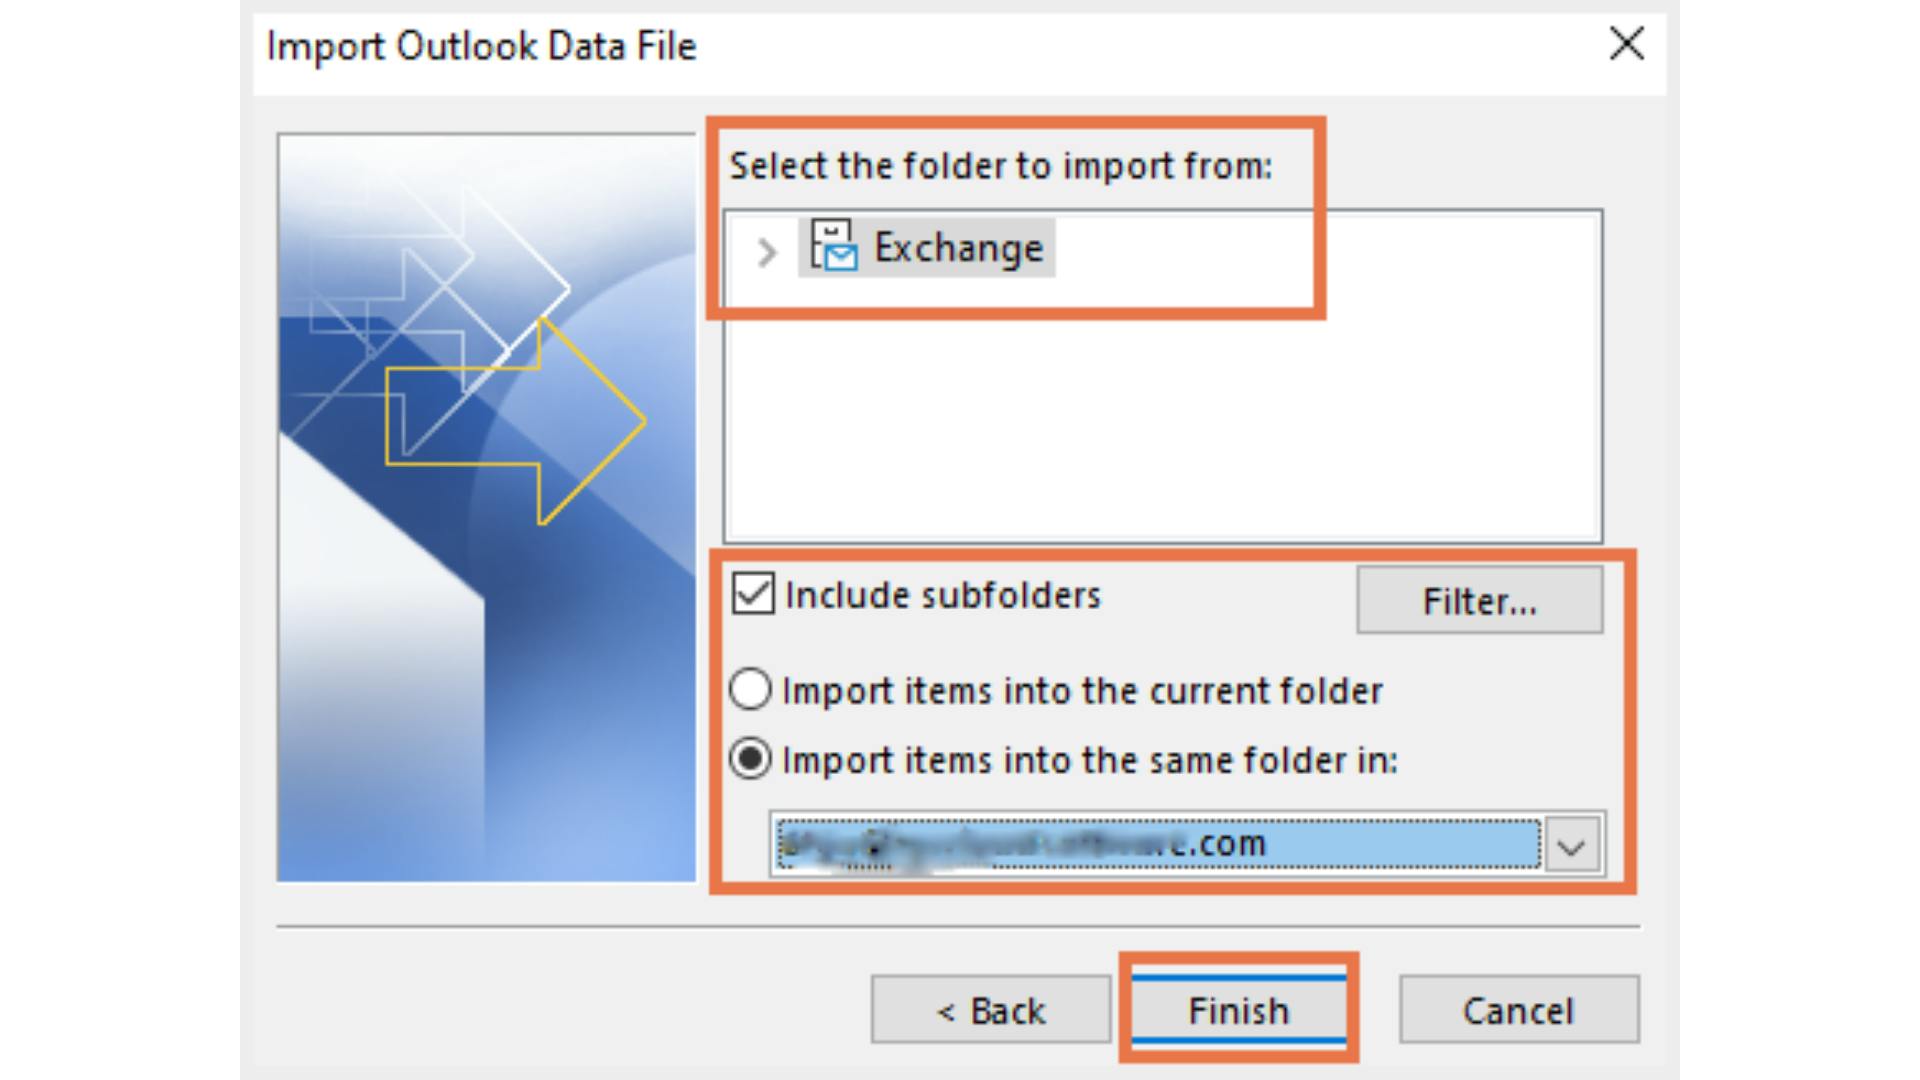
Step 10: Select the folder to import from and click Finish.
Recovering deleted Teams messages manually using content search is a tedious process. Using a third-party cloud backup solution like SysCloud, administrators can take unlimited backup of Teams channel messages and easily export them with the click of a button.
Quiz time! Which of the following helps you back up your data?
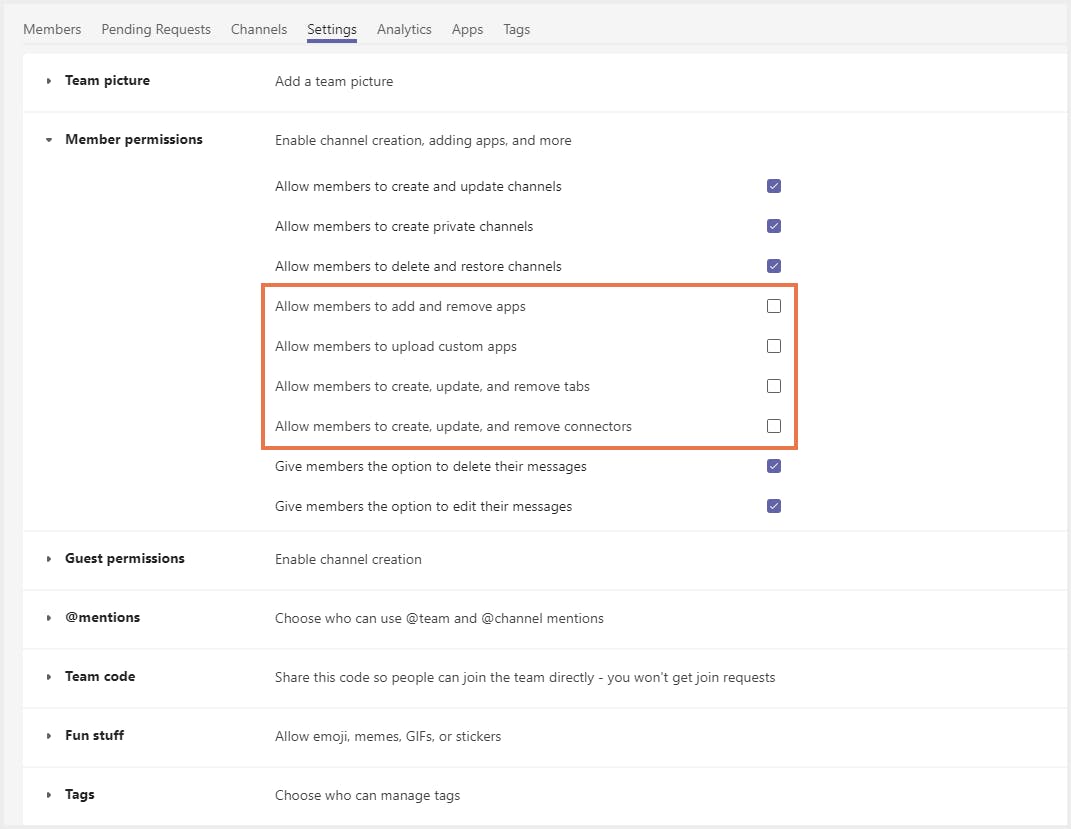
5. Can you recover deleted tabs, bots, or connectors?
Step 1: Click on the three dots next to the team name, and select Manage team.
Step 2: Navigate to the Settings tab and disable the following settings.
6. How to recover deleted Teams data using SysCloud
With SysCloud backup for Microsoft Teams, administrators will no longer have to worry about the 30-day retention period for deleted teams or channels; deleted teams can easily be restored even after the 30-day retention period, with all the app relationships intact.
Step 1: Log in to SysCloud using your admin credentials.
Step 2: Navigate to “Archives” tab and select “Teams” from the Backup and Restore drop-down.

6.1. How to recover deleted teams using SysCloud
Step 3: Select the team you need to restore by clicking the checkbox next to it. Click “Restore.”
Step 4: Add comments to be shown in the restore report (optional) and click on “Restore” to confirm the restore.
Note: You can only restore one team at a time.

6.2. How to recover deleted Teams files using SysCloud
Step 3: Click on the team which contains the file(s) you need to restore. This will take you to the Channel/ SharePoint archives for the given team.
Step 4: Navigate to the SharePoint tab. Select the file(s) to be restored. Click “Restore.”
Step 5: Add comments to be shown in the restore report (optional) and click on “Restore” to confirm the restore.

6.3. How to recover deleted Teams channels using SysCloud
Step 3: Open the required team from which you need to restore a channel. This will open the team's channel archives.
Step 4: Select the channel(s) that need to be exported. Click "Export." In the pop-up, add any comments to be added to the export report and click "Export."

6.4. How to recover deleted channel messages using SysCloud
Step 3: Open the required team from which you need to restore a channel. This will open the team's channel archives.
Step 4: Open the channel which contains the message(s) that need to be exported. Select the required messages and click "Export." In the pop-up, add any comments to be added to the export report and click "Export."

Note: You have the option to preview the messages before exporting them.
Recommended content
2 May 2024
8 min read
3 May 2023
3 min read
11 May 2023
2 min read
Get actionable SaaS administration insights
We don’t spam. Unsubscribe anytime.
In this article
- Recover a deleted team in Microsoft Teams
- Recover deleted Teams channels
- Recover deleted Teams files
- Recover deleted messages in Microsoft Teams
- Can you recover deleted tabs, bots, or connectors?
- Recover deleted Teams data using SysCloud
Tools

