Categories
In this article
- Recover data from QuickBooks Online backup
- Recover deleted QuickBooks Online data from exports
- Recover deleted QuickBooks Online data from SysCloud backup archives
How to Recover Deleted QuickBooks Online Data
11 Apr 2023
7 min read
Ahana
Article at a glance
- Native QuickBooks Online tools only allow rollback of company data to a specific point in time, but they cannot recover individual transactions, lists, or items.
Manually exporting data or using built-in backup features can be time-consuming and does not offer comprehensive protection against accidental deletion or data loss. What is the solution?
Read more
QuickBooks Online has access to massive amounts of sensitive information related to your business. The application does not have a recycle bin and it is impossible to completely avoid human error or other data loss instances. However, there are a few ways that could help you recover deleted QuickBooks Online data.
What happens to deleted QuickBooks Online data?
Recover from QuickBooks Online backup
Recover from exports
Recover from the SysCloud backup archives
Restore data from QuickBooks Online backup
To learn how to back up your QuickBooks Online company using QuickBooks Online native back-up and restore tool, click here.
How to restore deleted QuickBooks Online data using the native backup and restore tool:
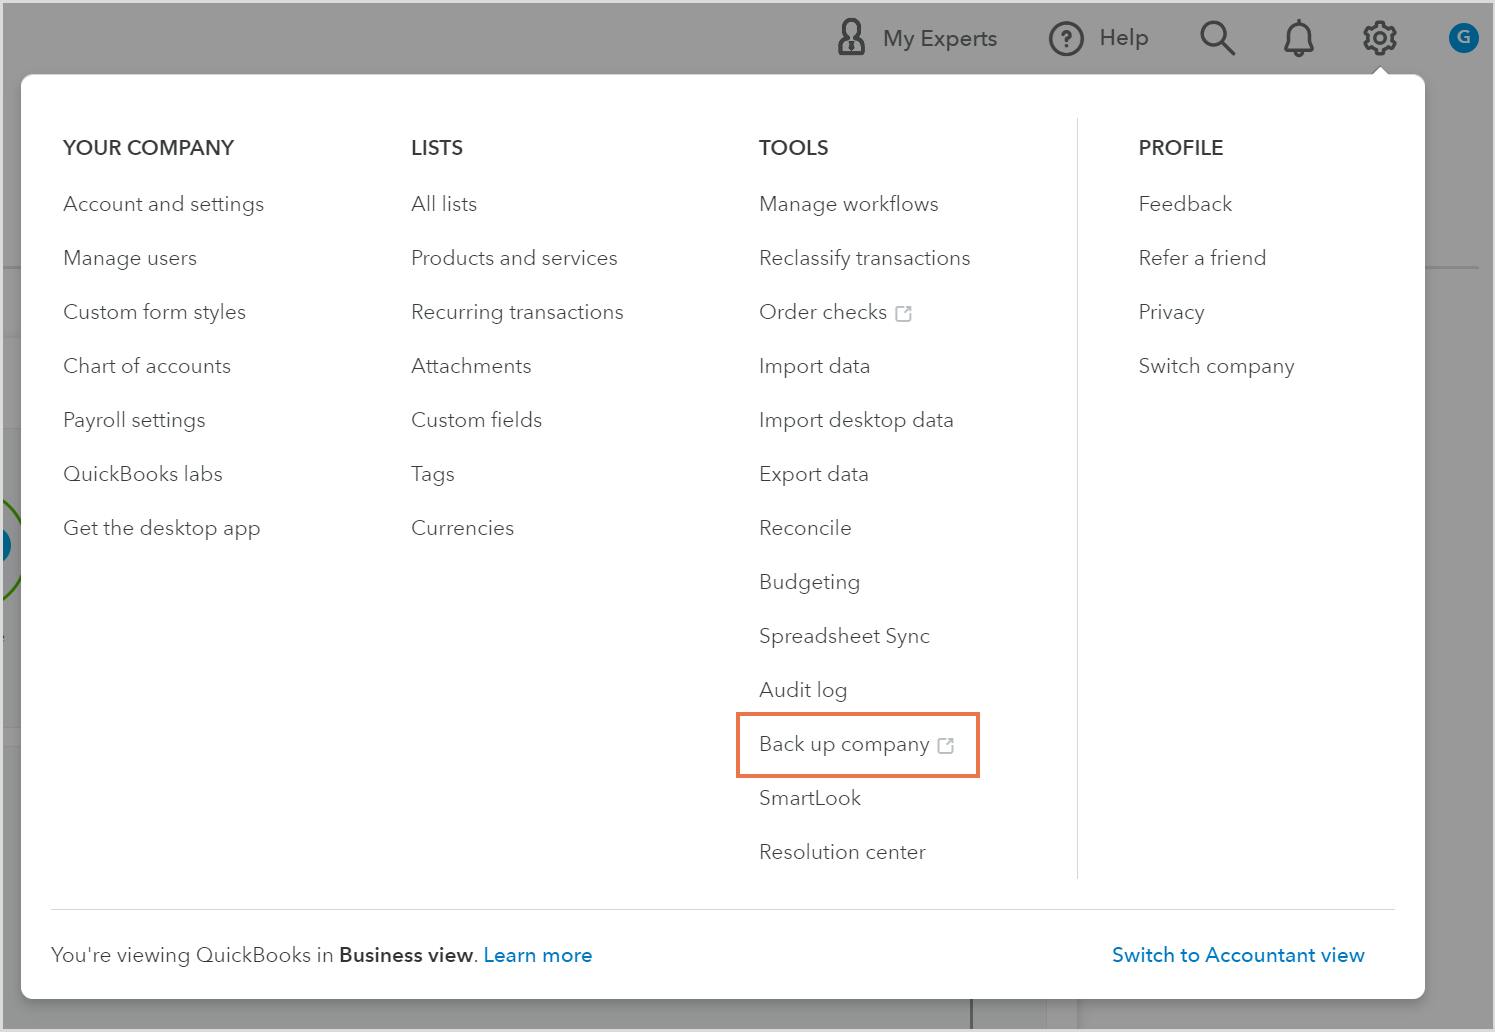
Step 1: Go to Settings ⚙.
Step 2: Select “Back up company”. Note: You might need to sign in with Intuit, and then select “Authorize” to proceed.
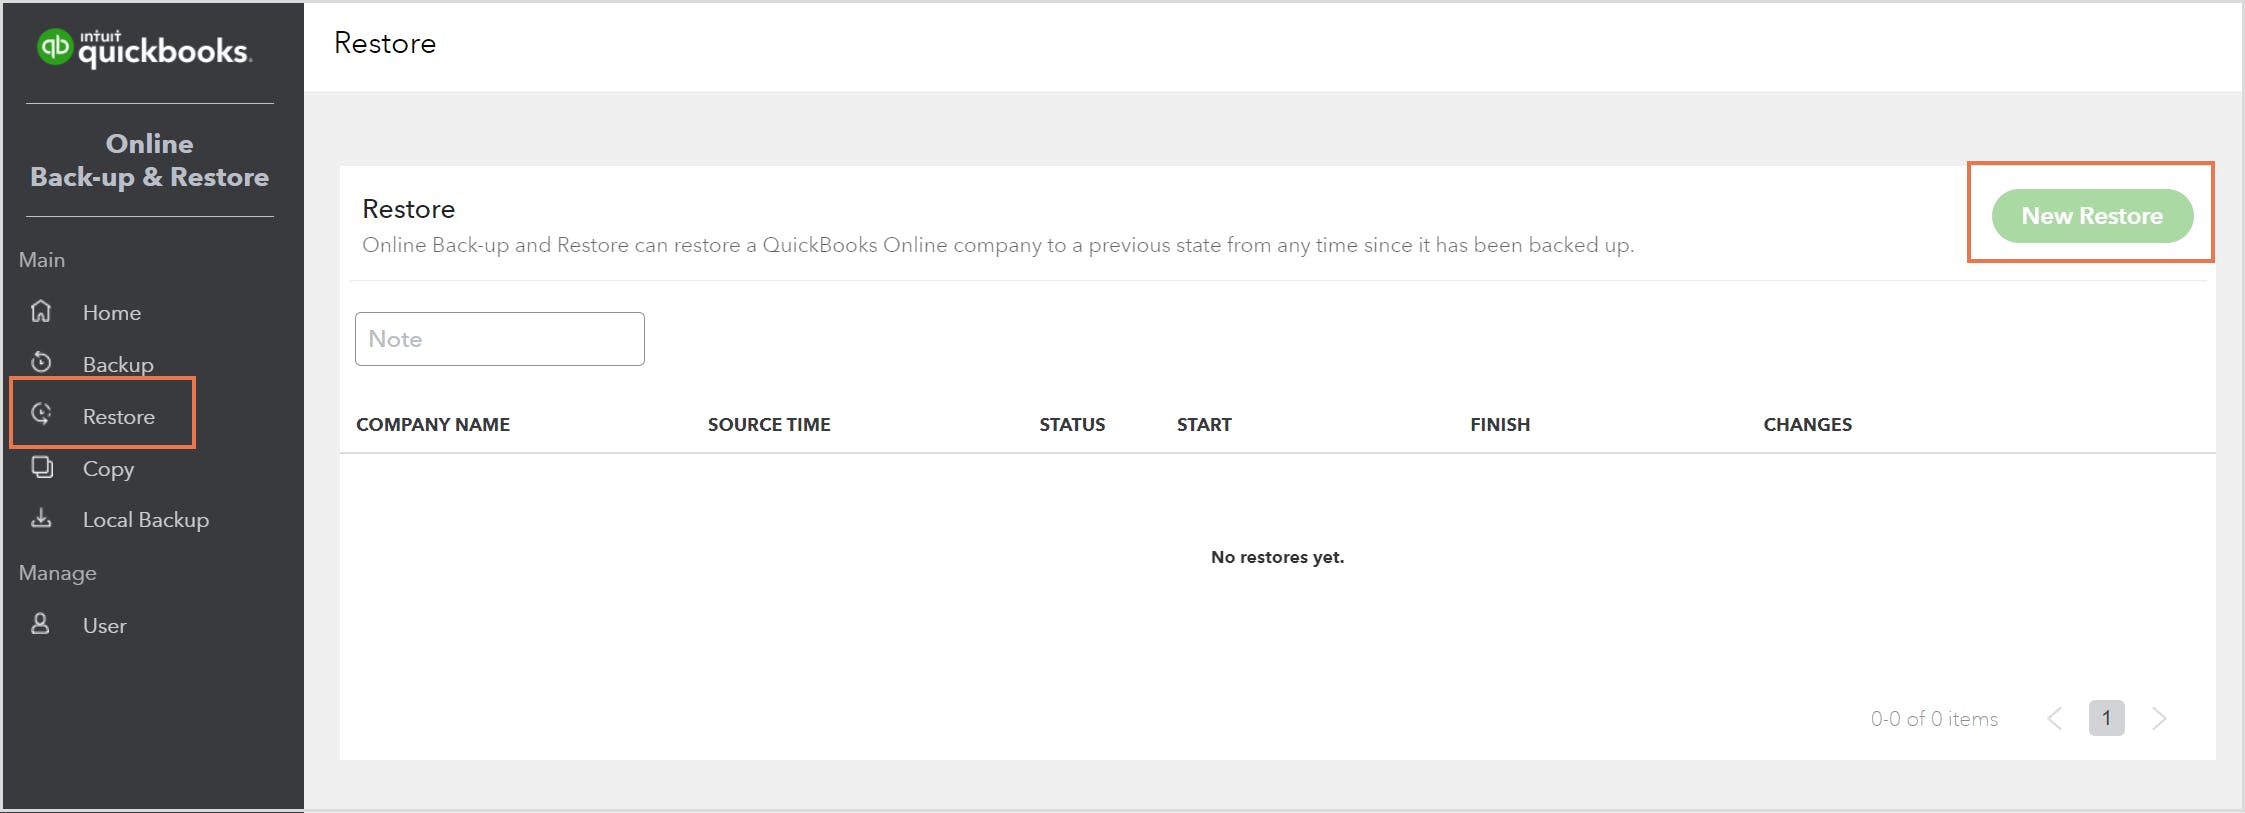
Step 3: Select the “Restore” menu, then select “New Restore”.
Step 4: In the “Company” dropdown menu, select the company you want to overwrite and restore accounting data to.
Step 5: In the “Restore to” dropdown menu, select the time and date you want to restore.
Step 6: Make sure everything is correct, then select “Create Restore”.
Step 7: Enter your company’s name, then select “Restore”.
Note: QuickBooks Online backup and restore tool cannot help you recover individual transactions, lists, or items. The native recovery tool can only roll back the company data to a different point-in-time.
To learn about the limitations of using the native backup tool, click here.
Recover deleted QuickBooks Online data from exports
To learn how to export QuickBooks Online data, click here.
How to recover deleted QuickBooks Online data from exports
Step 1: Log in to your QuickBooks Online company.
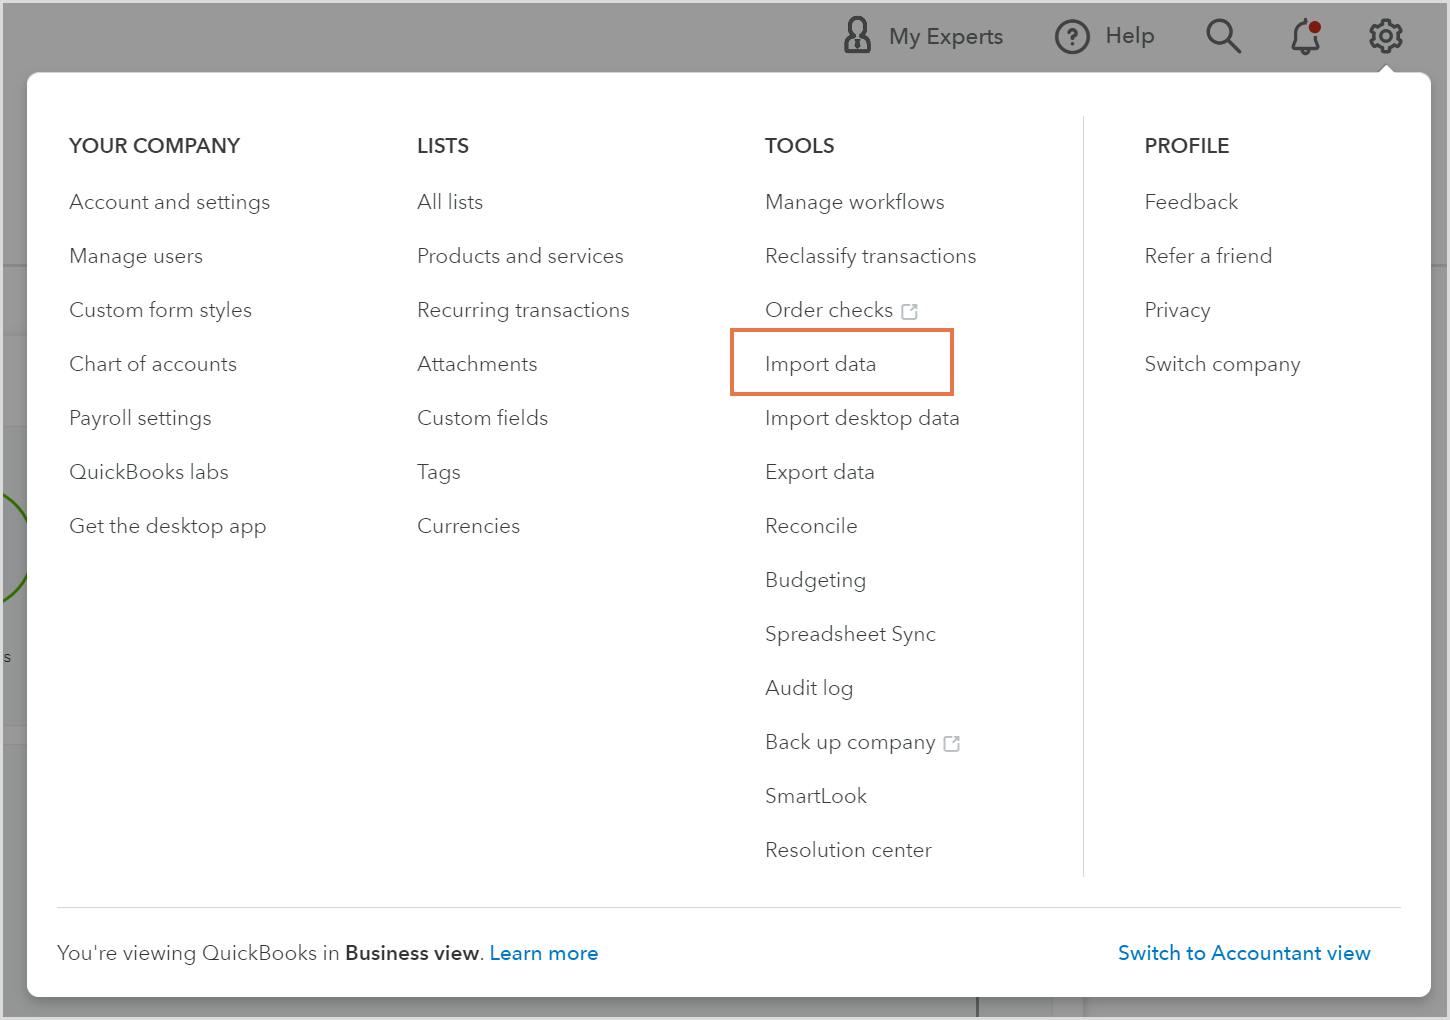
Step 2: Go to Settings ⚙.
Step 3: Click “Import data”.
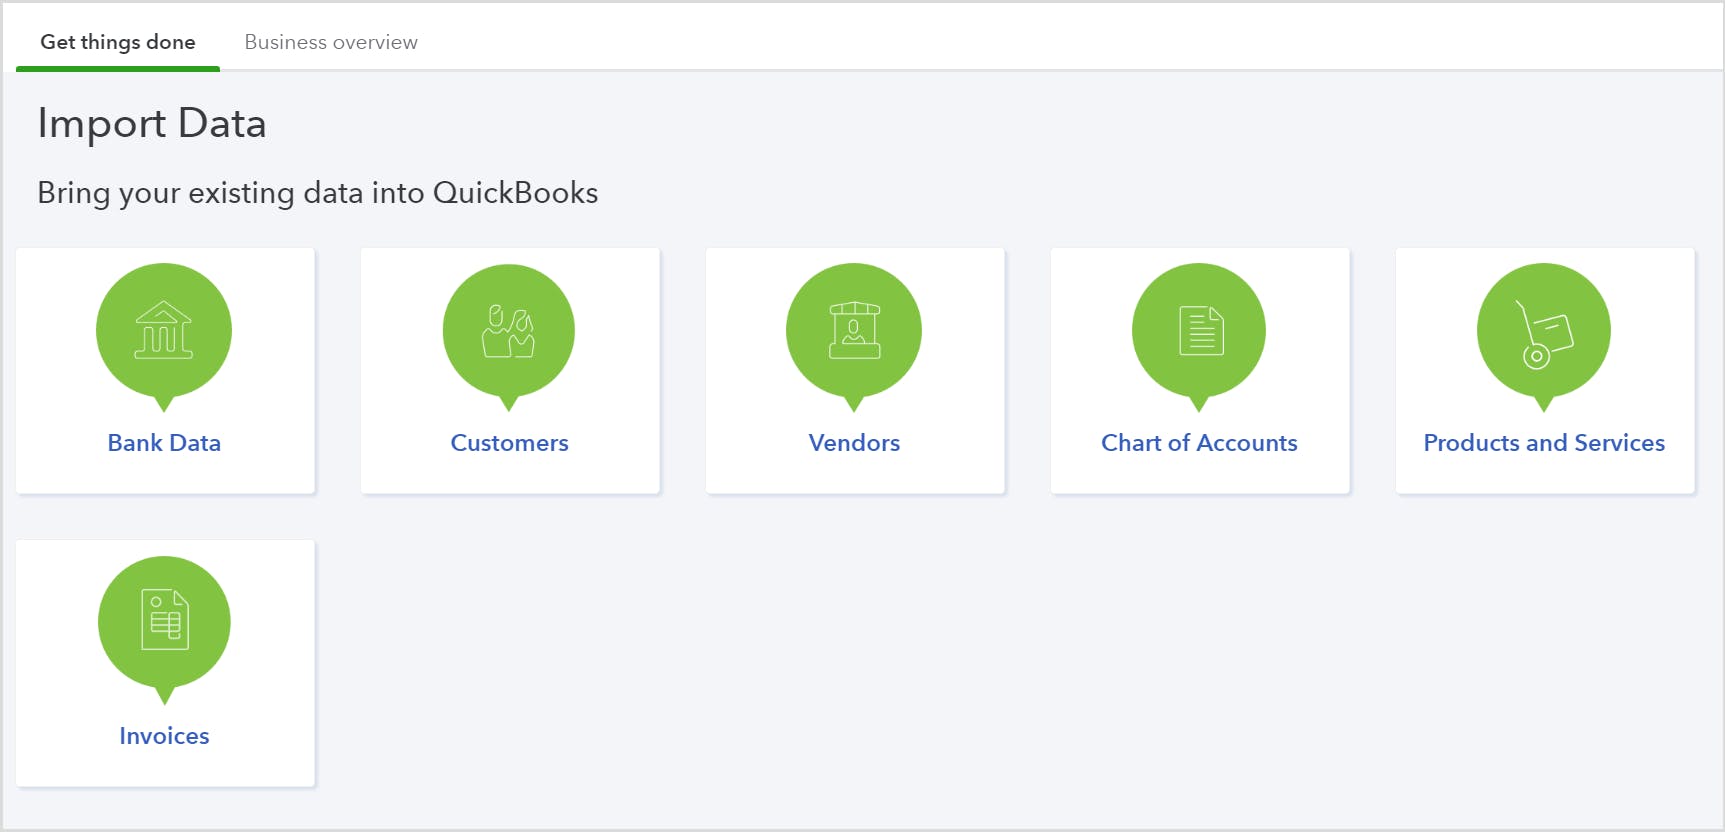
Step 4: Select the type of QuickBooks Online data that you want to import into the application.
Step 5: Browse your local device and select the file you want to import.
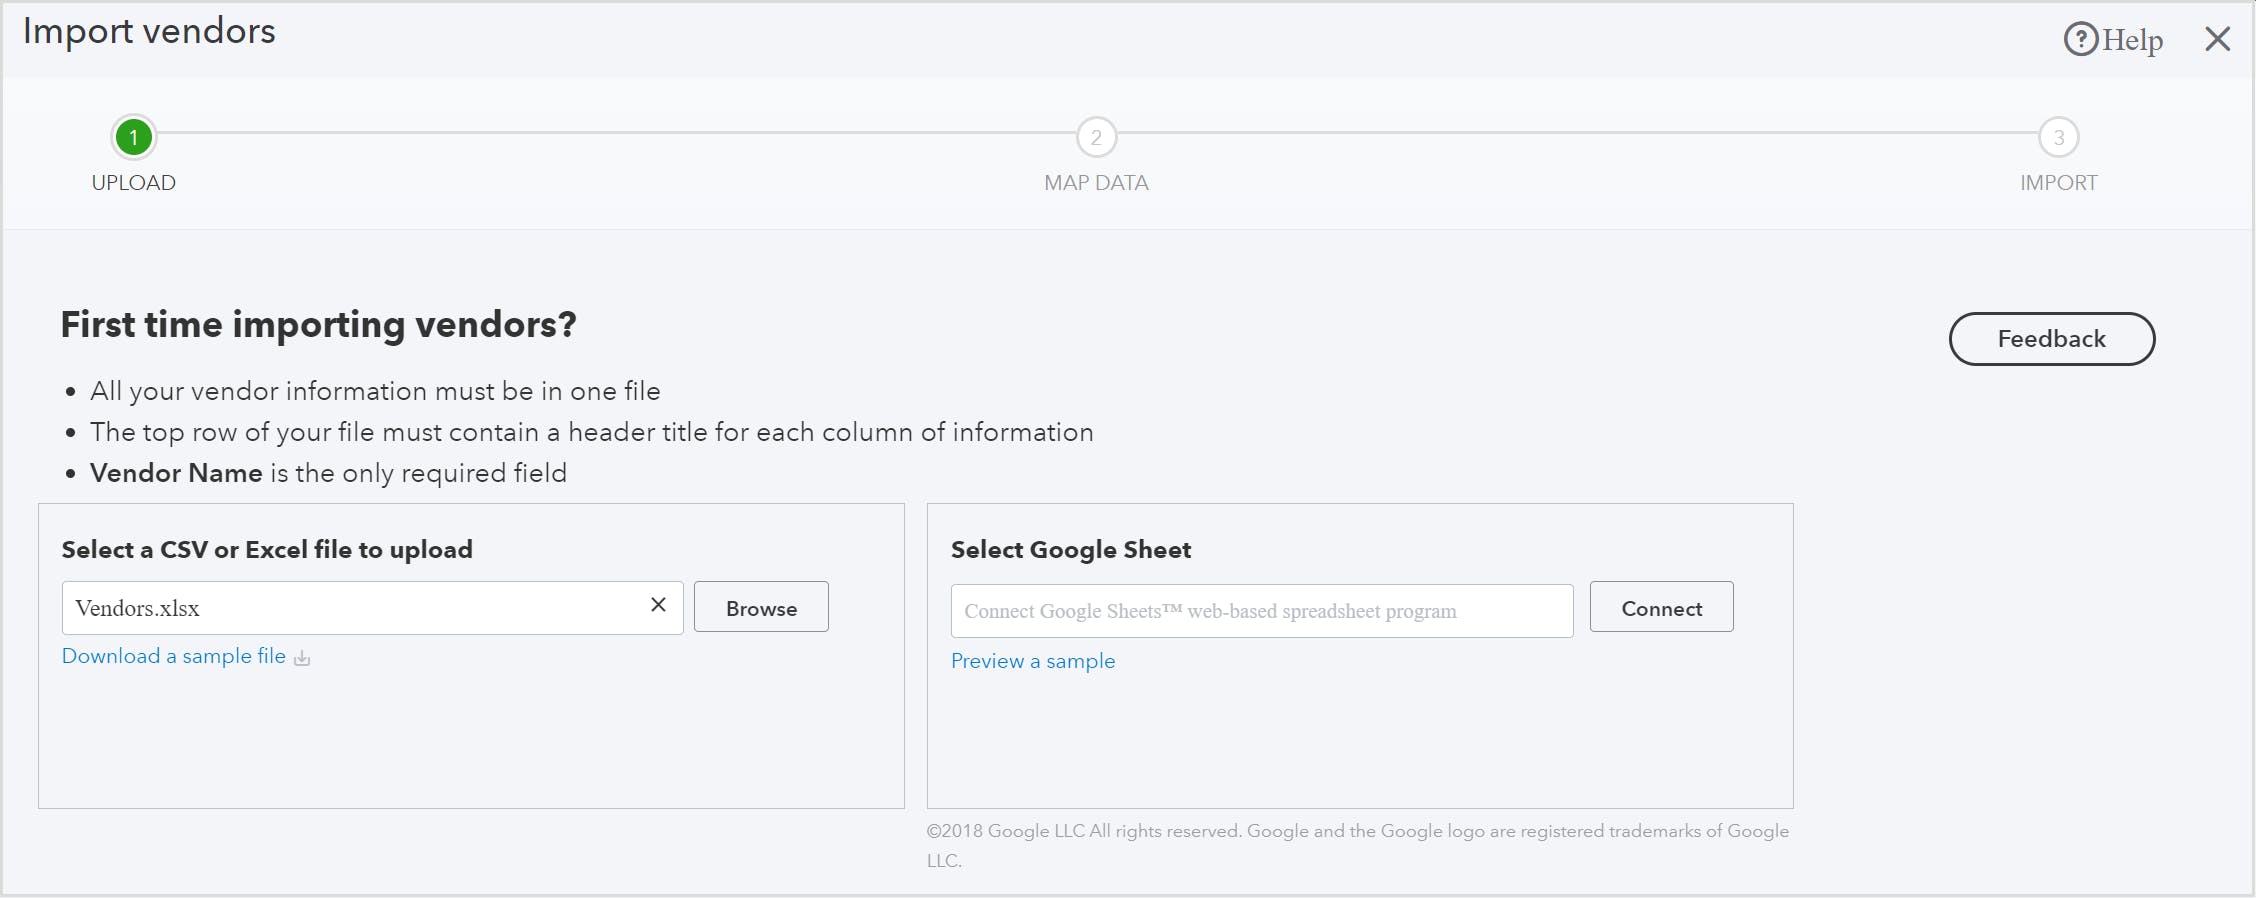
Step 6: Click “Next”.
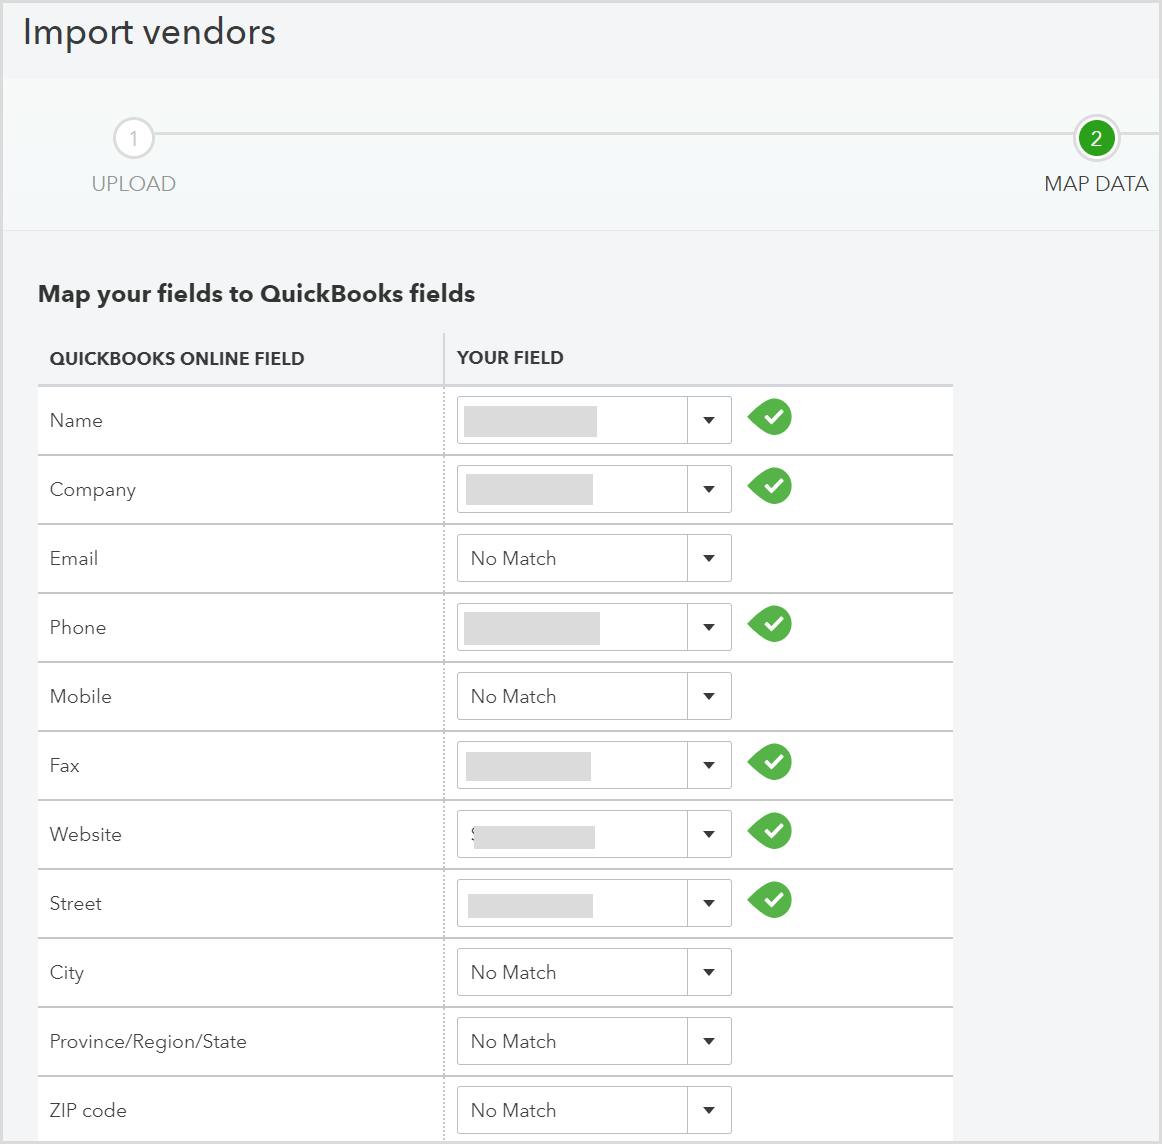
Step 7: Map the fields in your file to fields in QuickBooks Online.
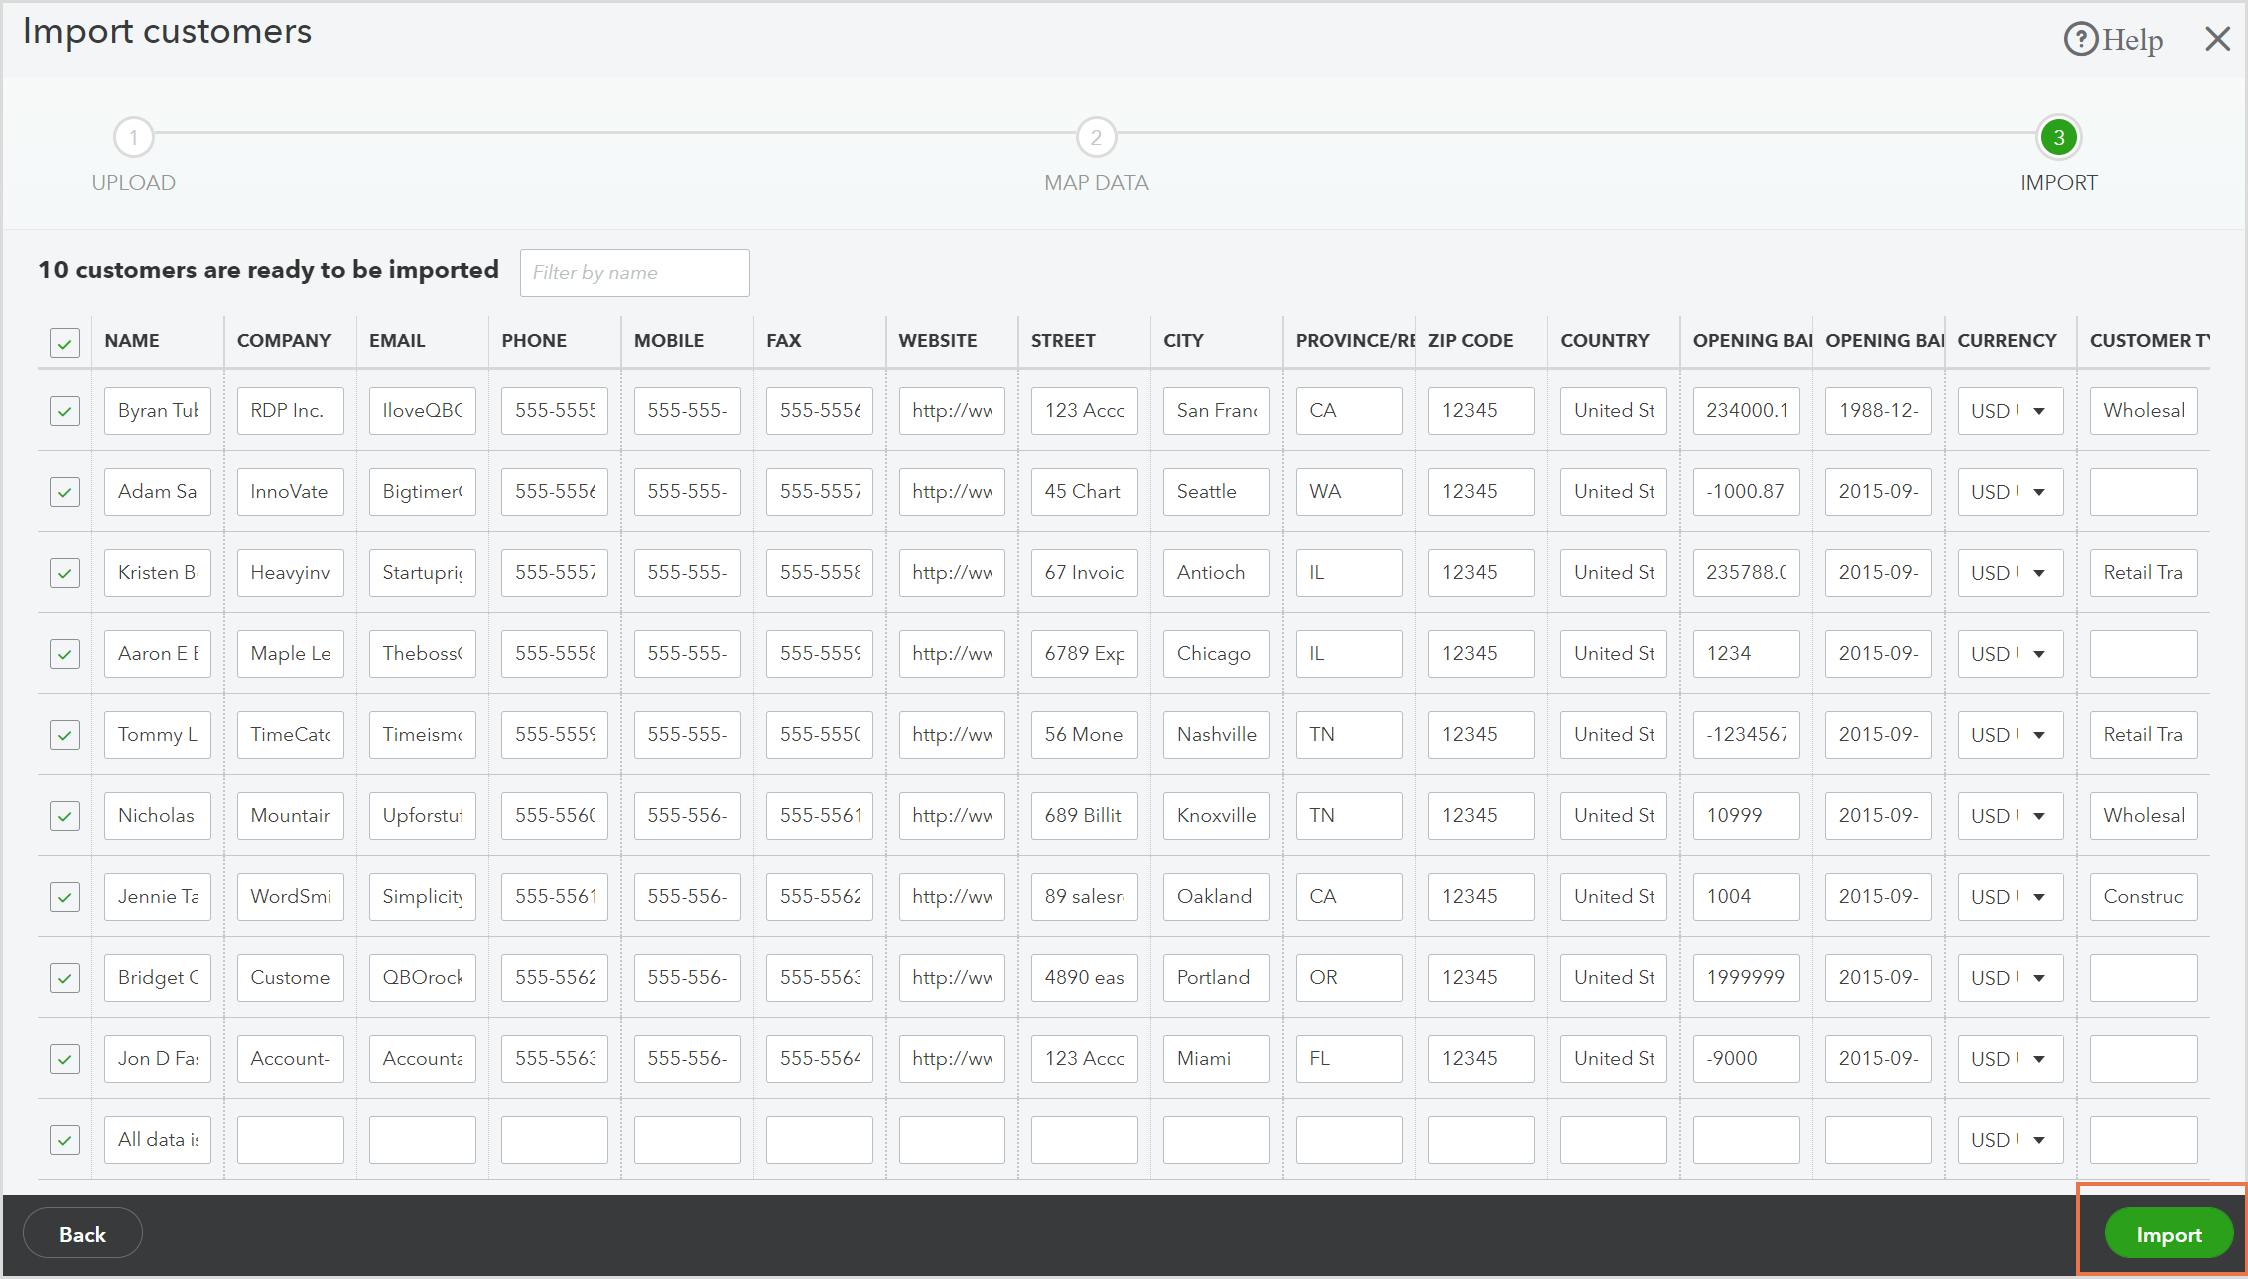
Step 8: Review your data and click “Import”.
QuickBooks Online data recovery from the SysCloud backup archives
SysCloud automatically backs up QuickBooks Online transactions and list data associated with multiple QuickBooks Online companies and makes it possible to undo accidental deletions by allowing users to restore data anytime.
How to restore a deleted QuickBooks Online transaction from the SysCloud backup archives?
Step 1: Log in to your SysCloud account.
Step 2: Click “Archives> QuickBooks Online”.
Step 3: Select the company you want to restore the list to.
Step 4: Click “Transactions” from the navigation menu on top.
Step 5: Select the type of transaction you want to restore.
Step 6: Select the transaction you want to restore. You can select multiple transactions at once.
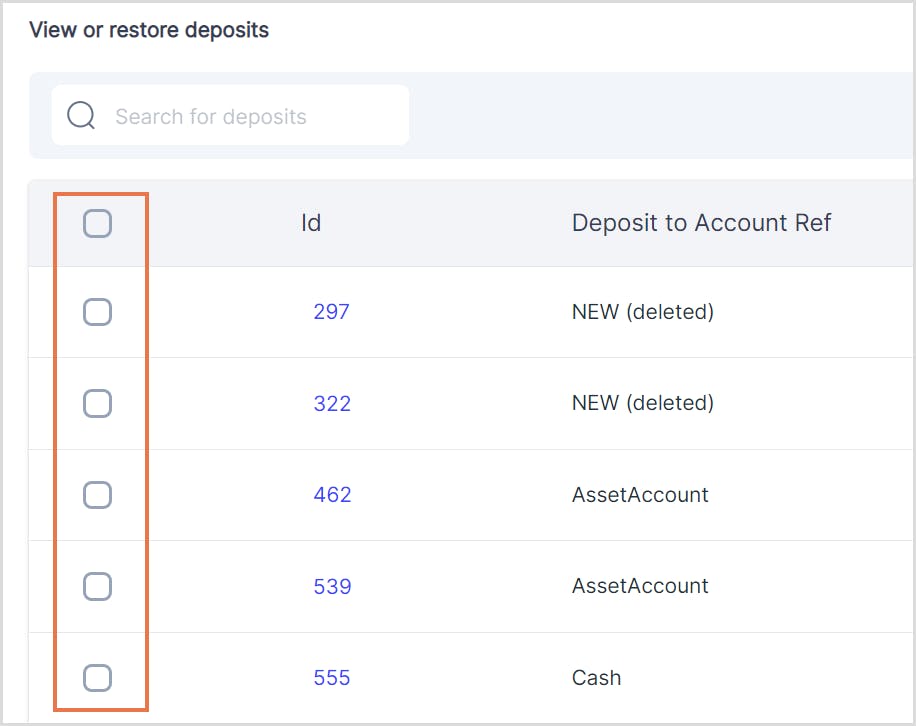
Step 7: Click “Restore” from the action bar on top.
Step 8: In the confirmation dialog box, select the checkbox beside “Overwrite item(s)?” to overwrite the existing transaction (if unselected, the item will be restored with a new ID). Select the checkbox next to “Restore associated attachable(s)” if you want the attachable(s) (if any) also to be restored. You can also add any comments in the “Add comment” section and this will be added to the restore report. Then, click the Restore button.
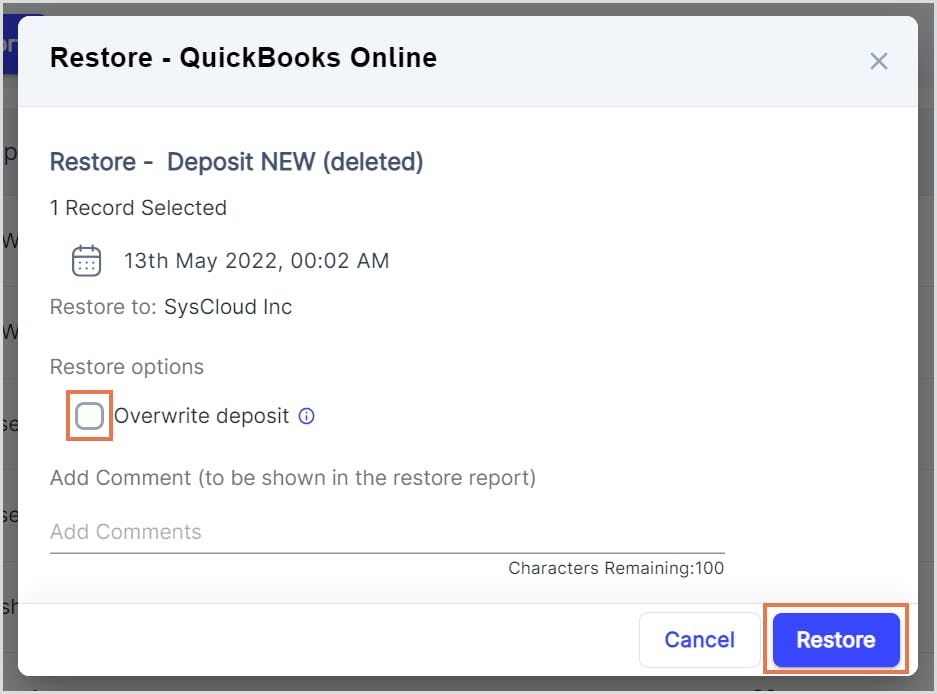
Caution: If you unselect the “Overwrite item(s)” option, the transactions will be duplicated on your QuickBooks Online company. This could create discrepancies in your company’s financial statements.
Note: According to QuickBooks Online API, a list entry (such as a Vendor or Customer) corresponding to a transaction should exist when the transaction is being restored. If the list entry is deactivated or deleted, SysCloud will automatically recreate the list items and then restore the transaction.
How to restore a deleted QuickBooks Online list item from the SysCloud backup archives?
Step 1: Log in to your SysCloud account.
Step 2: Click “Archives> QuickBooks Online”.
Step 3: Select the company you want to restore the list to.
Step 4: Click “Lists” from the Navigation menu bar on top.

Step 5: Select the type of list you want to restore.
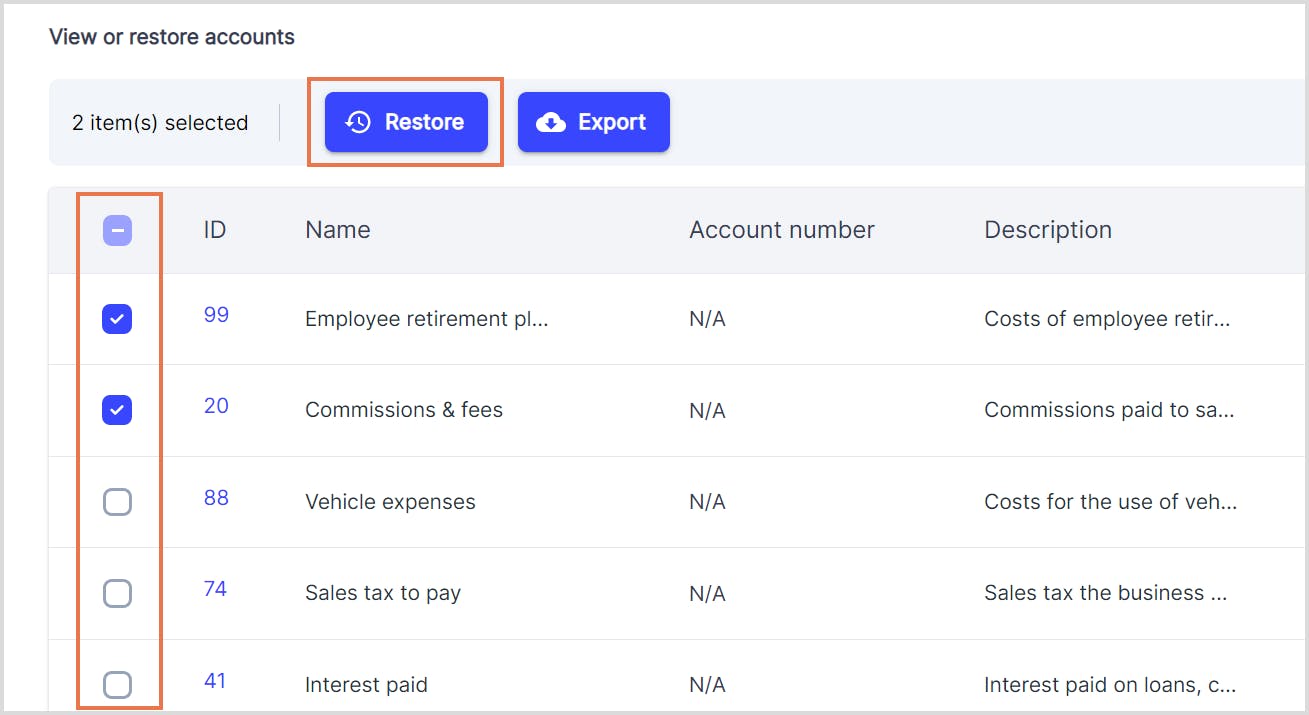
Step 6: Click the checkbox next to the item you want to restore. You can choose multiple items to be restored.
Step 7: Click “Restore” from the Actions tab on top.
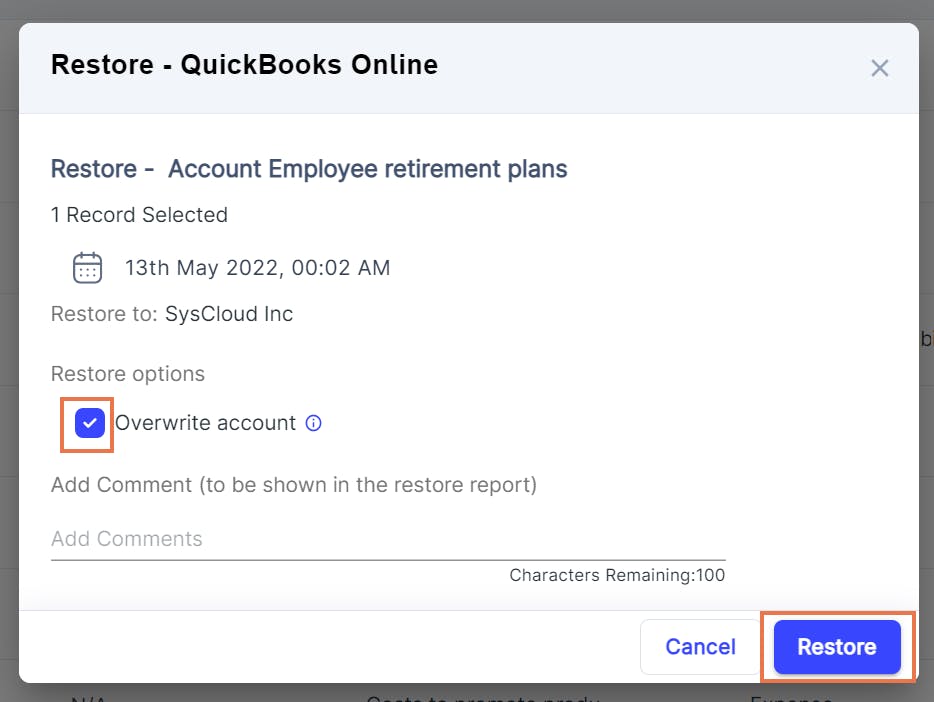
Step 8: In the confirmation dialog box, select the checkbox beside “Overwrite account(s)” to overwrite the selected item. If unselected, the item will be restored with a new ID. Select the checkbox beside “Restore sub-accounts if application” to restore the sub-accounts, if any. You can also add any comments that will be shown in the restore report. Click the Restore button.
How to restore a deleted QuickBooks Online attachable from the SysCloud backup archives?
Step 1: Log in to your SysCloud account.
Step 2: Click “Archives> QuickBooks Online”.
Step 3: Select the company you want to restore the list to.
Step 4: Click “Attachables” from the Navigation menu bar on top.

Step 5: Choose the attachable you want to restore by clicking the checkbox next to the file or note name. You can select multiple files/notes to be restored.
Step 6: Click “Restore” from the action tab on top.
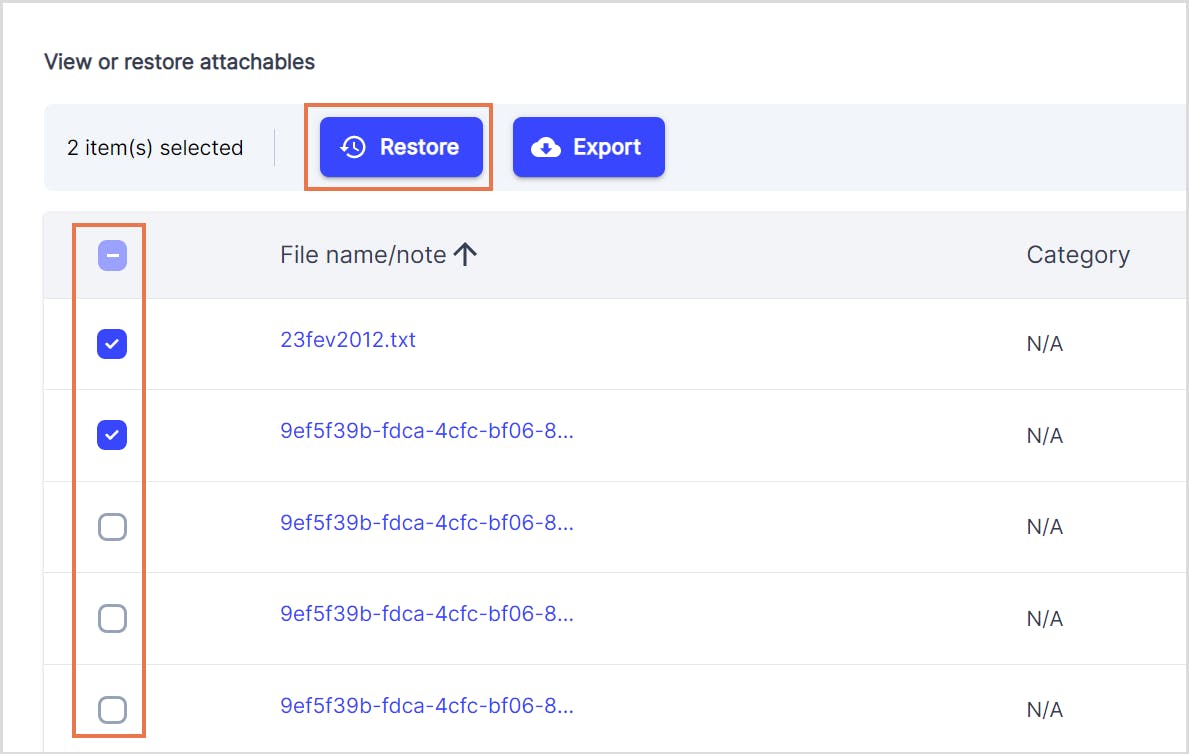
Step 7: In the confirmation dialog box, select the checkbox next to “Overwrite attachables” if you want the attachable in your QuickBooks Online account to be overwritten. If you unselect the checkbox, the attachable(s) will be restored with new IDs. Select the checkbox next to “Restore associated transactions” to restore any transactions associated with the file/note to be restored. You can also add any comments in the “Add comment” section and they will be added to the restore report. Click the Restore button.

To learn more about what you can back up and restore with SysCloud, click here.
Click here to learn more about SysCloud backup for QuickBooks Online.
Frequently asked questions
Can I restore a deleted QuickBooks Online transaction?
QuickBooks Online does not have a recycle bin. This means any transaction, list, or item that gets deleted gets removed from the application permanently, unless you have a backup in place. Click here to learn more.
How can I undo a transaction in QuickBooks Online?
There is no native undo option for the transactions made in QuickBooks Online. However, if you have a backup solution like SysCloud in place, you can easily view any point-in-time snapshot of the transaction and restore it to your QuickBooks Online account without any hassle.
Can I restore my QuickBooks Online transaction to a previous date?
The QuickBooks Online backup and restore tool is available in the Advanced subscription. However, the native recovery tool can only roll back the company data to a different point-in-time. cannot help you recover individual transactions, lists, or items. For a comprehensive backup and restore solution for QuickBooks Online, check out SysCloud.
Does QuickBooks Online have backups?
The QuickBooks Online backup and restore tool is available exclusively for QuickBooks Online advanced users, at no additional cost. The backup and restore tool is not available for QuickBooks Online Simple Start, Essential, and Plus plans. To learn more about how you can backup your QuickBooks Online data, and implement a comprehensive data retention strategy, check out How to Backup QuickBooks Online Data.
How to recover a deleted transaction in QuickBooks Online
Click here to learn more.
Recommended content
How to Backup QuickBooks Online Data
Learn how to backup QuickBooks Online using native options as well as third-party cloud backup tools.
Learn more6 Reasons Why You Should Back up QuickBooks Online
Learn why it is critical for IT administrators to backup QuickBooks Online data.
Learn moreHow to Export QuickBooks Online Data
Learn how to export QuickBooks Online transactions and lists using native export options & third-party tools, and why it should not be used as a backup alternative.
Learn moreIn this article
- Recover data from QuickBooks Online backup
- Recover deleted QuickBooks Online data from exports
- Recover deleted QuickBooks Online data from SysCloud backup archives

