Categories
In this article
- What is Salesforce data model?
- Salesforce objects and fields
- Create a custom object in Salesforce
- Create a custom field in Salesforce
- Create a relationship between two objects
- Salesforce Schema Builder
- Data Management in Salesforce
- Salesforce data model best practices
A Complete Guide to Data Model in Salesforce
3 Jan 2023
10 min read
Anju George
Article at a glance
- Salesforce supports various object relationships like lookup and master-detail, each with specific behaviors affecting data integrity and access.
- Designing and modifying your data model using tools like Schema Builder can simplify complex relationships and enhance data management.
Read more
Salesforce is a leading enterprise software company that provides Customer Relationship Management (CRM) services to over 150,000 businesses globally. Using the Salesforce CRM platform, you can store, process, and analyze your business-critical data. For this process to run smoothly, the user should be able to view and organize their Salesforce data in an understandable manner. Therefore, it is critical to have a proper Salesforce data model for your organization.
1. What is Salesforce data model?
The Salesforce data model is the way you store and structure your Salesforce data. It is the way in which tables of data are stored in your Salesforce database to make them understandable to anyone who views them. In the Salesforce platform, ‘Objects’ represents database tables, ‘Fields’ represents columns, and ‘Records’ represents rows.
1.1. Why is data model in Salesforce important?
- User experience
- Data reporting
- Data loading
- Ability to automate key business processes
- Data access and security policy
Note: Data model is not the infrastructure or where your data is physically stored; it is how your data is stored and categorized. The Salesforce data model is essentially an aggregation of Salesforce objects and fields, and data modeling is the process of giving structure to your data using objects, fields, and relationships.
2. What are Salesforce objects and fields?
2.1. Objects in Salesforce
(a) Standard objects: These are out-of-the-box objects that are created by Salesforce and come pre-built when you implement the Salesforce platform. These are the objects that are necessary to perform basic CRM activities. Some common examples of standard objects are Accounts, Contacts, Opportunities, and Leads.
(b) Custom objects: These are the objects created by the users if the pre-built standard objects are not enough to meet specific business requirements. Custom objects are used to track and store data that is unique to an organization. When Salesforce is connected to a third-party application (say ChargeBee), the third-party app can also create custom objects on the CRM.
2.2. How to create a custom object in Salesforce
Required editions:
Available in both Salesforce Classic (not available in all orgs) and Lightning Experience
User permissions needed:
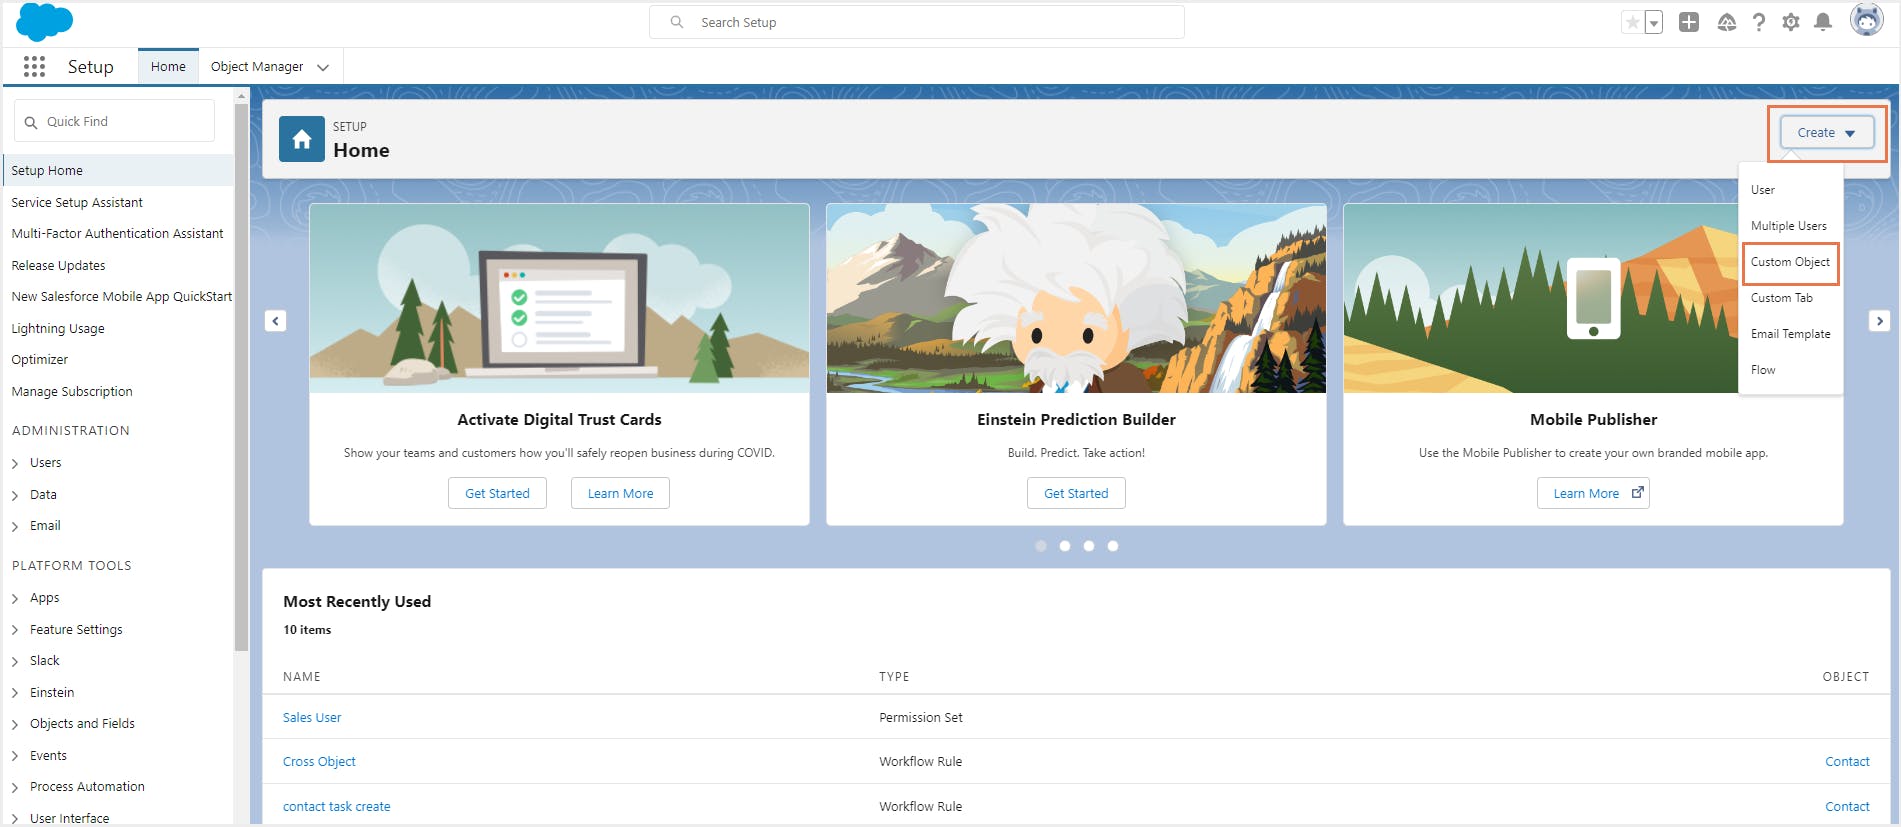
Step 1: Go to the Setup page. From the top right corner, click Create -> Custom object.
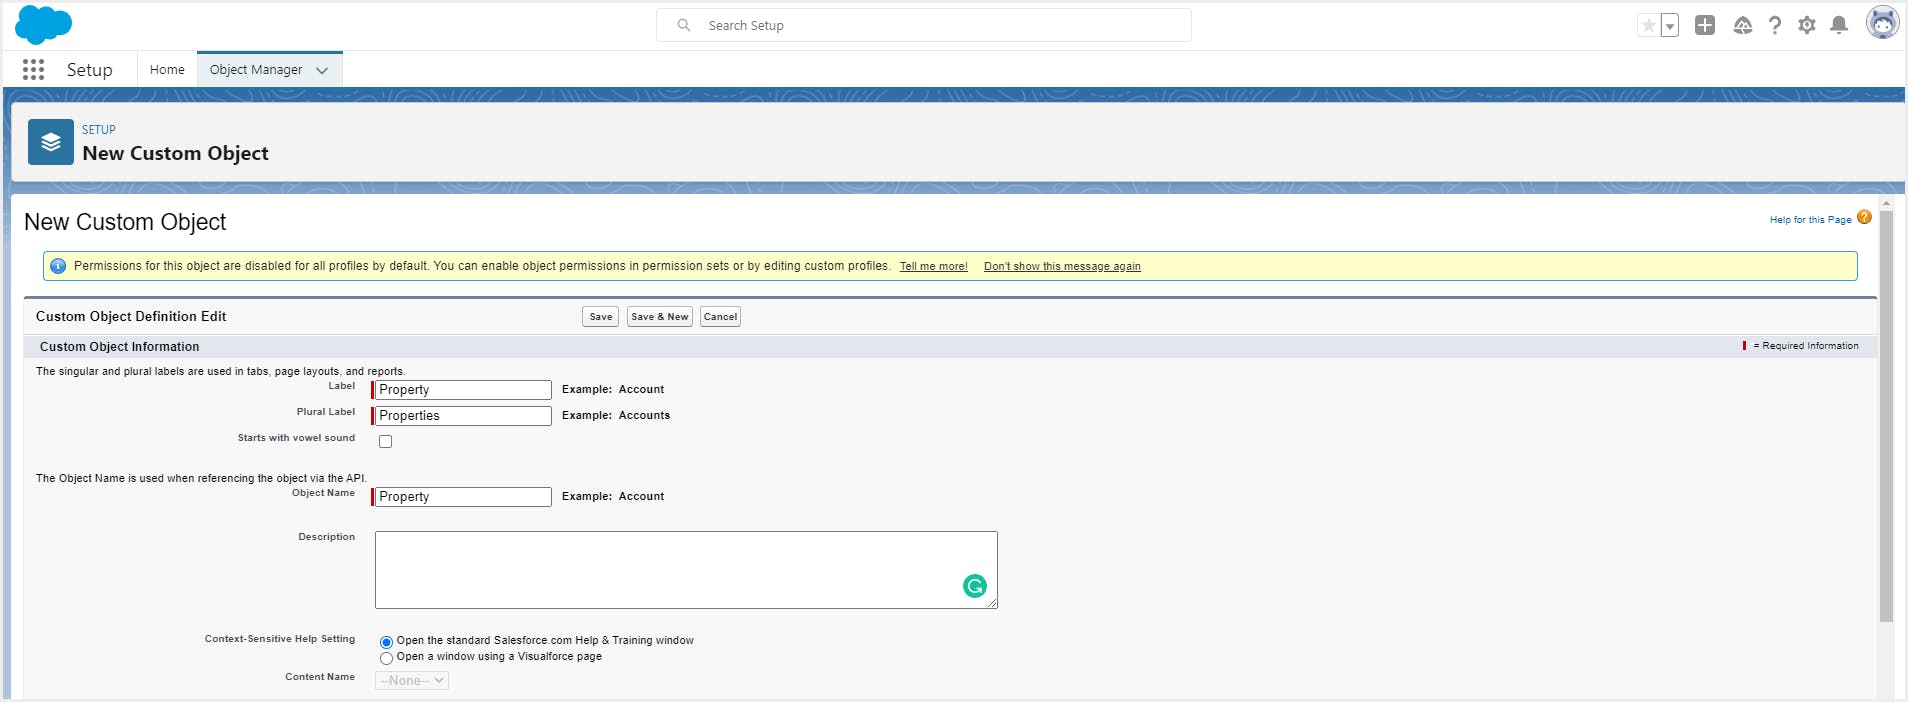
Step 2: Enter the singular and plural labels for the custom object, the object name, and the description. Learn more about the fields for creating custom objects.
Step 3: Enter the record name and data type, choose the optional features and other settings according to your business requirements.
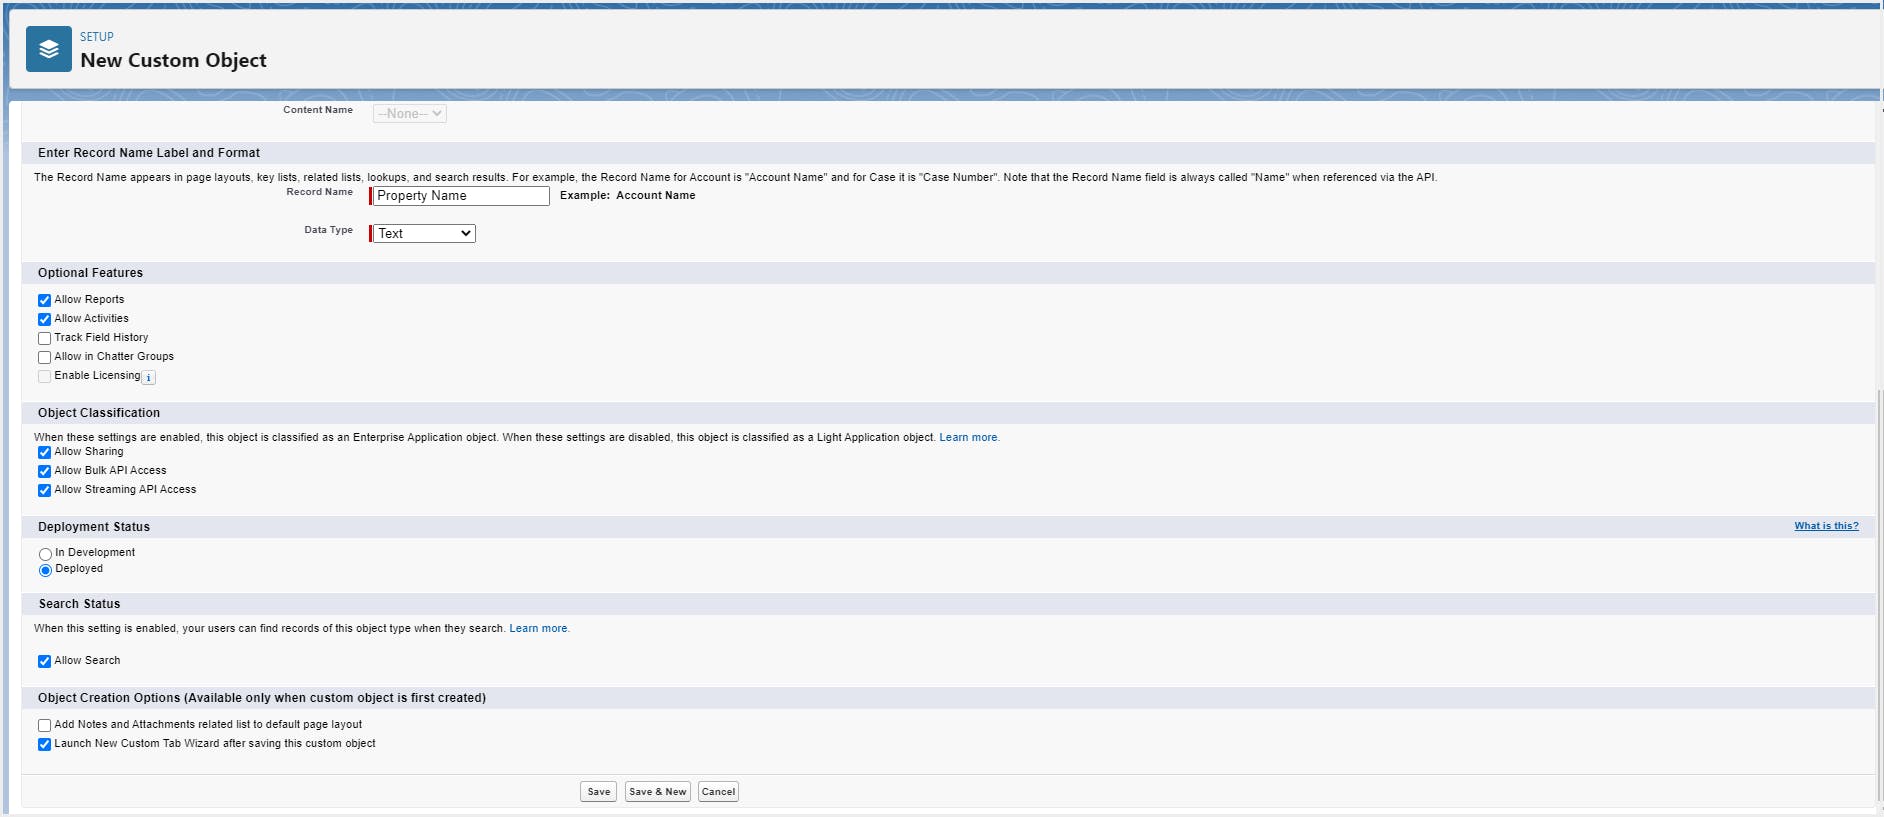
Note: Object creation options that you choose now cannot be changed later.
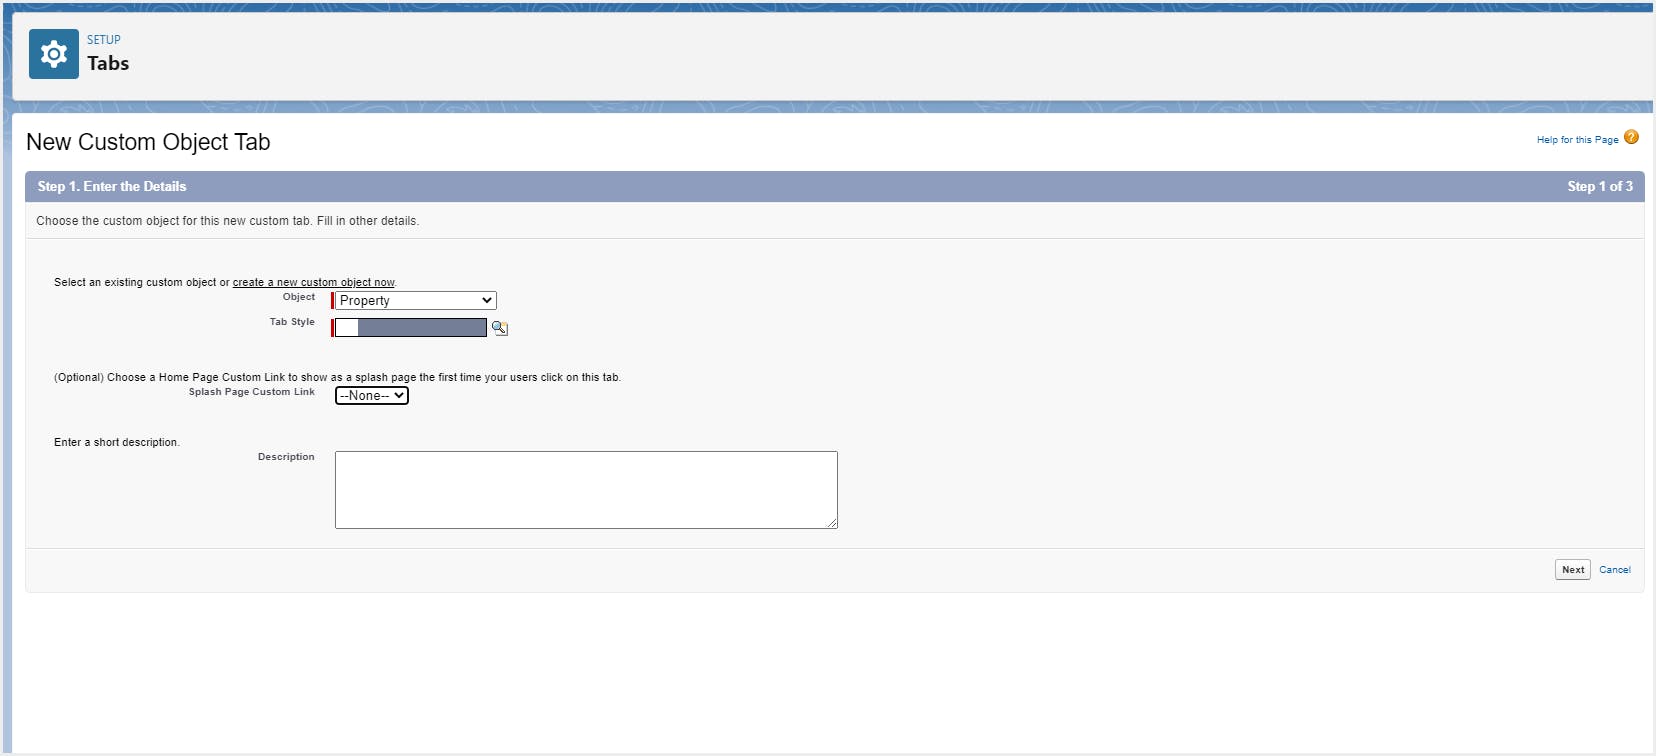
Step 4: Enter the details for the custom object tab. Choose the user profiles and custom apps for which the custom tab should be visible.
Once the custom object has been created, you can add custom fields to the object. Learn how to add custom fields to an object.
2.3. Fields in Salesforce
Standard fields, like standard objects, are pre-built in Salesforce and are common to most CRM businesses. Examples of standard fields include company name, contact, account number, status, date, and amount.
Custom fields are the fields that the users can create in Salesforce to capture information that is not covered by a standard field. You can create custom fields on both standard and custom objects. When you create a custom field, you specify where it appears, what information it contains, what format it should be in (such as number, text, date, or picklist), and who can access and edit it.
(a) Identity field
(b) System field A system field is a read-only field that provides information about a record from the system, like when the record was created or when it was last modified.
(c) Name field
(d) Custom field
2.4. How to create a custom field in Salesforce
Required editions:
User permissions needed:
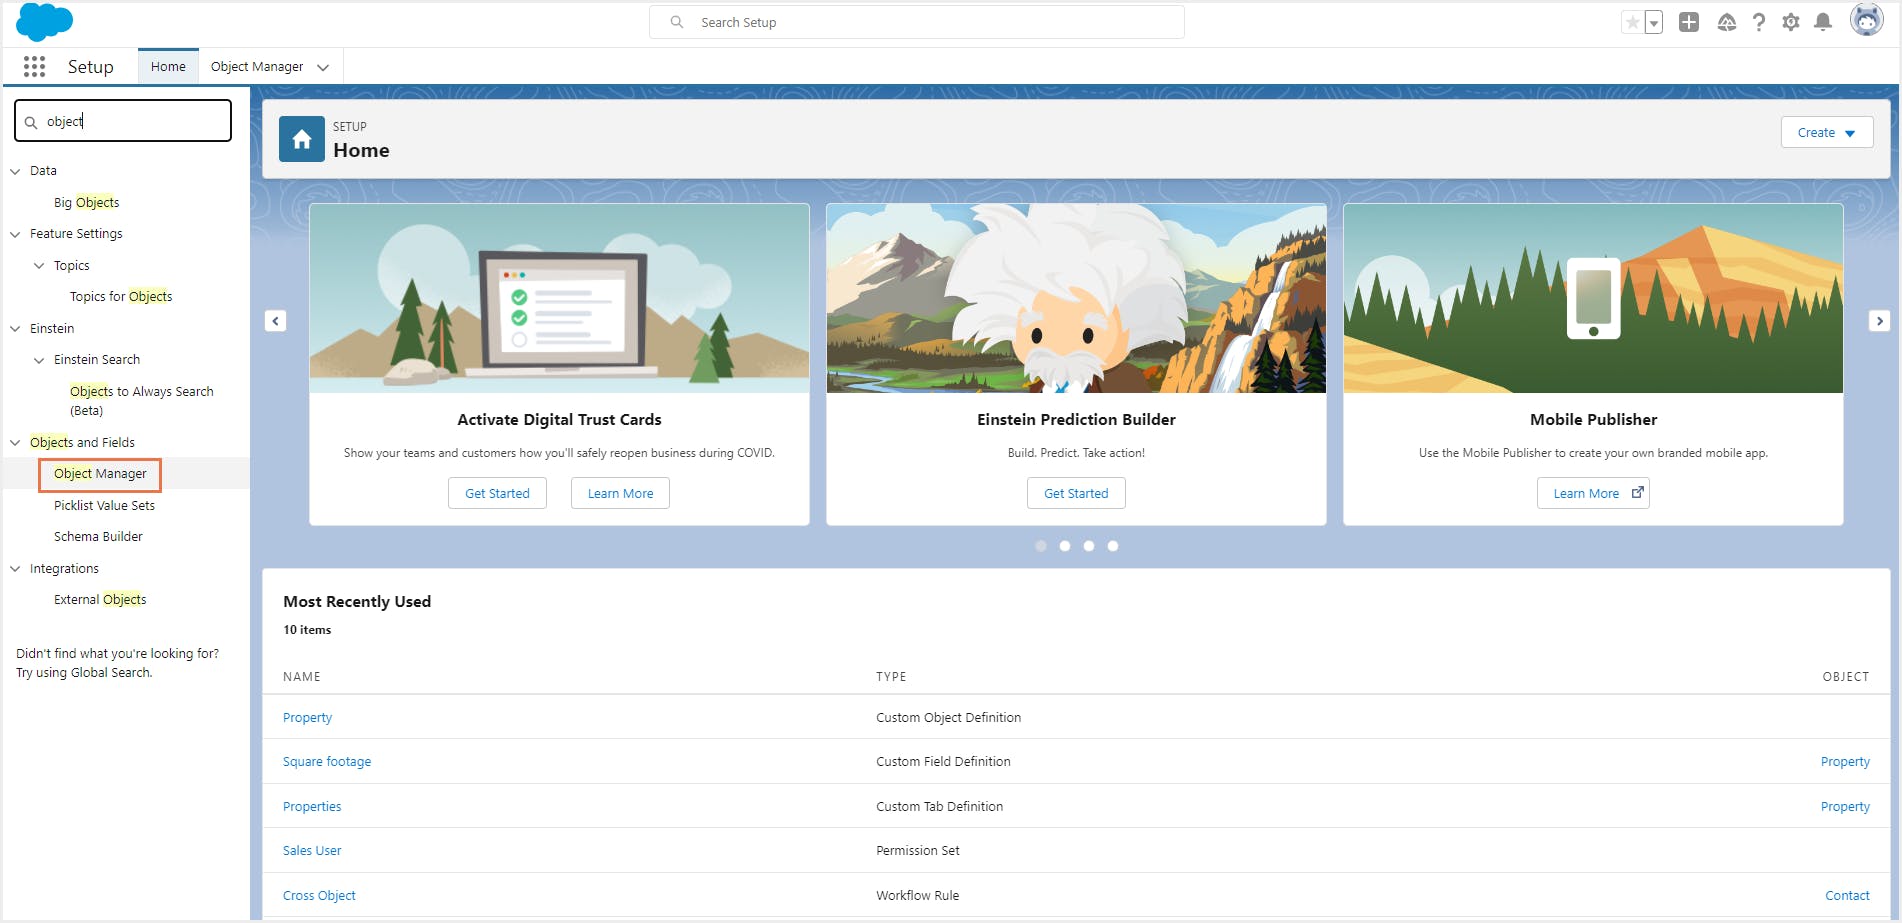
Step 1: Go to Setup and click on Fields & Relationships-> Object Manager.
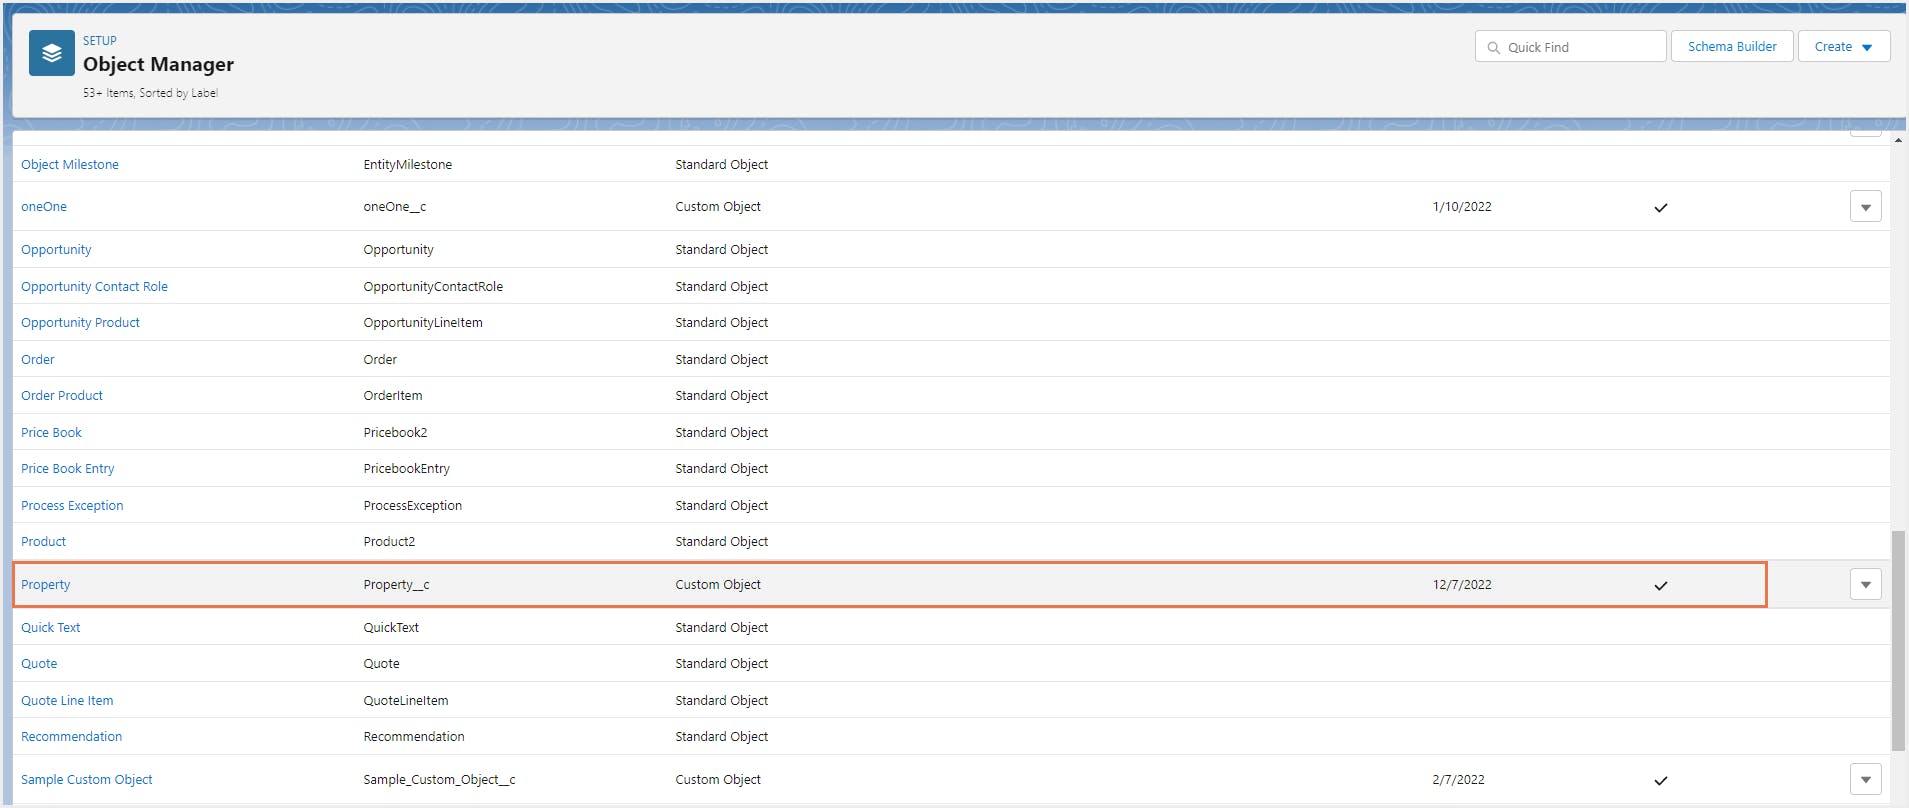
Step 2: Select the object for which you need to add a custom field. For example, select the custom object ’Property’ that has been created in the previous section. This opens the detail page for that object.
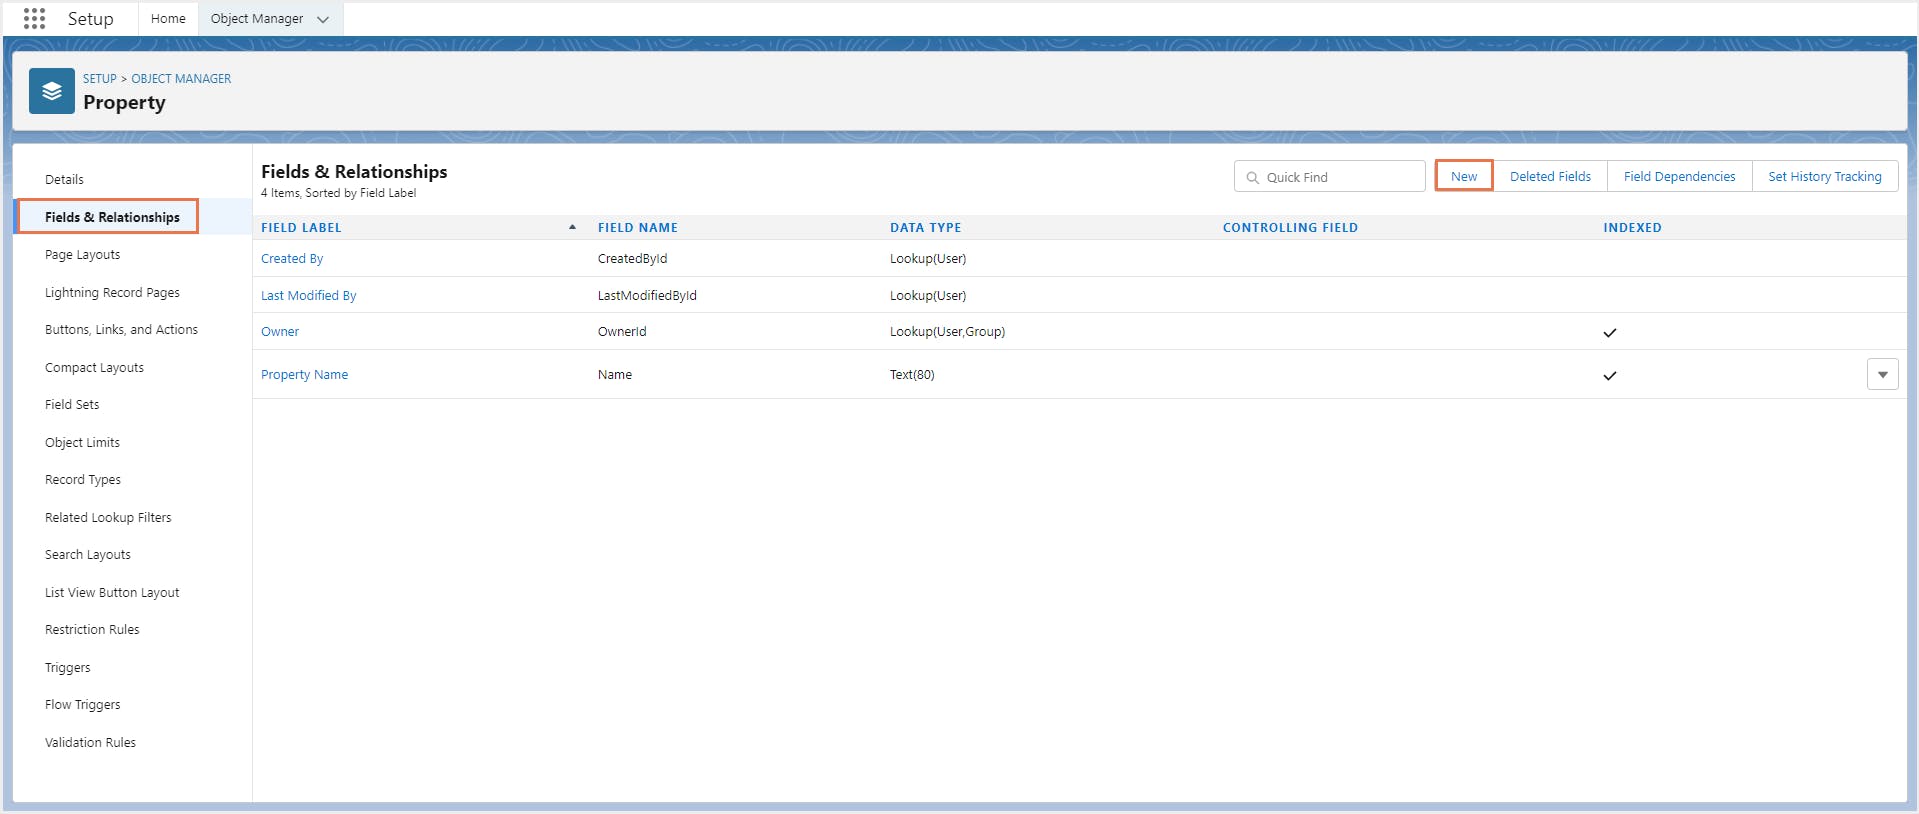
Step 3: Click Fields & Relationships from the left panel and click New to create a new field.
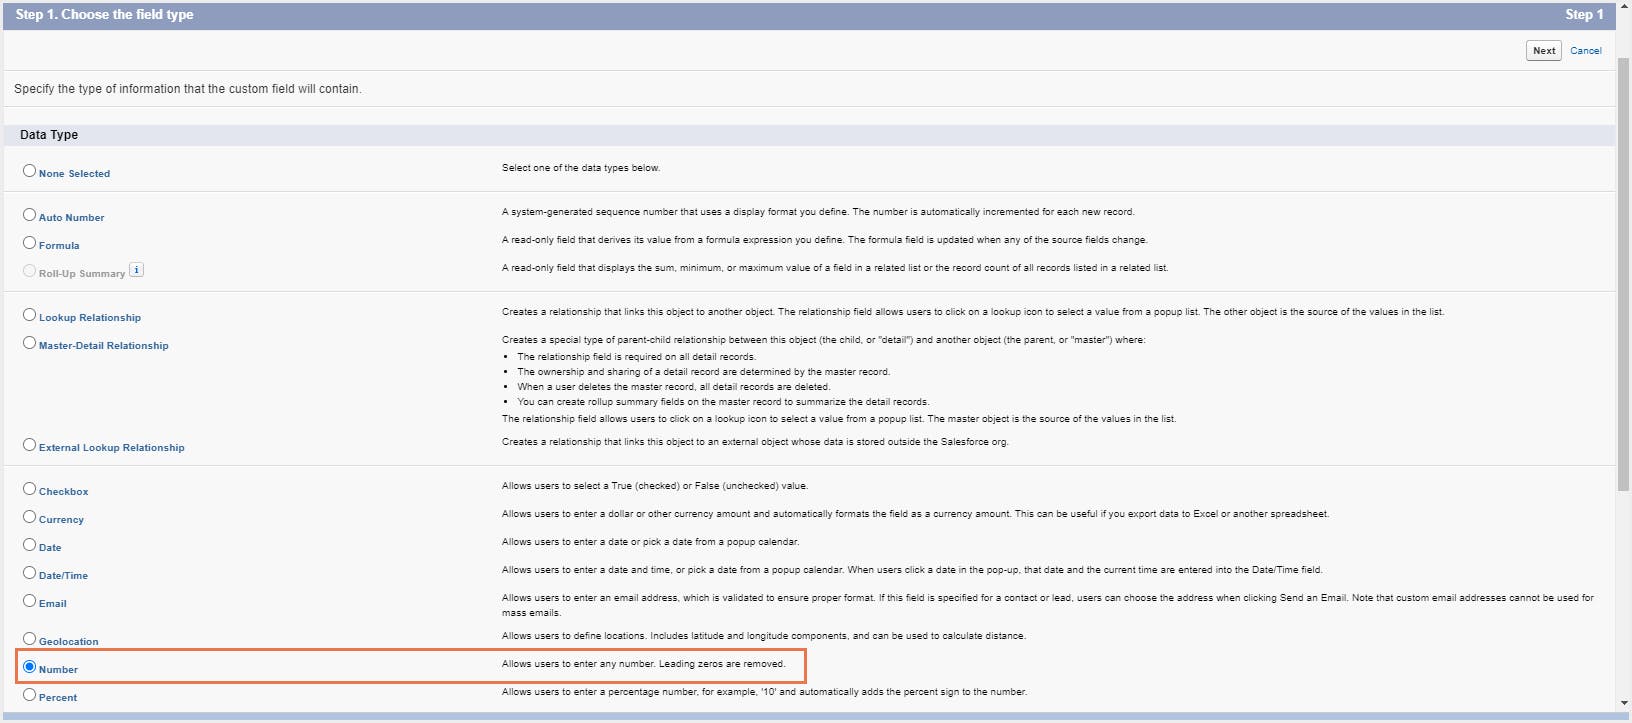
Step 4: Choose the field type. This gives you the ability to control the type of data that can be entered into the field. For example, if you create a field with the 'Number’ data type, users can only enter a numerical value to the field. Click Next.
Step 5: Enter the field details and click Next.
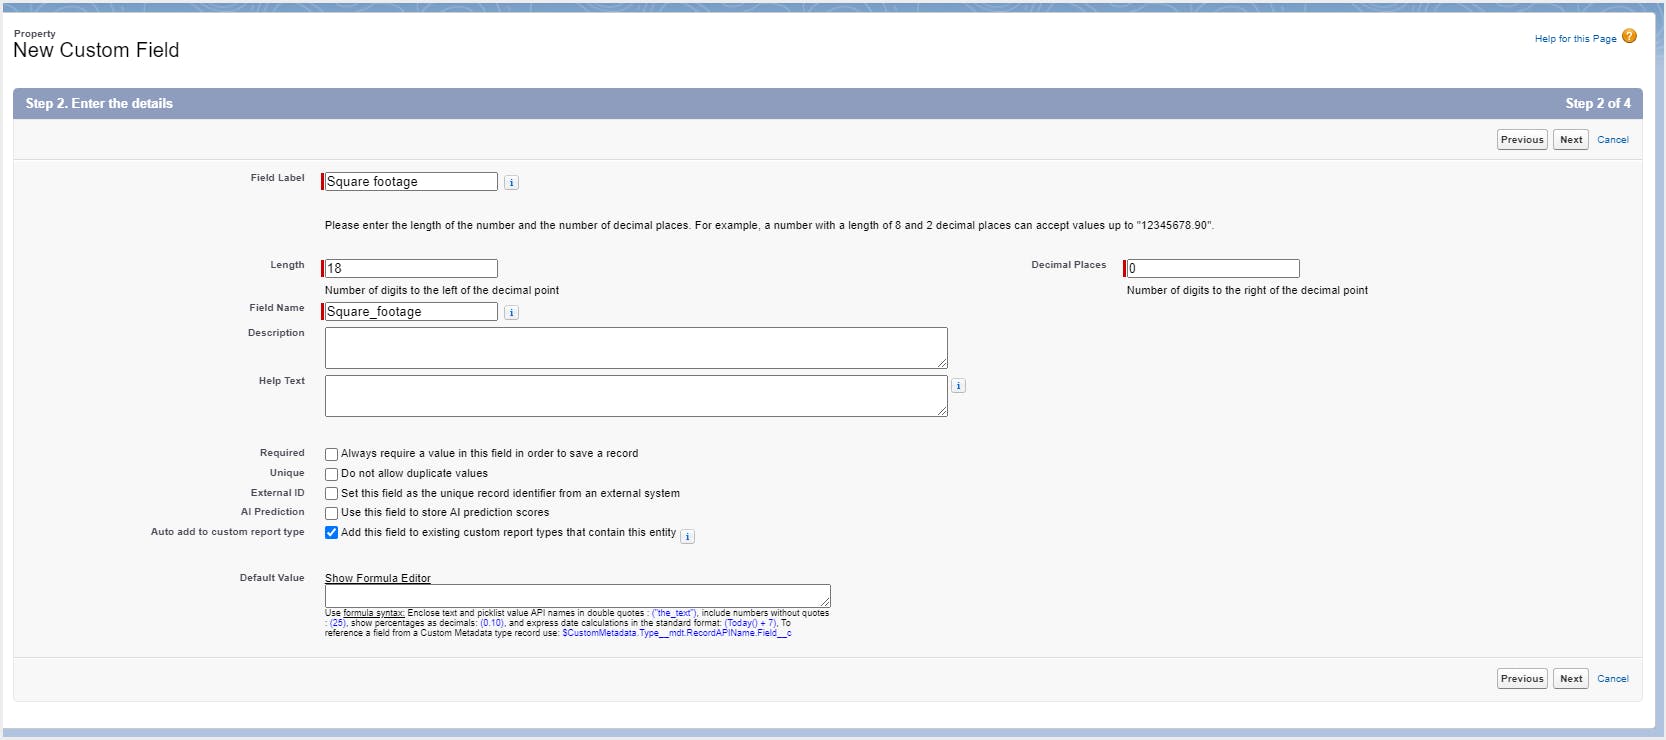
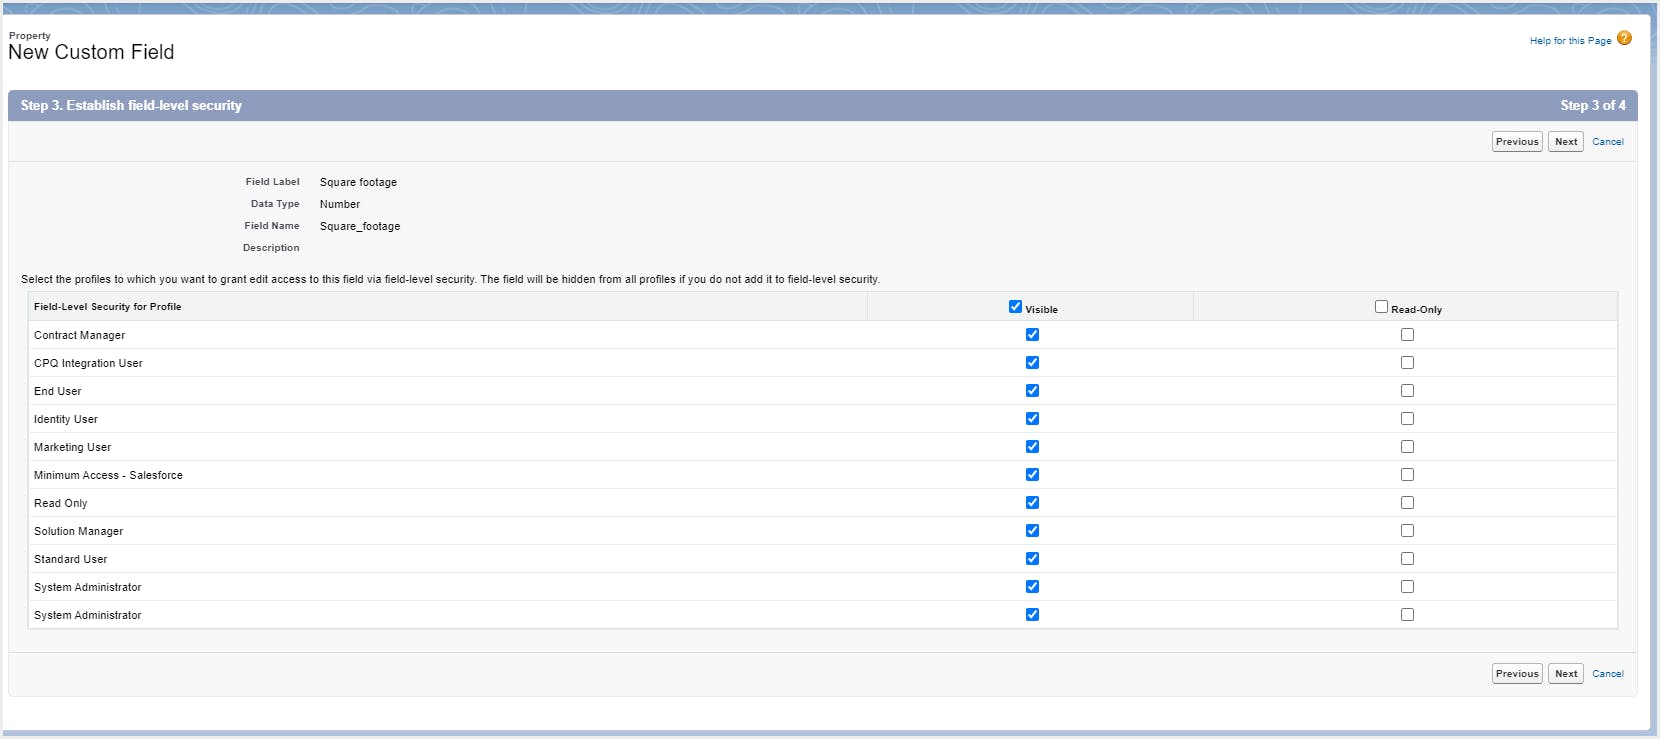
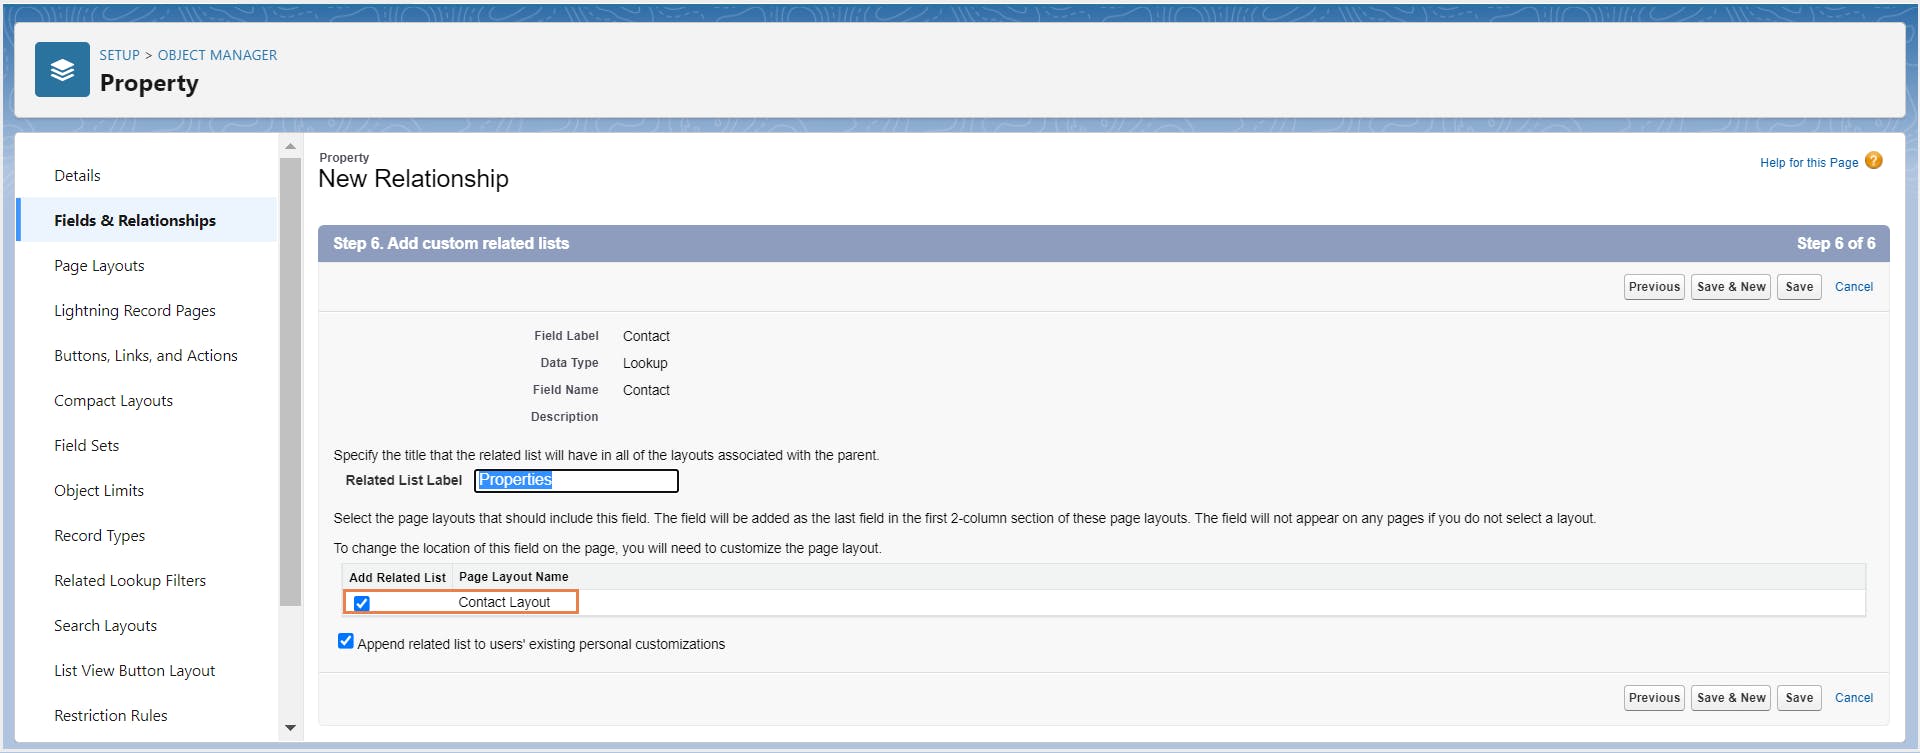
Step 6: Select the profiles to which you want to grant access to this field and click Next. Select the page layouts that should include this field. Click Save.

Note: If you do not want to create a custom object and its fields manually, you can use a spreadsheet to add the object and its fields to Salesforce and populate all its record data. Learn how to do this.
3. Object relationships in Salesforce
3.1. Types of relationships in Salesforce
3.1.1. Lookup relationship
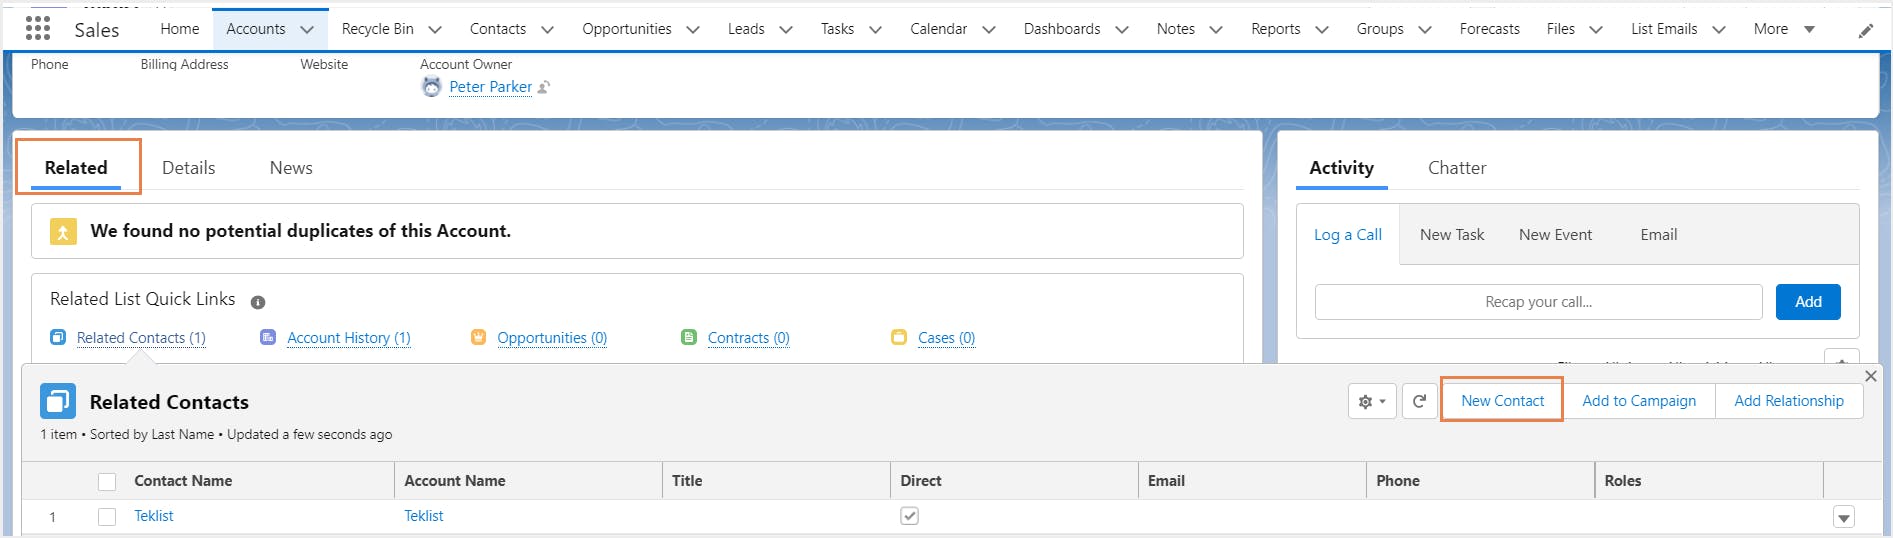
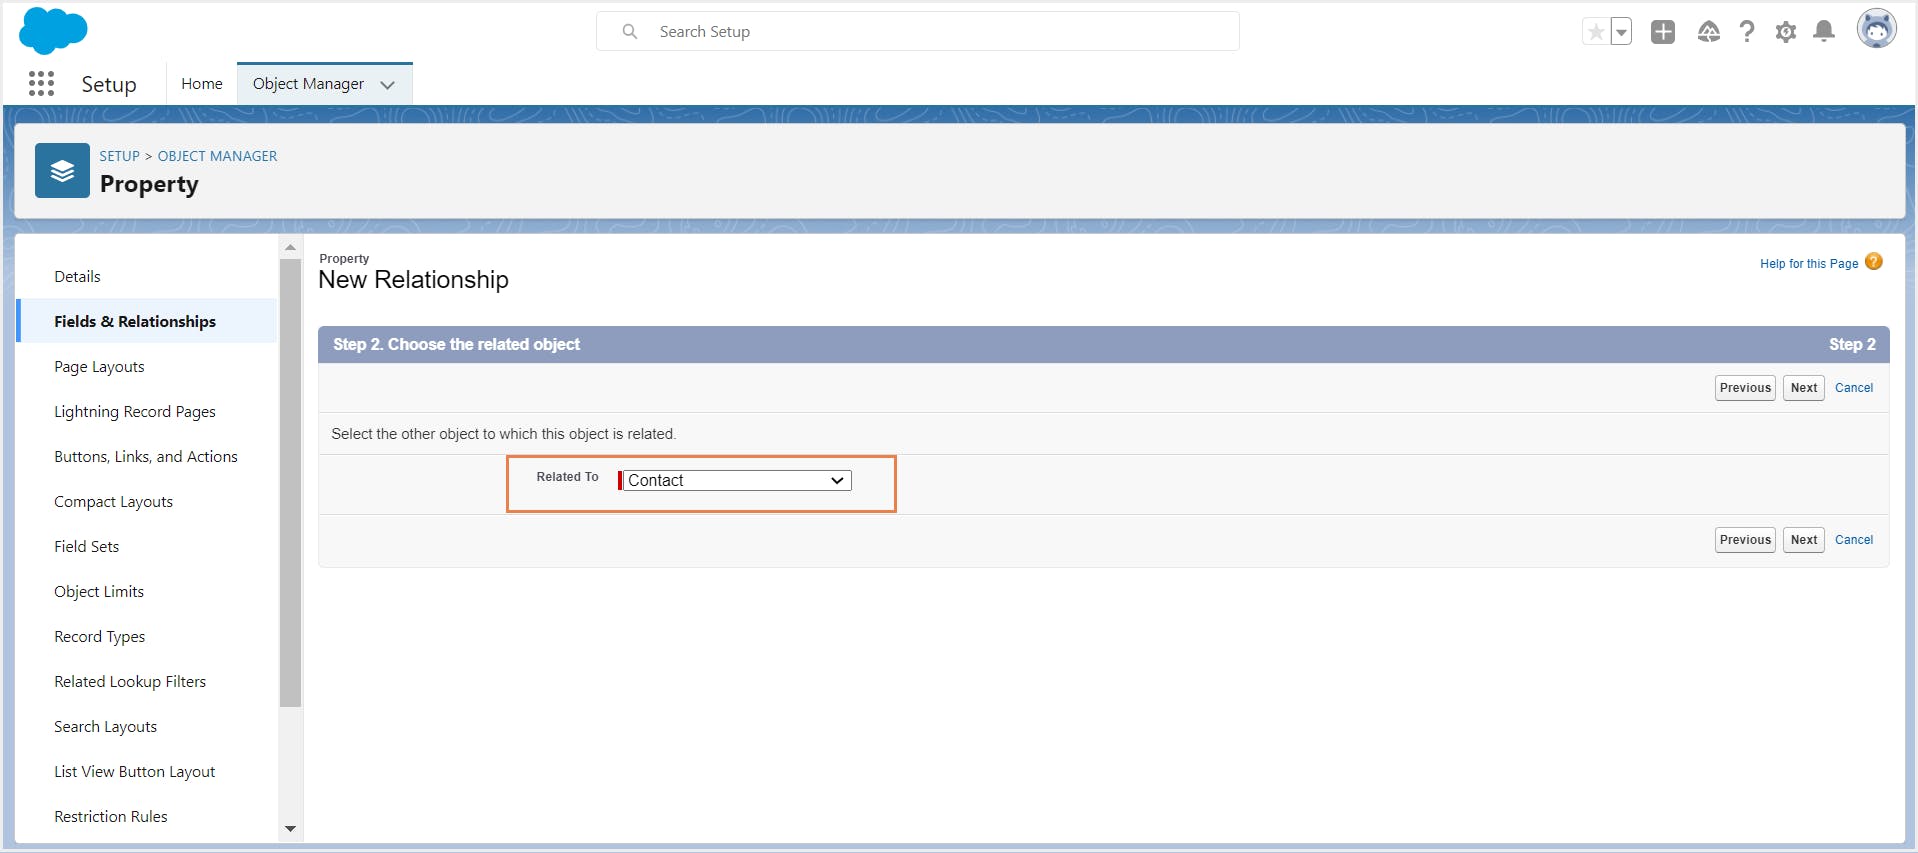
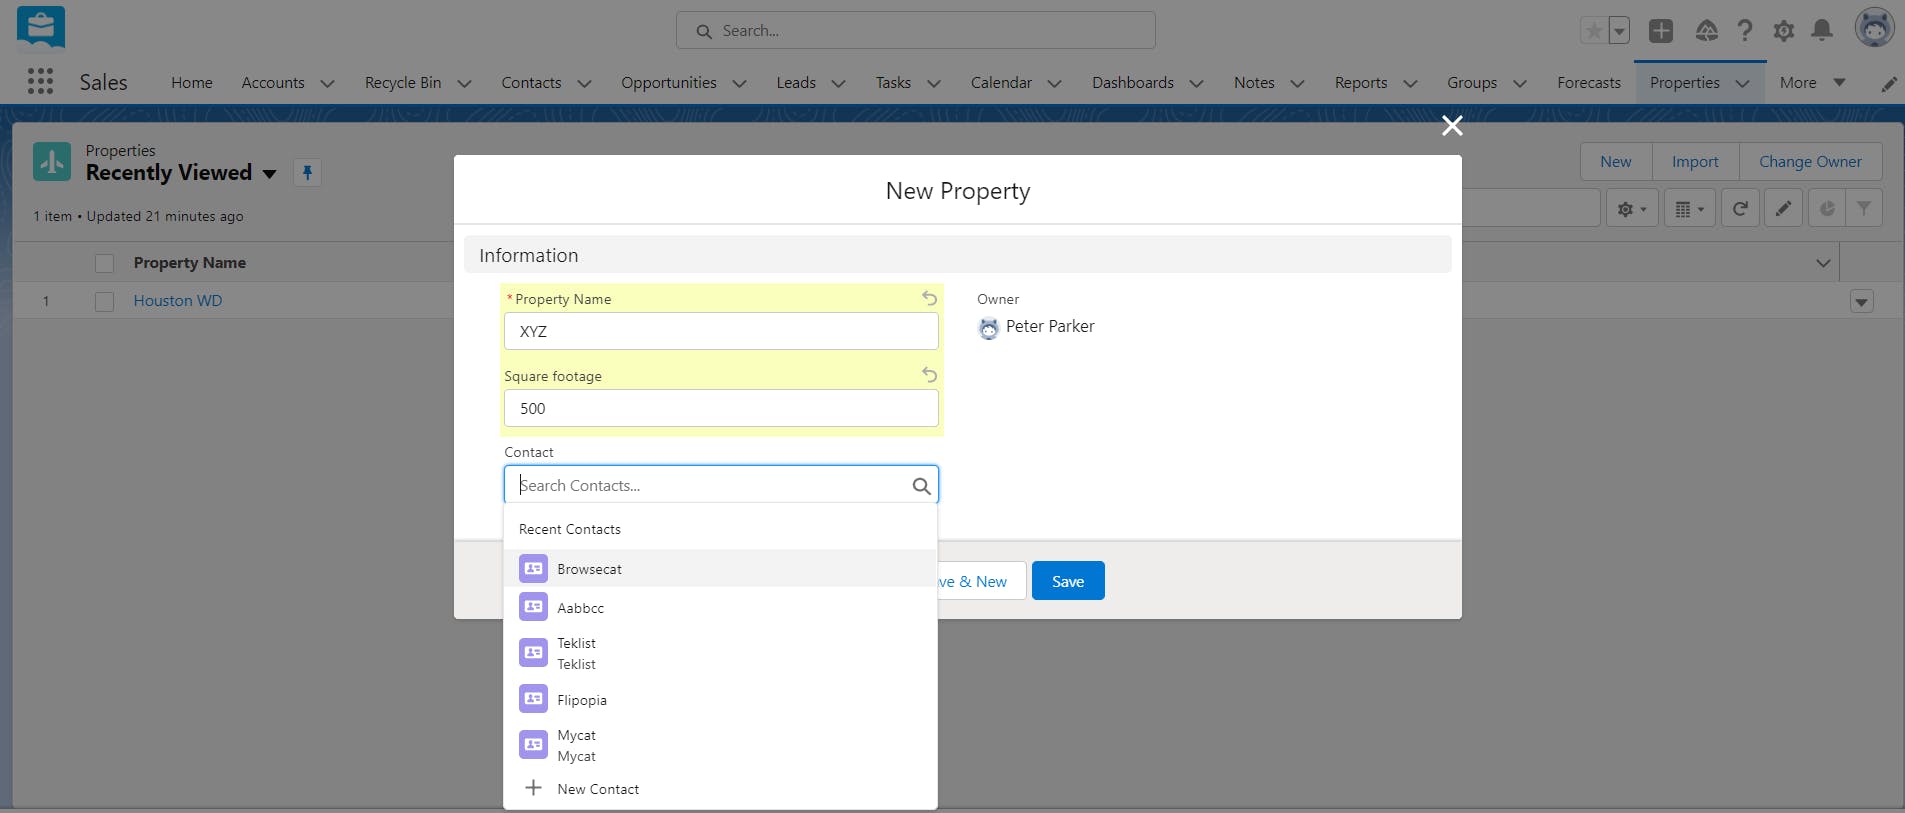
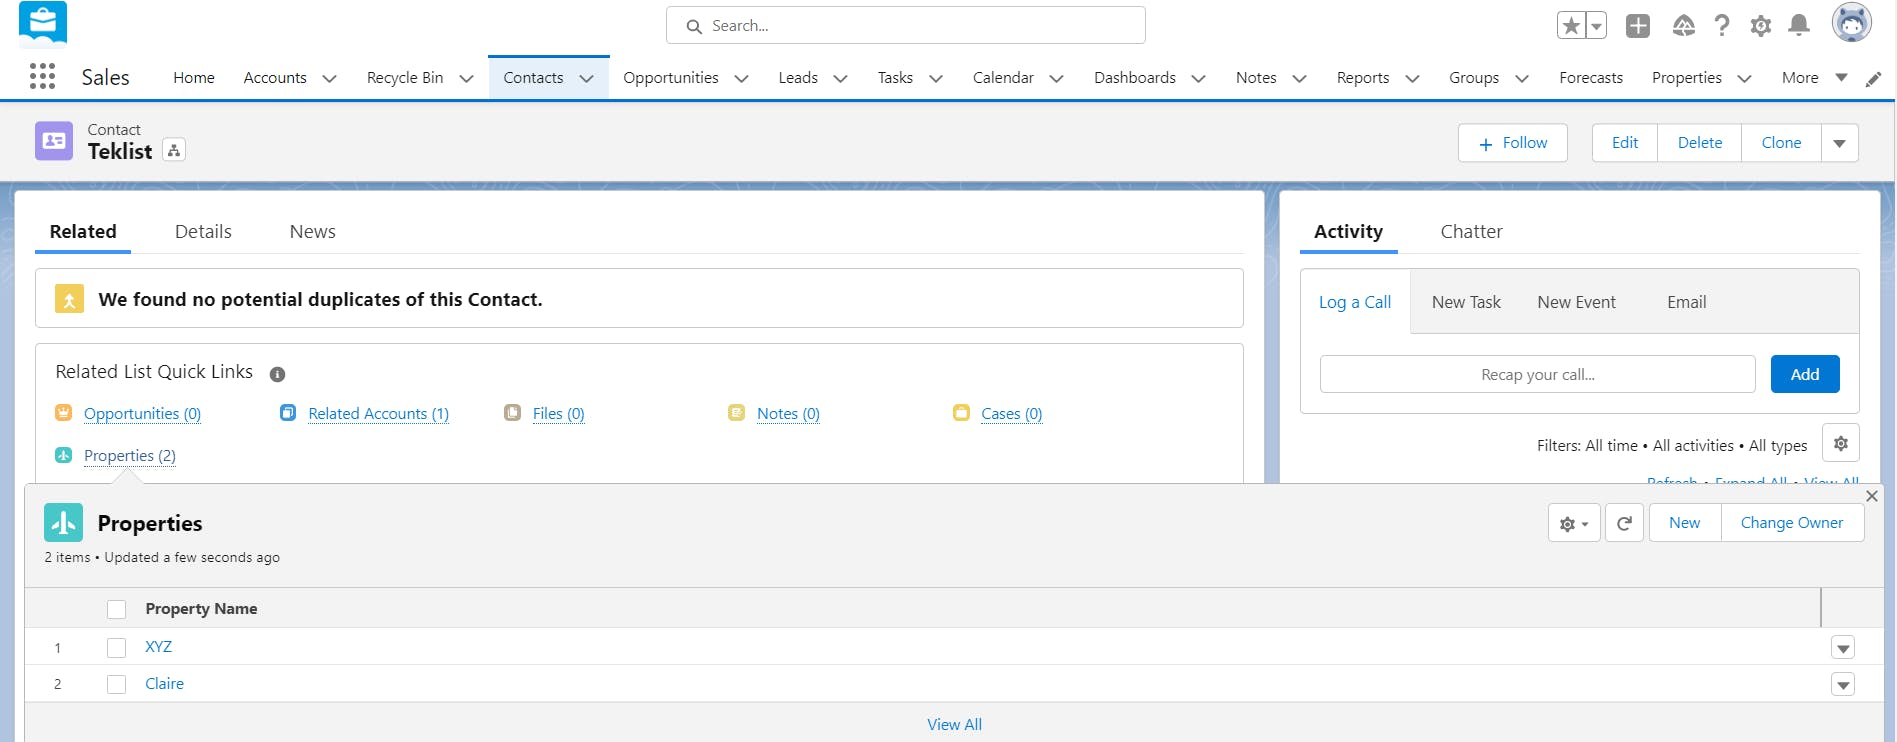
To create a custom lookup relationship between two objects, you will have to add a lookup relationship field on the child (many-sided) object. The relationship field allows users to click on a lookup icon to select a value from a pop-up list. The other object (one-sided object or parent object) is the source of the values in the list. For example, in the below screenshot, ‘Properties’ is the child object and ‘Contacts’ is the parent object. On clicking the ‘Contact’ field (lookup relationship field in this example), a pop-up list of contacts (parent object records) appears from which you can select one. Learn how to create a lookup relationship between two objects.

3.1.2. Master-detail relationship
- The detail object inherits the sharing and security settings of its master object.
- The ‘Owner’ field is not available on the detail object and is automatically set to the owner of its associated master record.
- A master-detail relationship can be created between two custom objects or between a standard object and a custom object; however, the standard object cannot be on the detail side of a relationship with a custom object.
By default, records cannot be reparented in master-detail relationships. However, admins can allow child records in master-detail relationships between custom objects to be reparented to different parent records by selecting the Allow reparenting option while creating the master-detail relationship.
- When a master record is undeleted, all its related detail records also get undeleted.
Learn how to create a master-detail relationship in Salesforce.
To learn more about relationships in Salesforce, refer to the Salesforce documentation.
3.2. Lookup relationship vs master-detail relationship
| Lookup relationship | Master-detail relationship |
|---|---|
Loosely coupled relationship: Deleting a parent record will not delete its child records. | Strongly coupled relationship: If the parent record is deleted, the child record also gets deleted by default. |
Roll-up summary field is not available. | Roll-up summary field is available. |
Parent record is not required when creating a child record. | Parent record is required to save a child record. |
Standard object record can be on the detail side of a lookup relationship with a custom object. | Standard object record cannot be on the detail side of a master-detail relationship. |
The ownership of child records is not controlled by the parent object records. | The parent object controls the record ownership of the child records. |
There can be a maximum of 40 lookup relationships on an object. | An object can have a maximum of 2 master-detail relationships. |
Note: If you’re unsure of what type of relationship to create between two objects, create a lookup relationship since it gives you more flexibility to change things in the future.
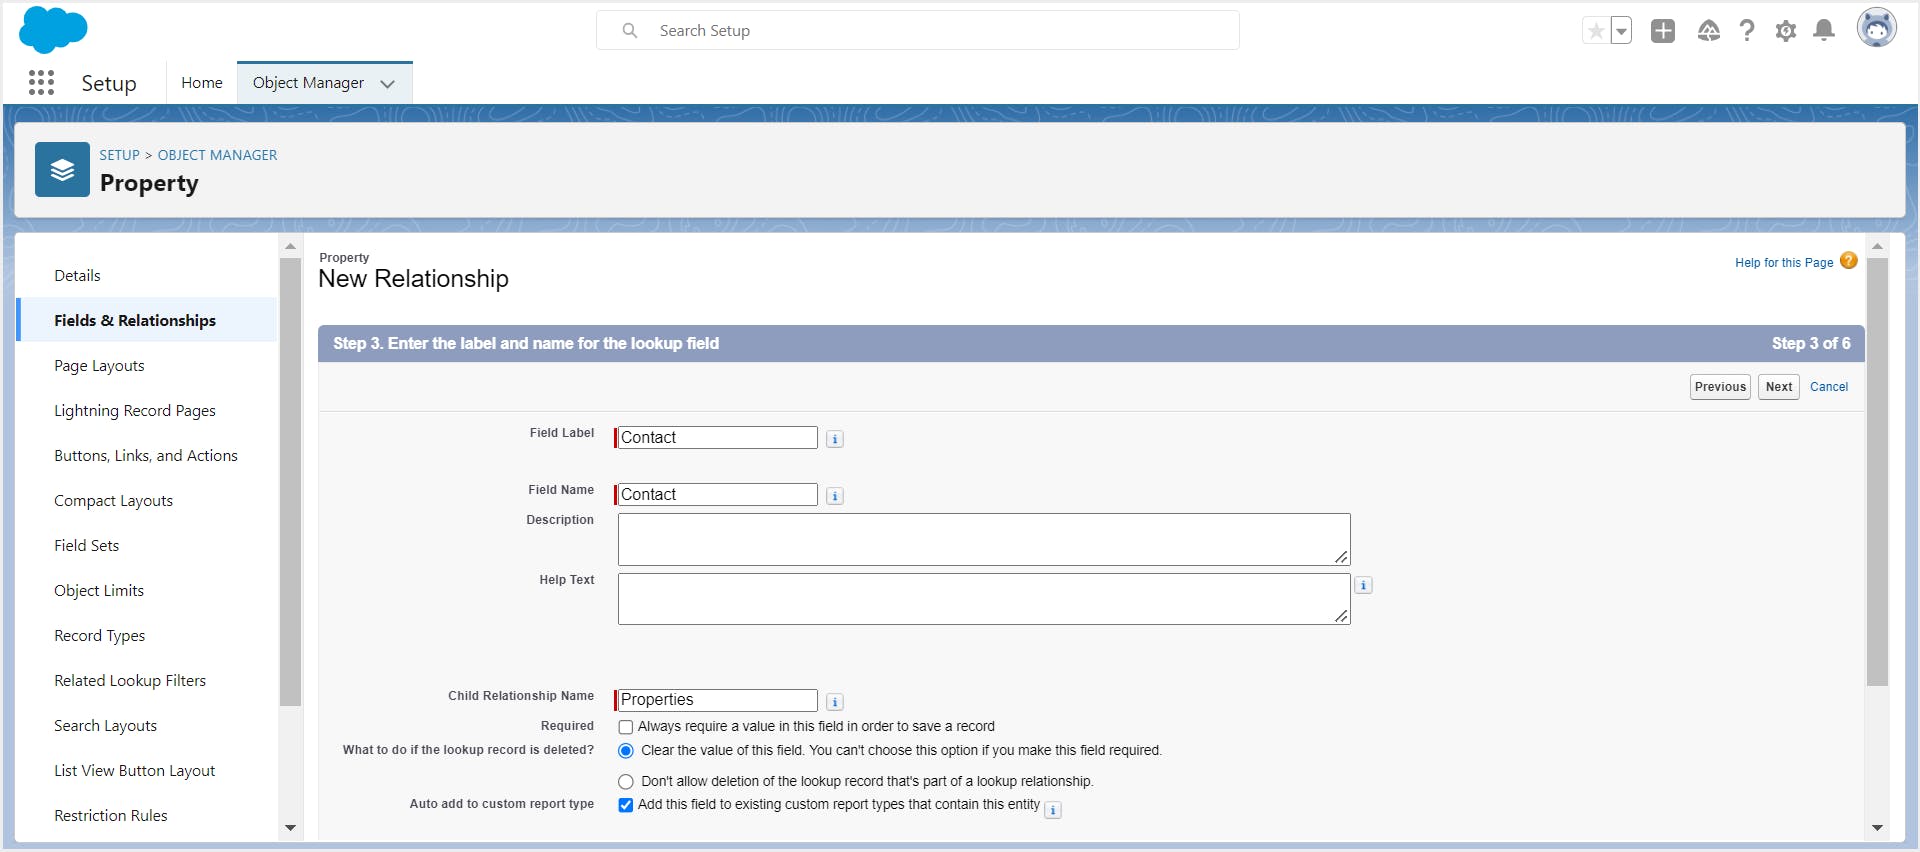
3.3. How to create a relationship between two objects in Salesforce
Step 1: Go to Setup and click on Objects and Fields -> Object Manager.
Step 2: From the Object Manager, select the object that will be the child object in the relationship. For example, select the custom object ’Property’ that has been created in the previous section. This opens the detail page for that object.
Step 3: Click Fields & Relationships from the left panel and click New to create a new field.
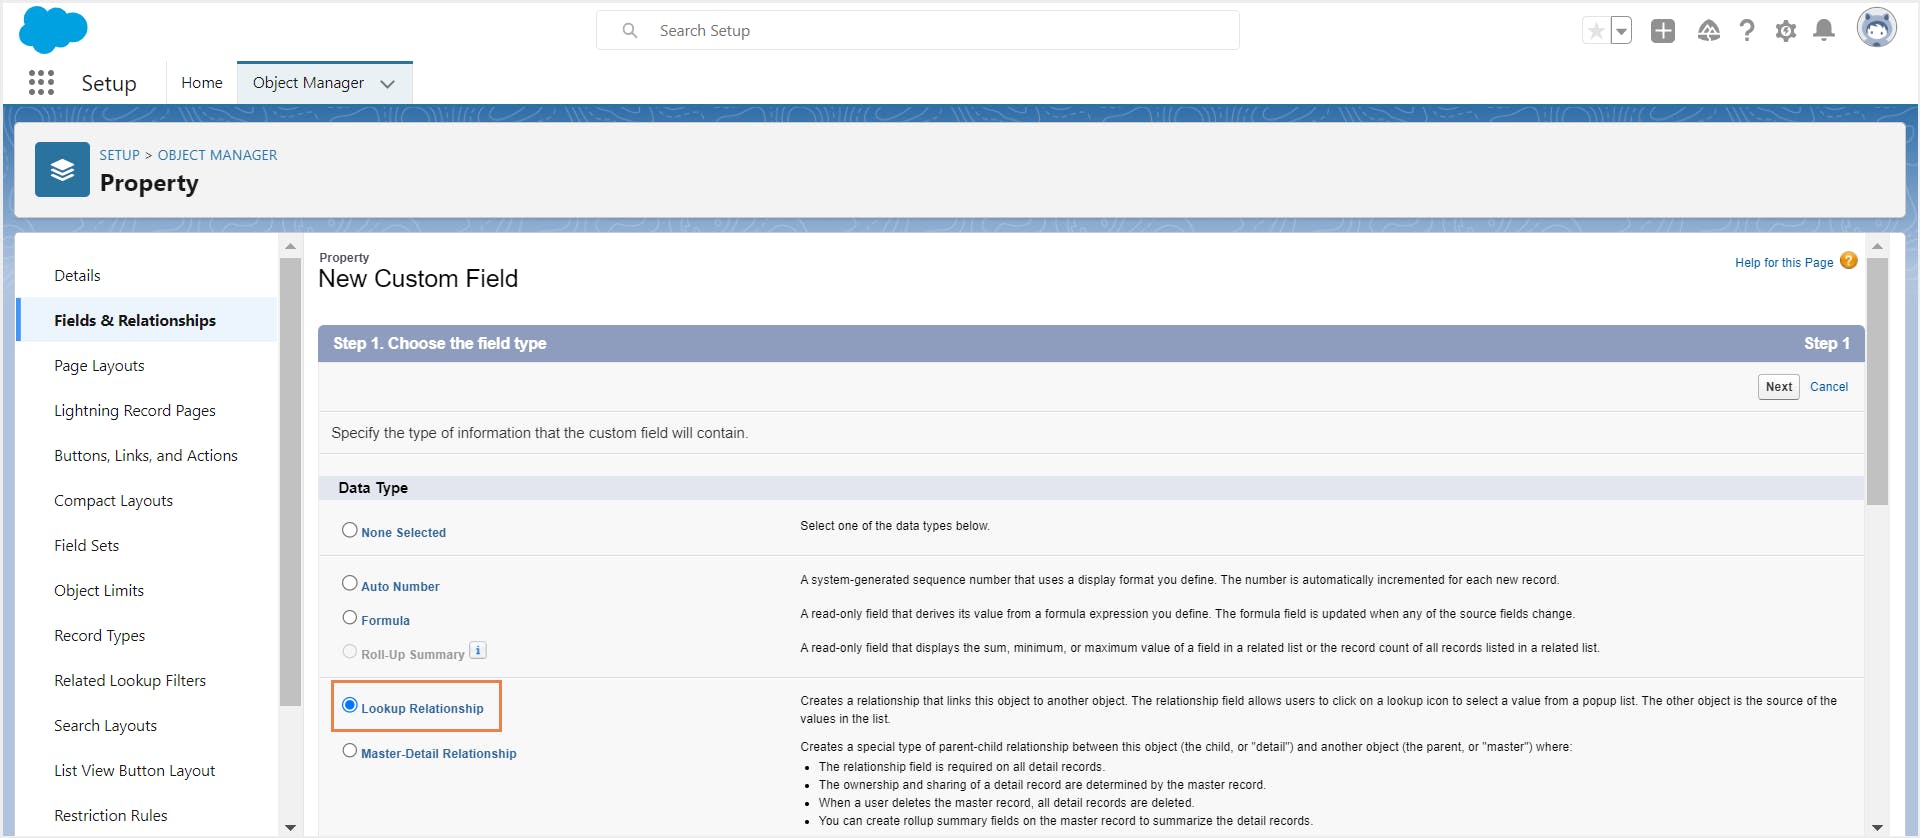
Step 4: Choose the field type. Select master-detail or lookup depending on what type of relationship you need to build. Click Next.
Step 5: Select the parent object to which you need to relate your object. For example, choose ‘Contacts’.
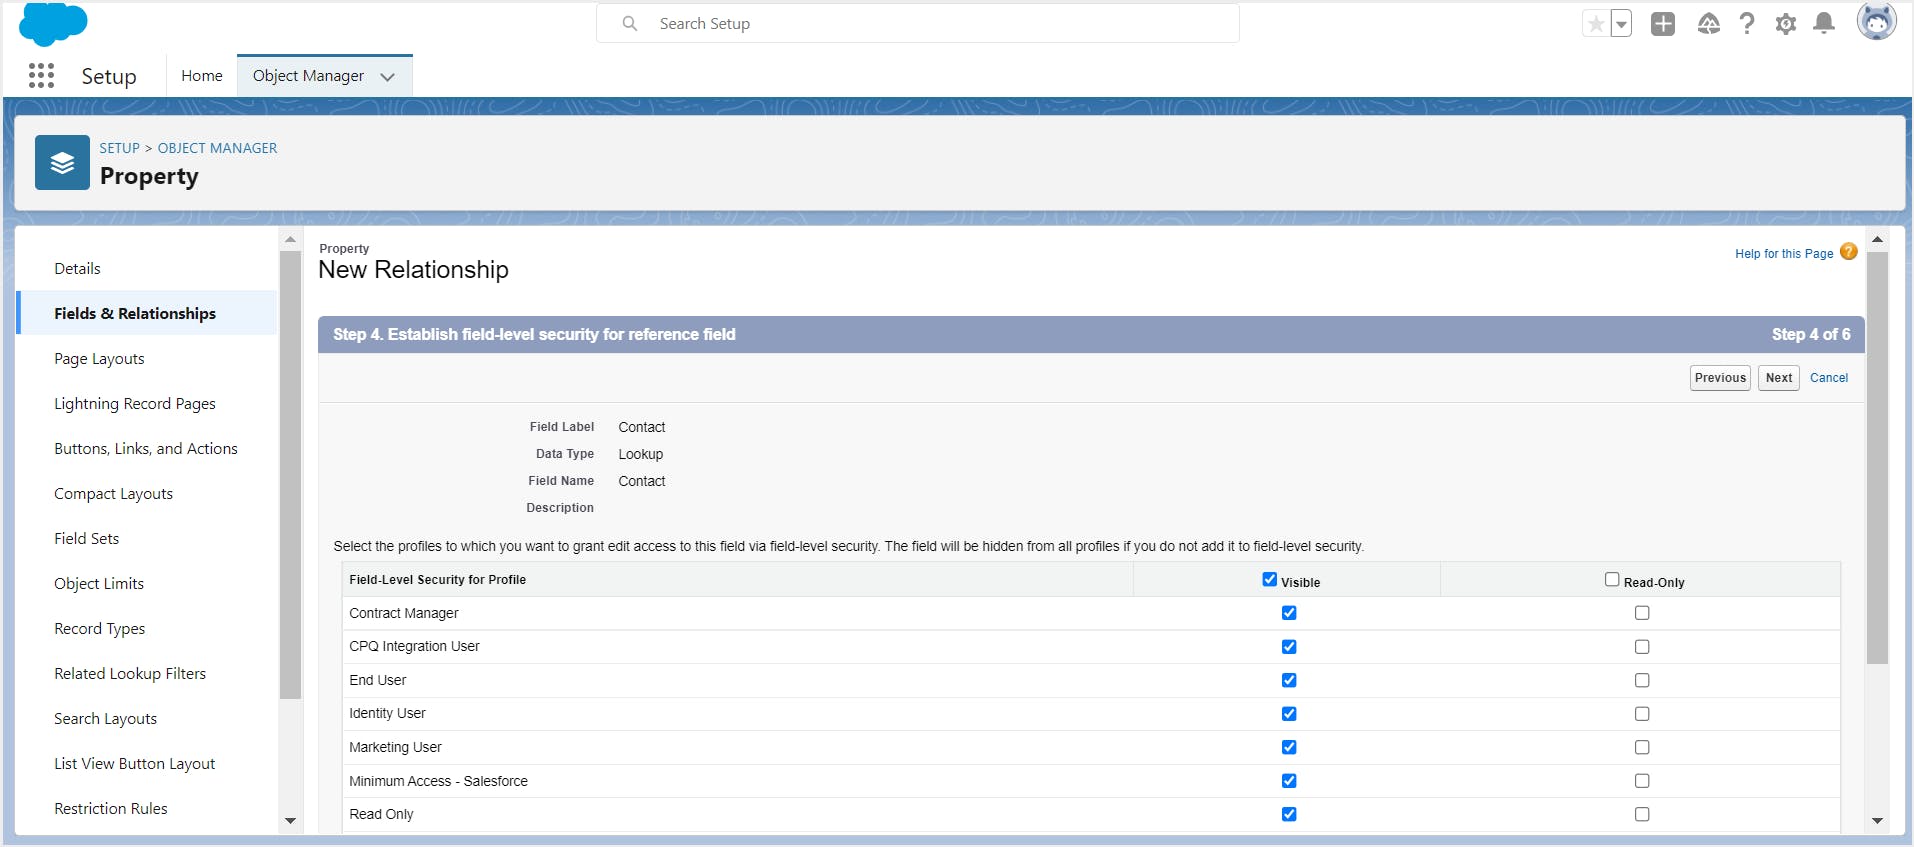
Step 6: Enter the field label, field name, and other details. Configure field-level security.
Step 7: Select the child object page layouts you would like to display the relationship field on and click Next.
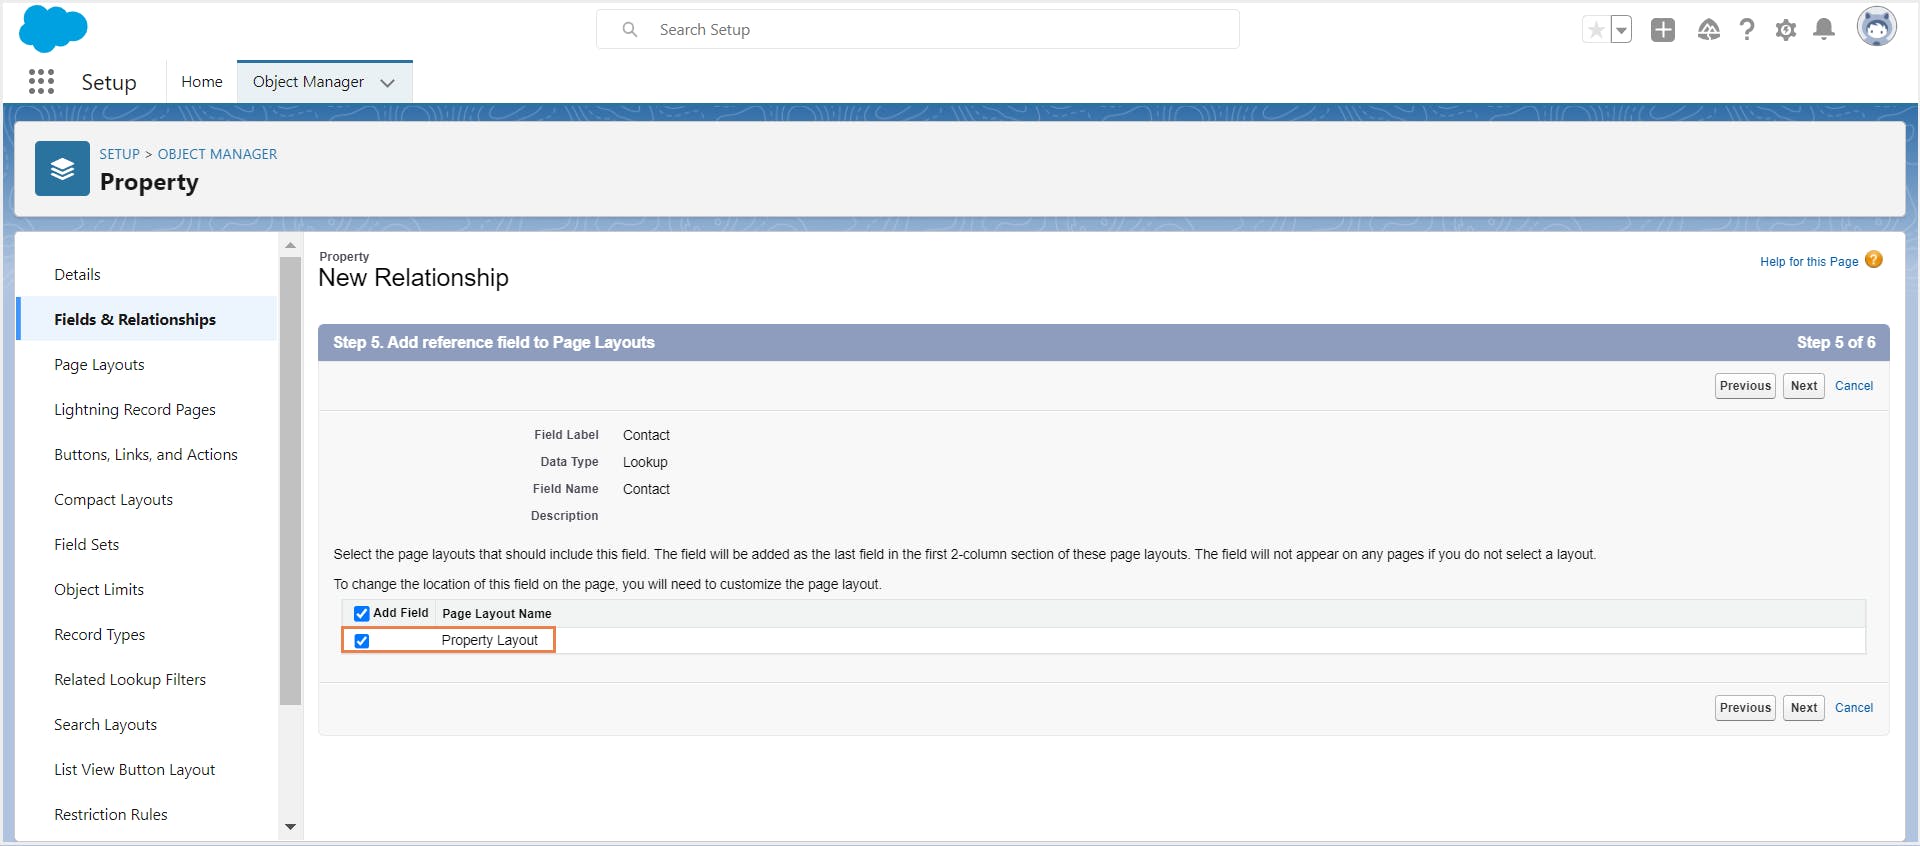
Step 8: Select the parent object page layouts where you would like to display the related list of child object records. Click Save.
4. Edit Salesforce data model using Schema Builder
Required editions:
User permissions needed: To view objects in Schema Builder: Customize Application
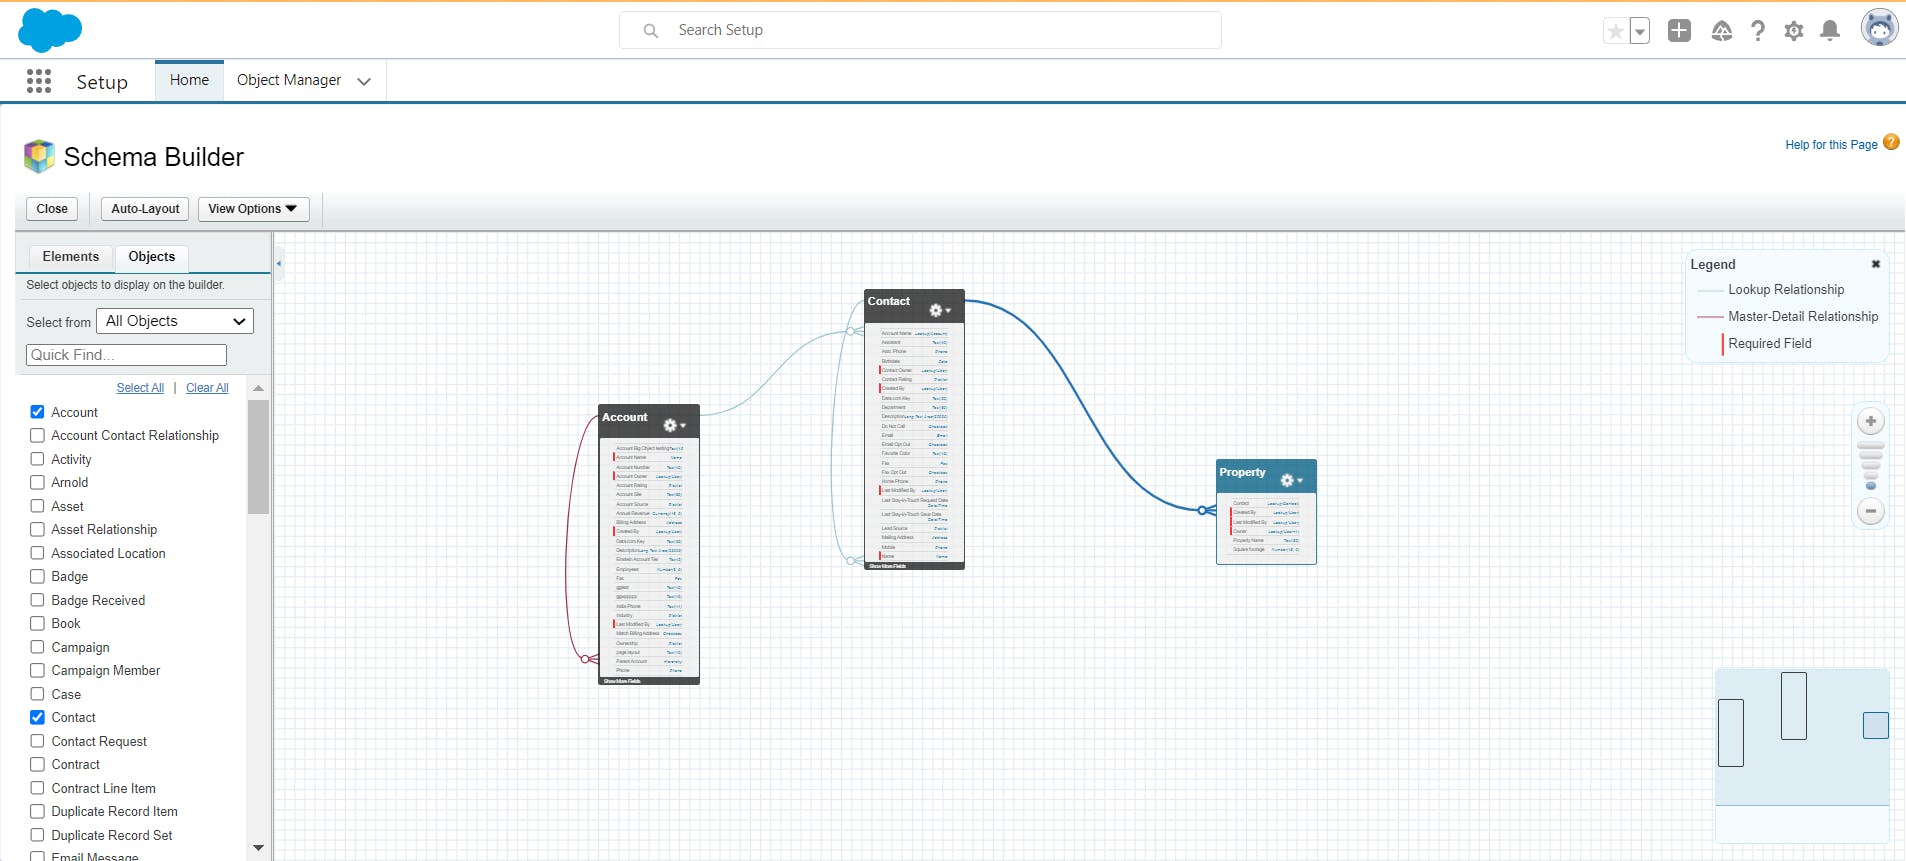
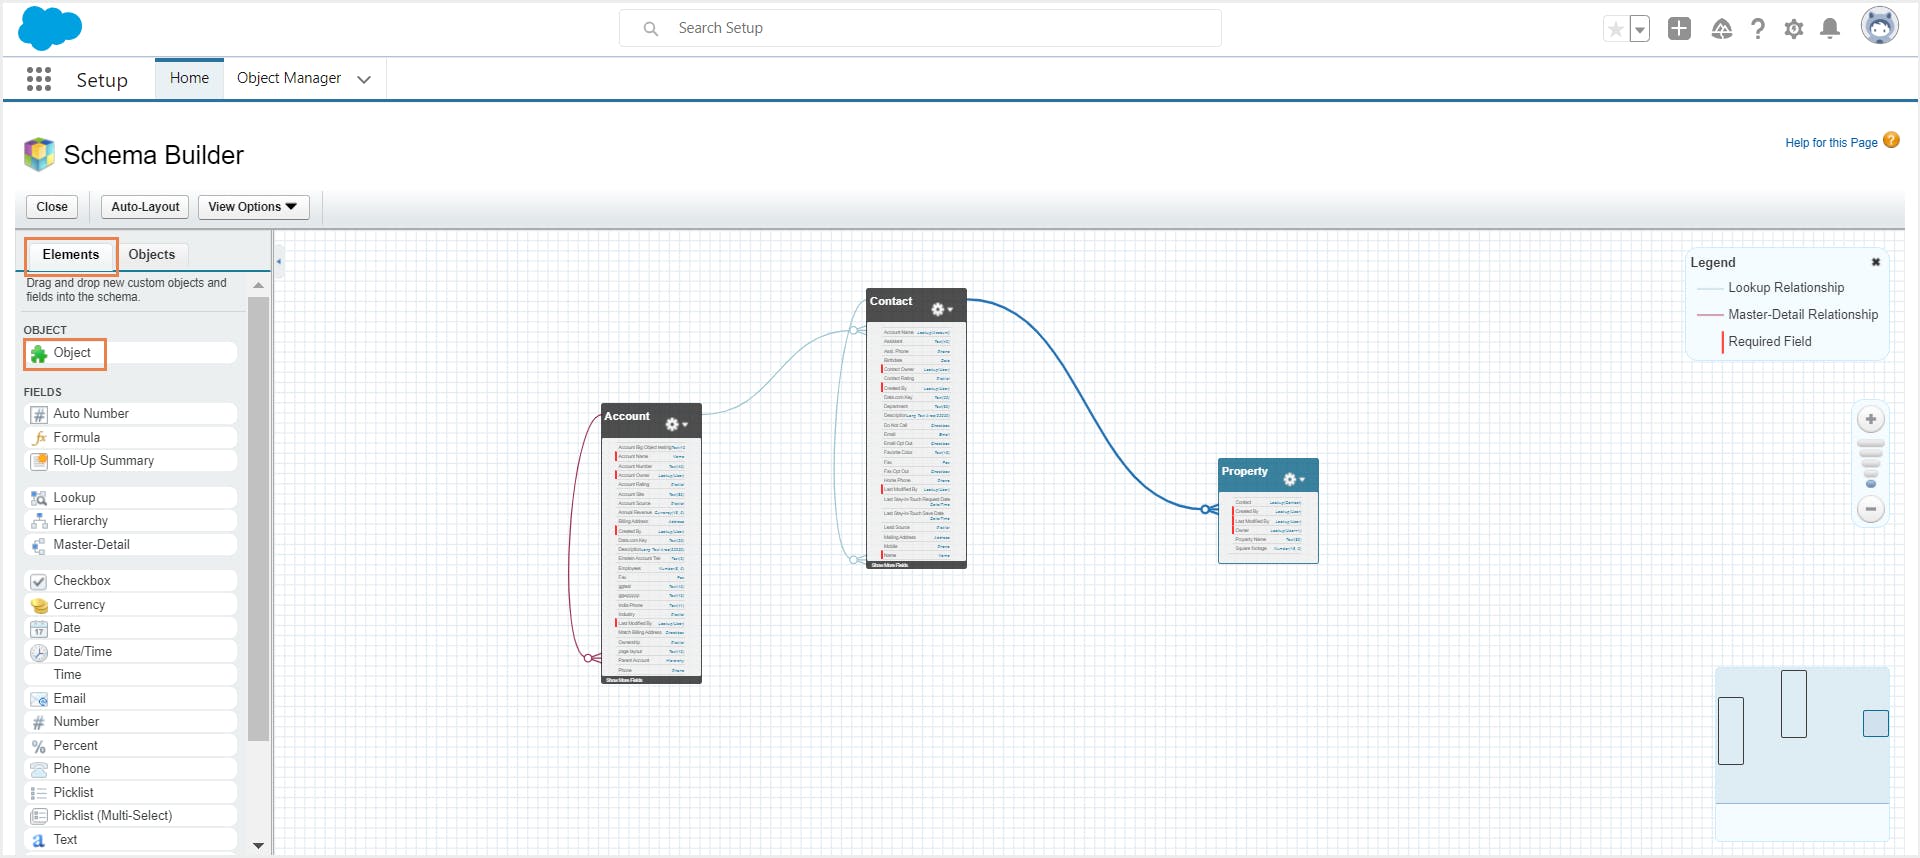
To access schema builder, navigate to Setup and search for Schema builder in the Quick Find box, select the required objects, and click Auto-Layout. You will see something as shown in the image below.
4.1. Create an object with Schema Builder
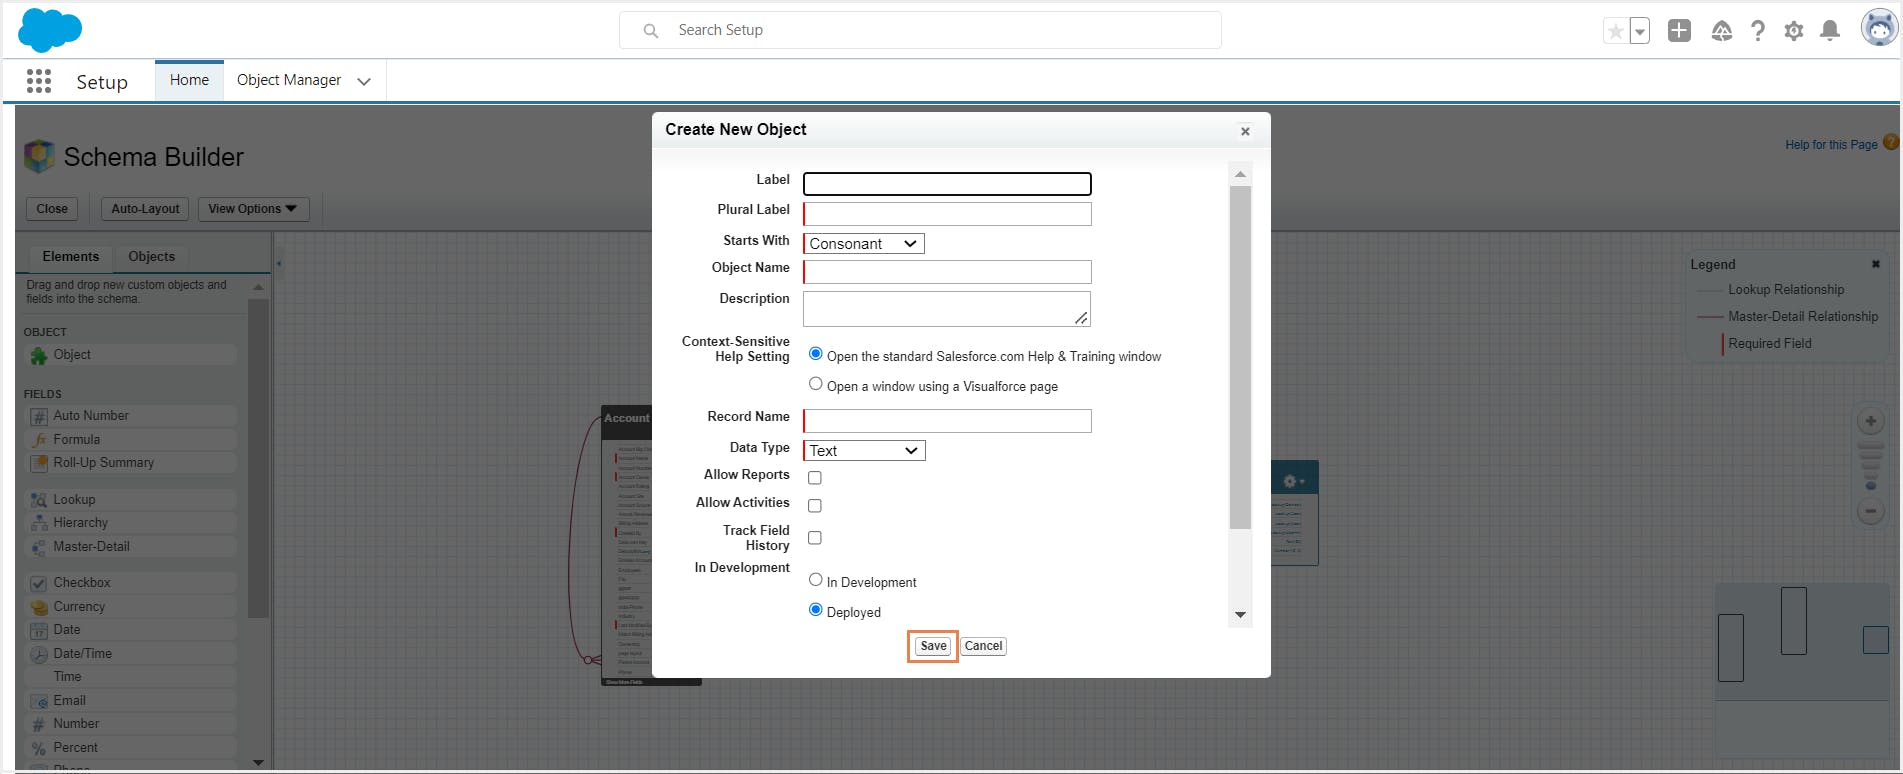
Step 1: Click the Elements tab in the left sidebar.
Step 2: Click Object and drag it onto the canvas.
Step 3: Enter your object details. Click Save.
4.2. Create fields with Schema Builder
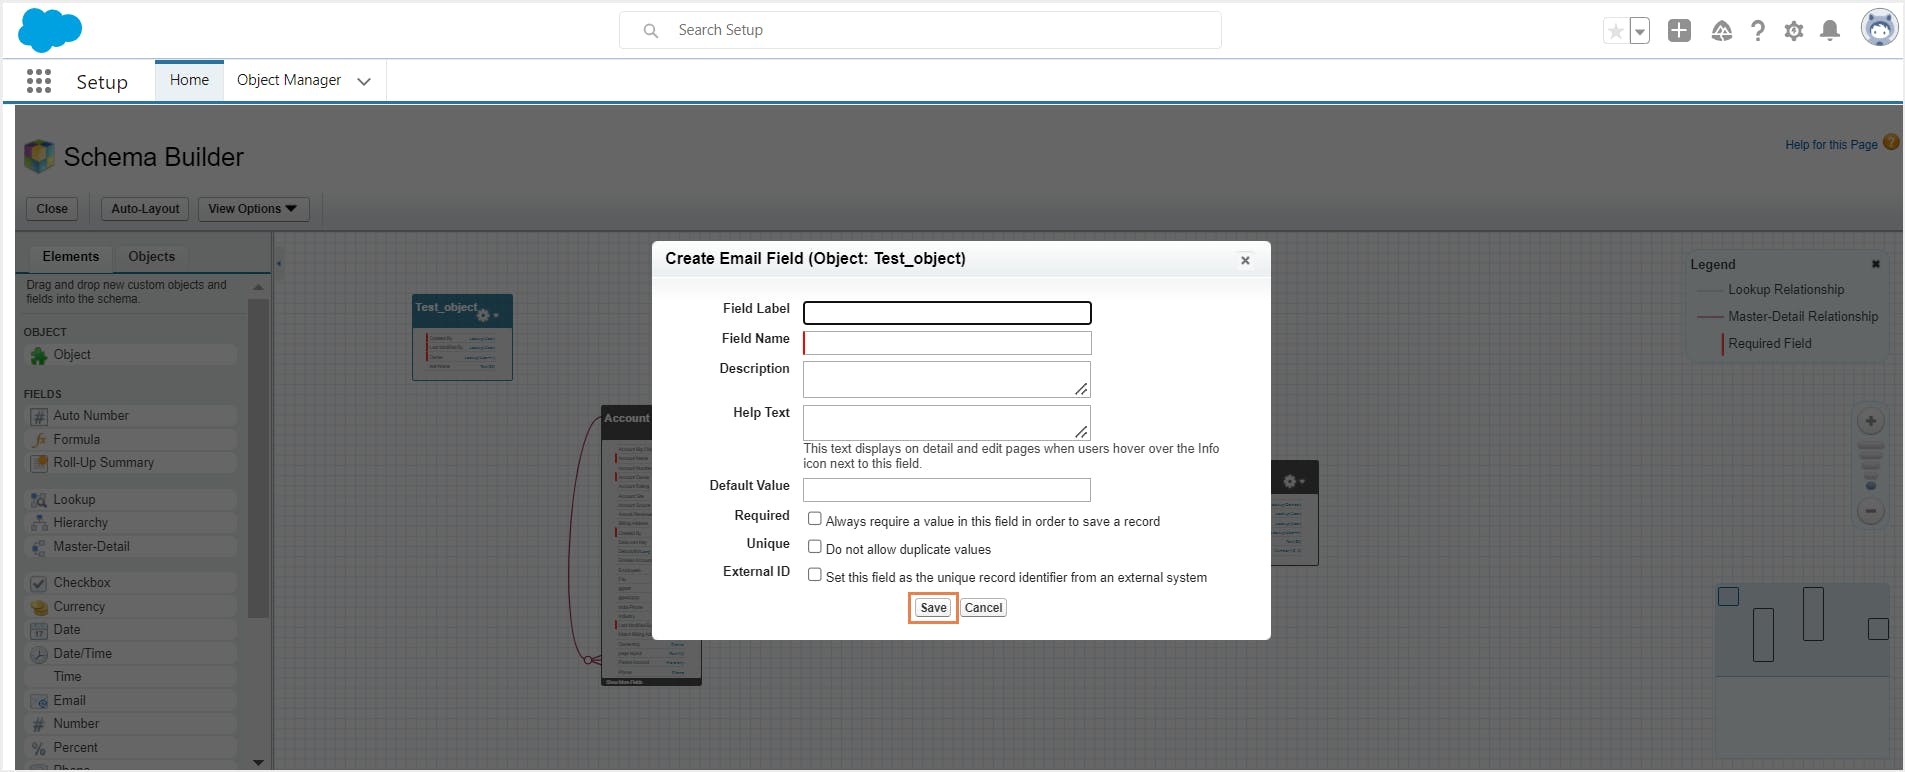
Step 1: Choose a field type from the Elements tab and drag it onto the object that was created in the previous section. You can create relationship fields, formula fields, and normal fields in Schema Builder.
Step 2: Fill out the field details and click Save.
If you go to Object Manager, you can now see the newly created object along with all your other objects.
5. Data Management in Salesforce
5.1 Import data into Salesforce
Learn more about each of these tools and how you can use them to import data into Salesforce.
5.2. Export data from Salesforce
To learn how to export Salesforce data using these tools, read our in-depth article Admin’s Guide to Salesforce Data Export.
6. Salesforce data model best practices
(a) Use a naming convention that is clear and consistent: Having a consistent naming convention makes it easier for users to understand the data model and for developers to work with the data model when making any changes or additions.
(b) Create custom objects/fields only when necessary: The more custom objects/fields you create, the more complicated your data model becomes. In most cases, Salesforce will already have a standard object/field that meets your requirements.
(c) Make the data model scalable: If your data model is not scalable, it will eventually reach a point where it cannot accommodate any more data, as the company and its data keep growing. To make your data model scalable, identify areas where your company is likely to experience growth and design your data model in such a way that it can easily accommodate data in those areas. You also need to review your data model periodically to make sure it remains scalable and update whenever required.
(d) Keep it simple: A simple data model is easy to understand and maintain. It is difficult to keep track of all the relationships and fields and make changes in a complex data model. A simple data model is also easier to scale.
(e) Set appropriate permissions for users: When you define a data model for your Salesforce organization, you define how the data will be organized and how it can be accessed. Consider which users need access to which data in Salesforce and grant only the required permissions.
(f) Avoid using special characters in object/field names: When you use spaces or special characters in object or field names, it can cause problems later when you try to reference the object/field in codes.
7. SysCloud backup for Salesforce
SysCloud backup for Salesforce backs up all your Salesforce data and metadata along with object relationships. In the event of data loss or corruption, administrators can restore deleted/modified records with all object relationships intact.
Learn how to restore Salesforce data with object relationships intact.
Recommended content
9 Nov 2022
10 min read
13 May 2022
7 min read
16 May 2022
20 min read
16 May 2022
15 min read
Get actionable SaaS administration insights
We don’t spam. Unsubscribe anytime.
In this article
- What is Salesforce data model?
- Salesforce objects and fields
- Create a custom object in Salesforce
- Create a custom field in Salesforce
- Create a relationship between two objects
- Salesforce Schema Builder
- Data Management in Salesforce
- Salesforce data model best practices

