Categories
In this article
- What happens when Slack data gets deleted
- How to recover deleted Slack data using the native eDiscovery tool
- How to recover Slack data using the Slack import and export tool
- How to restore deleted Slack data using SysCloud backup solution
A Guide to Recover Deleted Slack Data
29 Mar 2022
7 min read
Ahana
Article at a glance
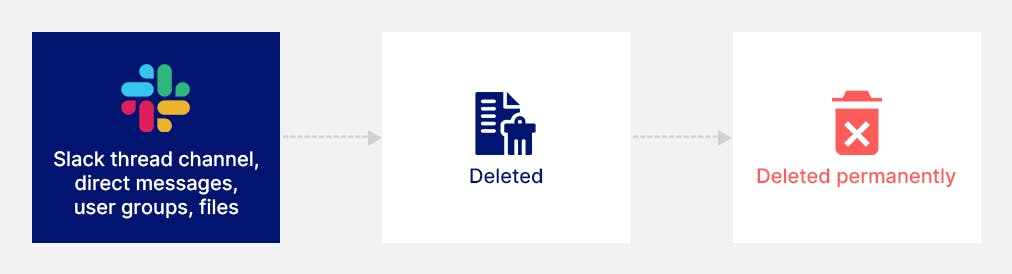
- Slack lacks a built-in recycle bin, meaning deleted messages, channels, and files are permanently lost unless recovered through other means.
Native tools like eDiscovery and the import/export tool offer recovery options but are complex and limited in scope. What is the solution?
Read more
Slack is one of the most popular workspace communication and collaboration tools available globally. Currently a part of Salesforce, the application has seen steady growth since its inception and now has over 12 million daily active users (DAUs).
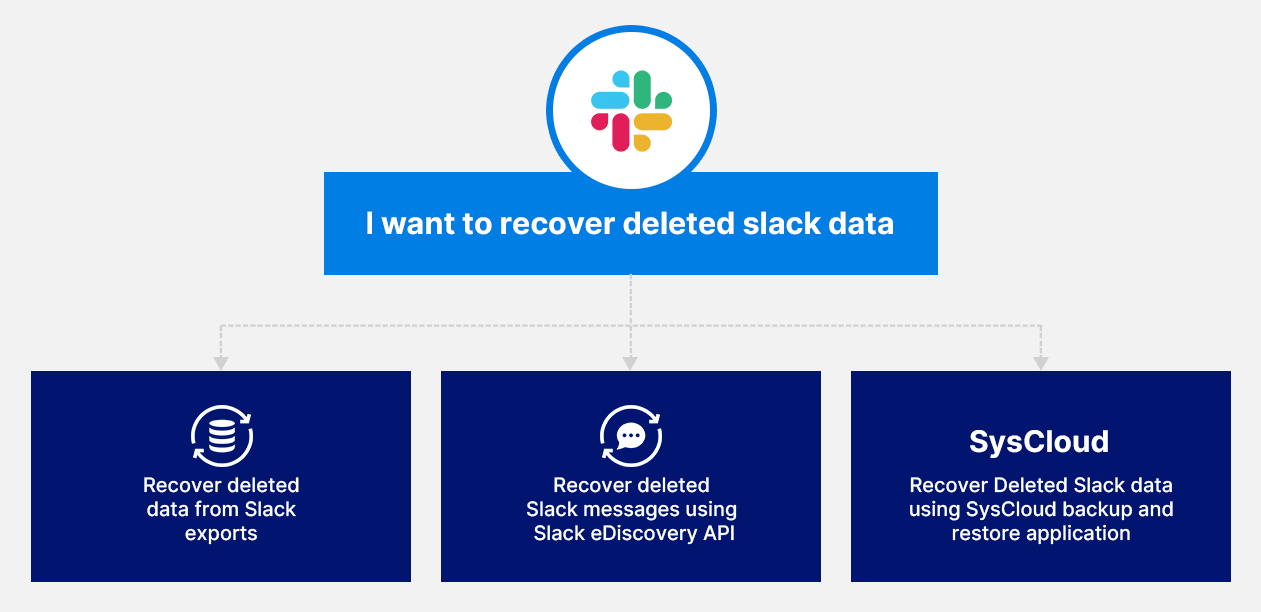
What happens when Slack data gets deleted?
- using Slack eDiscovery
- recovering from exported Slack data
- using a third-party Slack backup solution
How to recover deleted Slack data using the native eDiscovery tool
How to export data using Slack’s eDiscovery API
To know more about Slack eDiscovery, click here.
Limitations of exporting data using Slack eDiscovery
- eDiscovery is only available for Enterprise Grid subscription users.
- The primary org owner or an org owner must request the Slack Support team to enable the Discovery API.
Discover the easiest ways to recover your deleted messages and files with SysCloud's Slack backup solution.

How to recover Slack data using the Slack import and export tool
Click here to learn how to export Slack data.
How to import Slack data
Step 1: Upload the zipped export file to a secure cloud service, such as Google Drive, Dropbox, or Box, and generate a public direct download link (make sure to keep this link to hand). (This step can be skipped, and the file can be uploaded directly during Step 5).
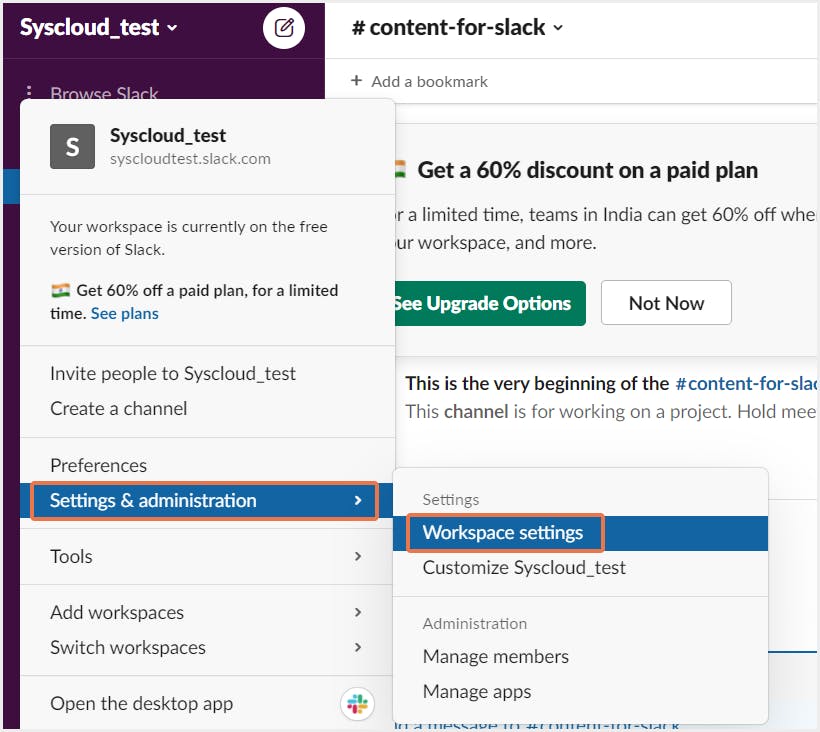
Step 2: Click the workspace name on the top left.
Step 3: Select Settings & administration, then choose Workspace settings from the menu.
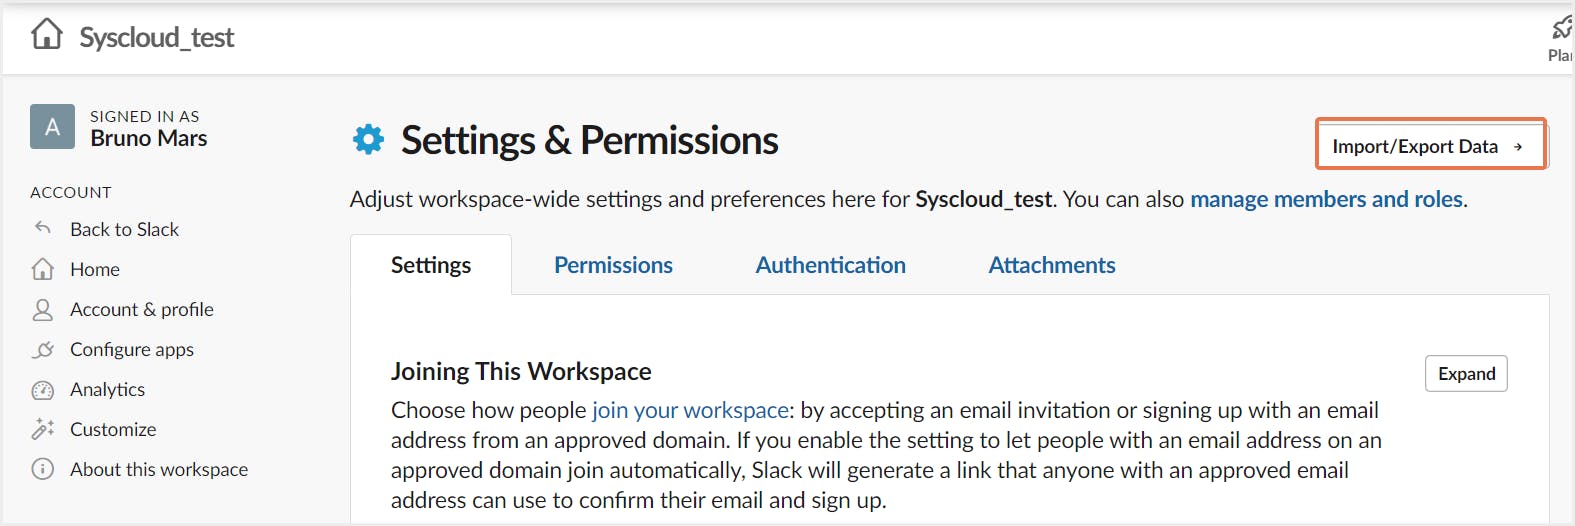
Step 4: Click on Import/Export data. Next to Slack, select Import.
Step 5: Paste the link to the export file into the Direct download link field or click on Upload it directly and choose the zipped export file from the local machine.
Step 6: Click on Upload file.
Step 7: An email will be sent when the upload is completed.
Limitations of recovering deleted Slack data using the Import Export tool
- Only workspace owners can import data into Slack.
- There is a limit to the amount of data that the tool can process at once. The export file might have to be split into multiple date ranges and processed as different imports
- Exporting and importing Slack data using the native tool is a time-consuming process since export must be set up manually for all plans except for Business+ subscription. If there is a large amount of data to be imported- it needs to be split into different date ranges. These might lead to further data loss.
- Owners cannot select specific messages or files to be imported back to the application.
- If internet access is lost, import progress is interrupted, and you will have to begin all over again.
Want to avoid the tedious road to Slack data recovery?
Locate and restore your lost Slack data in a jiffy with Slack backup.
Restore deleted Slack data using SysCloud
As mentioned above, the native backup and restore tools offered by Slack have serious limitations when it comes to data recovery. Third-party cloud backup applications like SysCloud are better options to effortlessly back up and restore your Slack data.
With SysCloud backup for Slack, administrators can easily back up all critical Slack data and restore data from any point-in-time backup snapshots and restore deleted messages to a different channel. Admins also have the option to export all Slack data as .csv files and files in their original format.
Why should you backup your Slack data using SysCloud?
- Automated Slack backups and automatically resolves API errors.
- Restore threads in a channel, direct messages, and channels with a single click.
- Export threads, channels, direct messages, or even the entire workspace in JSON format.
- Search for content inside conversations, files, channels, and user groups using keywords, across all your workspaces.
Click here to learn more about SysCloud backup for Slack.
Recommended Content
29/03/2022
3 min read
29/03/2022
10 min read
29/03/2022
8 min read
Get actionable SaaS administration insights
We don’t spam. Unsubscribe anytime.
In this article
- What happens when Slack data gets deleted
- How to recover deleted Slack data using the native eDiscovery tool
- How to recover Slack data using the Slack import and export tool
- How to restore deleted Slack data using SysCloud backup solution

